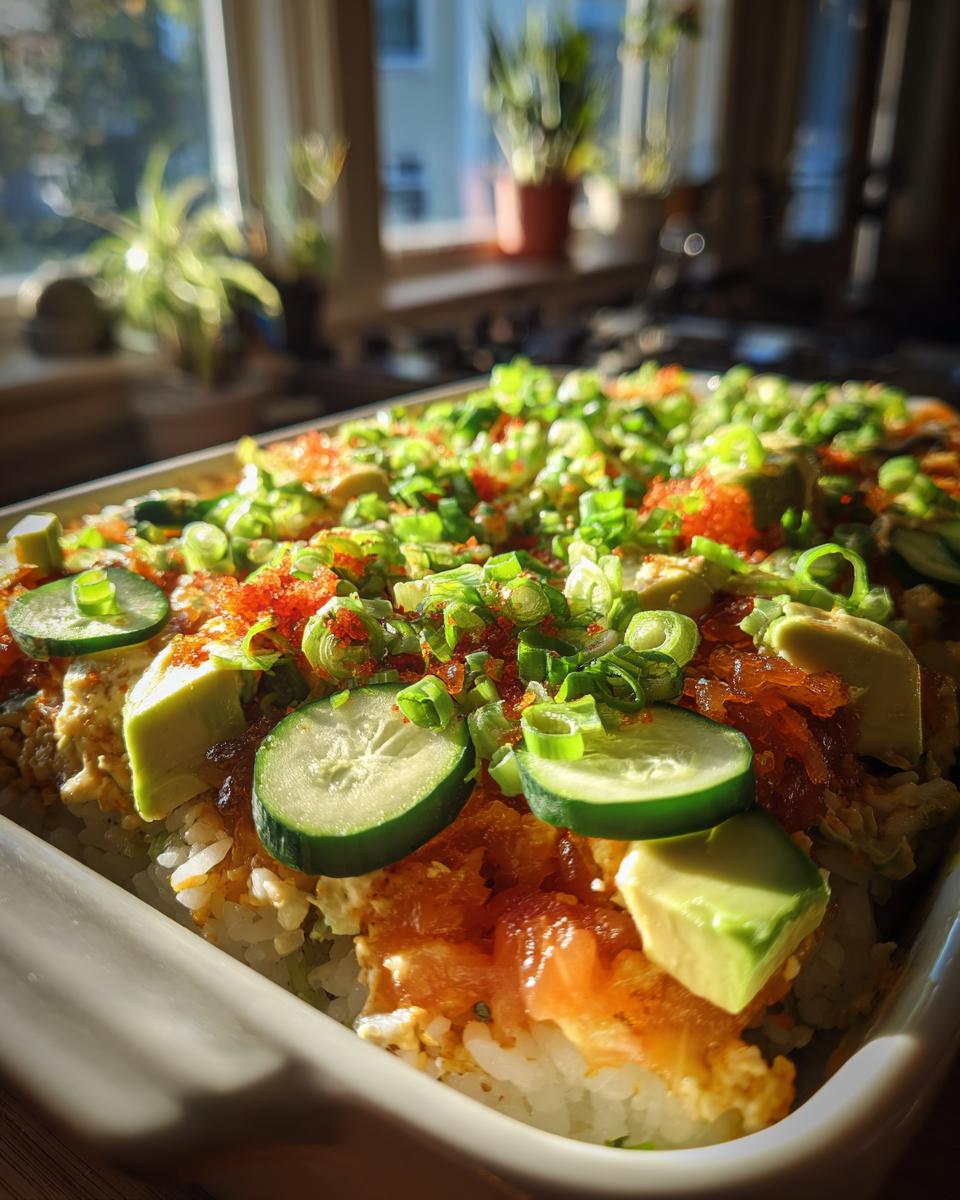
There's something magical about gathering around the table with loved ones, and the Spicy Salmon Sushi Bake has always been a centerpiece in my home during cozy evenings. As the dish bakes, the tantalizing smell of salmon mingles with the sweetness of rice and the kick of sriracha, filling the kitchen with warmth. It's easy to prepare and feels like a warm hug on a plate, making it perfect for any occasion where comfort food is needed.

What Is Spicy Salmon Sushi Bake?
The Spicy Salmon Sushi Bake is a delightful fusion dish that layers sushi rice, tender salmon, and flavorful toppings for a comforting meal. This easy-to-make recipe combines the best of sushi flavors in a warm, baked form, perfect for sharing with friends and family.
- Prep Time: 20 minutes
- Cook Time: 25 minutes
- Total Time: 45 minutes
- Servings: 4 people
Why You'll Love Spicy Salmon Sushi Bake
- This recipe is quick to prepare, making it perfect for busy weeknights or last-minute gatherings.
- It uses simple ingredients that are easy to find, ensuring that anyone can recreate this dish at home.
- The beginner-friendly method requires no special skills, allowing even novice cooks to shine.
- It's a crowd-pleaser, making it ideal for family dinners, potlucks, or special occasions.
- This dish can be made ahead of time, giving you the flexibility to enjoy more time with your guests.
Ingredients You'll Need
- 1 cup sushi rice - a perfect base for the dish, ensure it's sushi-grade for the best texture.
- ¼ cup rice wine vinegar - this adds a tangy flavor; can substitute with apple cider vinegar if needed.
- 2 teaspoons sugar - balances the vinegar's acidity.
- 1 teaspoon salt - for flavor enhancement.
- ½ cup furikake seasoning - a delightful mix of seaweed and sesame that elevates the dish.
- 8 oz salmon fillets - fresh or sushi-grade salmon works best; feel free to use canned salmon in a pinch.
- 1 tablespoon soy sauce - use gluten-free tamari for a gluten-free option.
- ¼ cup cream cheese - softened for easy mixing, adds creaminess.
- ¼ cup mayonnaise - Kewpie mayo is preferred for its rich flavor, but regular mayonnaise is fine.
- 2 tablespoons sriracha sauce - adjust for spice preference; sambal oelek is a great alternative.
- 1 avocado - sliced or cubed, adds creaminess and freshness.
- ½ cucumber - sliced or cubed for a crisp texture.
- 2 green onions - sliced for a fresh, oniony bite.
- Nori seaweed sheets - for serving, provides a lovely wrap.
- More kewpie mayo - for drizzling on top for extra flavor.
- Unagi sauce - optional, but adds a delicious sweet finish.
Step-by-Step Instructions
Preparing the Sushi Rice
- Rinse the sushi rice under cold water until the water runs clear. This removes excess starch and helps achieve a fluffy texture.
- Cook the rice according to package instructions, usually using a rice cooker or stovetop method. The rice should be tender and slightly sticky when done.
- Once cooked, transfer the rice to a large bowl and gently fold in the rice wine vinegar, sugar, and salt while the rice is still warm. This will enhance the flavor and give it a lovely sheen.
Making the Salmon Mixture
- In a large mixing bowl, combine the furikake seasoning, salmon fillets (make sure to remove any skin), soy sauce, cream cheese, mayonnaise, and sriracha sauce.
- Using a fork or spatula, gently mix the ingredients until the salmon is well coated and the mixture is creamy. Be careful not to overmix, as you want to keep some texture from the salmon.
- Pro Tip: If using canned salmon, drain it well and break it into smaller pieces before mixing to maintain a good consistency.
Layering and Baking
- Preheat your oven to 350°F (175°C).
- In a baking dish, spread half of the prepared sushi rice evenly at the bottom, creating a nice layer.
- Next, spoon the salmon mixture over the rice layer, spreading it out evenly with a spatula.
- Top with the remaining sushi rice, pressing it down gently to create a solid layer.
- Bake in the preheated oven for about 25 minutes or until the top is golden brown and bubbly.
Adding Toppings
- Once out of the oven, let the sushi bake cool for a few minutes before adding the toppings.
- Top generously with sliced avocado and sliced cucumber for freshness and crunch.
- Sprinkle the sliced green onions on top for a burst of flavor.
- Serve with nori sheets on the side for wrapping, and drizzle with more kewpie mayo and unagi sauce for an extra touch of deliciousness.
- Enjoy your Spicy Salmon Sushi Bake while it's warm, and relish in the comforting flavors!
Variations
- Add diced mango or pineapple for a tropical twist.
- Use different types of fish like tuna or crab for a unique flavor.
- Incorporate seasonal vegetables like roasted bell peppers or asparagus.
- For a spicy kick, add jalapeños or spicy mayo on top.
- Make it dairy-free by substituting cream cheese and mayonnaise with avocado or a dairy-free alternative.
Serving and Storage Tips
Serving
Serve the Spicy Salmon Sushi Bake warm, allowing everyone to scoop their portion onto a nori sheet. Pair it with a side of pickled ginger or a fresh salad for a refreshing contrast.
Storage
Store leftovers in an airtight container in the fridge for up to 3 days. You can also freeze individual portions for up to a month. Reheat gently in the oven or microwave before serving.
Common Mistakes
- Not rinsing the sushi rice: This can lead to overly sticky rice. Always rinse until the water is clear.
- Overmixing the salmon mixture: This can make it mushy. Gently fold to maintain some texture.
- Skipping the resting time after baking: Cutting too soon can cause the layers to fall apart. Let it cool slightly before serving.
- Using low-quality ingredients: Fresh ingredients make a difference. Opt for high-quality salmon and seasonings for the best flavor.
Helpful Notes
- For a gluten-free option, ensure all sauces (like soy sauce) are gluten-free.
- Substitute cream cheese with Greek yogurt for a lighter option.
- Add chopped cilantro or sesame seeds for added flavor and texture.
- For a vegan adaptation, use tofu and vegan mayonnaise instead of salmon and cream cheese.
- Feel free to adjust the spice level by adding more or less sriracha.
Frequently Asked Questions
Can the recipe be frozen?
Yes, the Spicy Salmon Sushi Bake can be frozen. Allow it to cool completely, then portion it into airtight containers or freezer bags. It will keep well for up to a month.Can ingredients be substituted?
Absolutely! You can substitute the salmon with canned salmon or even cooked shrimp for a different flavor. For a gluten-free option, use tamari instead of soy sauce.How to store leftovers?
Store any leftovers in an airtight container in the fridge for up to 3 days. Make sure to cover it well to keep it fresh.Can the recipe be made ahead?
Yes, you can prepare the Spicy Salmon Sushi Bake ahead of time. Assemble it the day before and store it in the fridge, then bake it just before serving for the best texture.Final Thoughts
I truly hope you find joy in making this Spicy Salmon Sushi Bake as much as I do. It's a wonderful dish to share around the table, inviting laughter and warmth into your home. Whether it's a cozy family dinner or a gathering with friends, this recipe is sure to spark delightful conversations and satisfied smiles. So gather your loved ones, dive into this comforting meal, and enjoy the flavors together. Happy cooking!

Spicy Salmon Sushi Bake
Equipment
- Rice Cooker
- baking dish
Ingredients
Sushi Rice
- 1 cup sushi rice
- ¼ cup rice wine vinegar
- 2 teaspoon sugar
- 1 teaspoon salt
Salmon Mixture
- ½ cup furikake seasoning
- 8 oz salmon fillets 2 portions
- 1 tablespoon soy sauce gluten free if needed or use tamari
- ¼ cup cream cheese softened
- ¼ cup mayonnaise Kewpie or regular mayonnaise
- 2 tablespoon sriracha sauce or sambal oelek
Toppings
- 1 avocado sliced or cubed
- ½ cucumber sliced or cubed
- 2 green onions sliced
- nori seaweed sheets
- more kewpie mayo
- unagi sauce
Instructions
- Cook sushi rice according to package instructions. Once cooked, mix rice wine vinegar, sugar, and salt into the rice.
- In a bowl, combine furikake seasoning, salmon fillets, soy sauce, cream cheese, mayonnaise, and sriracha sauce. Mix well.
- In a baking dish, layer the seasoned sushi rice, followed by the salmon mixture. Bake at 350°F for about 25 minutes.
- Once baked, top with avocado, cucumber, green onions, nori, and drizzle with kewpie mayo and unagi sauce before serving.


Leave a Reply