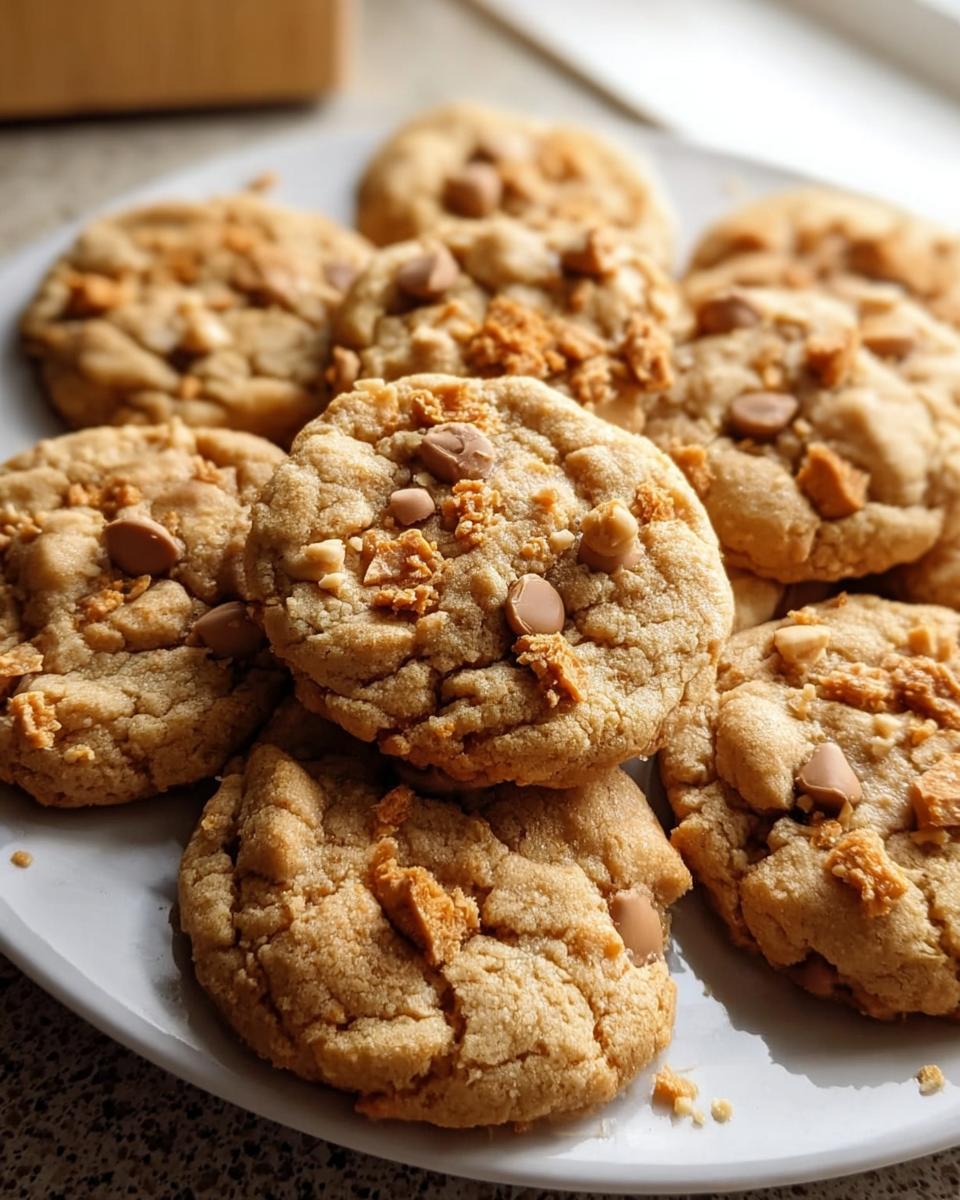
Every holiday season, my kitchen fills with the warmth of freshly baked treats, and this is when I whip up my beloved Peanut Butter Butterfinger Cookies. The rich, nutty aroma wafts through the air, bringing back memories of laughter and joy shared with family. Each cookie is a delightful balance of creamy peanut butter and crunchy Butterfinger bits, creating a texture that is both soft and satisfying. It's a comforting recipe that embodies the spirit of togetherness, making it a favorite among friends and family alike.

What Is Peanut Butter Butterfinger Cookies?
Peanut Butter Butterfinger Cookies are a delightful treat that combines the creamy richness of peanut butter with the crunchy sweetness of Butterfinger candy bars. These cookies are incredibly easy to make, perfect for any occasion, and a true crowd-pleaser.
- Prep Time: 15 minutes
- Cook Time: 10 minutes
- Total Time: 25 minutes
- Servings: 24 cookies
Why You'll Love Peanut Butter Butterfinger Cookies
- Quick preparation: Ready in just 25 minutes, perfect for those impromptu cravings.
- Simple ingredients: Made with common pantry staples, making it easy to whip up anytime.
- Beginner-friendly: Even novice bakers can create these delicious cookies without fuss.
- Perfect for gatherings: These cookies are a hit at parties, potlucks, and family events.
- Make-ahead convenience: Dough can be prepared in advance and baked fresh when needed.
Ingredients You'll Need
- 1 cup butter, softened - use unsalted for better control over sweetness.
- 1 cup granulated sugar - feel free to substitute with coconut sugar for a healthier option.
- 1 cup light brown sugar, packed - adds moisture and a deeper flavor.
- 1½ cups creamy peanut butter - choose a natural variety for a more authentic taste.
- 2 large eggs - ensure they are at room temperature for better mixing.
- 1 teaspoon vanilla extract - pure vanilla extract enhances the cookie's flavor.
- 3 cups all-purpose flour - sifted for lighter cookies.
- 1 teaspoon baking soda - make sure it's fresh for optimal rise.
- 1 cup peanut butter chips - find them in the baking aisle or substitute with chocolate chips.
- 1 cup chopped Butterfinger candy bars (about 3 bars) - for that irresistible crunch and sweetness.
Step-by-Step Instructions
Preparing the Ingredients
- Gather all your ingredients and equipment: mixing bowl, baking sheet, and a spatula.
- Measure out the softened butter and sugars. Ensure the butter is at room temperature for easy creaming.
- Chop the Butterfinger bars into small pieces, about the size of chocolate chips, for even distribution in the cookies.
Mixing the Dough
- In the mixing bowl, cream together the softened butter, granulated sugar, and light brown sugar. Mix until the mixture is light and fluffy, about 3-4 minutes.
- Add in the creamy peanut butter, eggs, and vanilla extract. Mix until everything is thoroughly combined and smooth.
- In a separate bowl, whisk together the all-purpose flour and baking soda.
- Gradually add the dry ingredients to the wet mixture, stirring gently until just combined. Be careful not to overmix; a few lumps are okay.
Adding Mix-ins
- Fold in the peanut butter chips and chopped Butterfinger bars with a spatula, ensuring they're evenly distributed throughout the dough.
- At this stage, you can sample a little dough if you'd like - just remember the raw eggs!
Baking the Cookies
- Preheat your oven to 350°F (175°C) if you haven't already.
- Using a cookie scoop or tablespoon, drop spoonfuls of dough onto an ungreased baking sheet, spacing them about 2 inches apart to allow for spreading.
- Bake in the preheated oven for 10-12 minutes, or until the edges are lightly golden. The centers may look slightly soft, which is perfect for that chewy texture.
Cooling the Cookies
- Once baked, remove the cookies from the oven and let them cool on the baking sheet for about 5 minutes. This helps them set.
- Gently transfer the cookies to a wire rack to cool completely. The smell of peanut butter and Butterfinger will fill your kitchen!
Variations
- For a chocolate twist, substitute half of the peanut butter with chocolate peanut butter.
- Add a sprinkle of sea salt on top before baking for a sweet-salty flavor.
- Try using crushed pretzels for an added crunch and a hint of saltiness.
- Make them gluten-free by swapping all-purpose flour for a gluten-free blend.
- Incorporate seasonal flavors by adding pumpkin spice or peppermint extract for a festive touch.
Serving and Storage Tips
Serving
These Peanut Butter Butterfinger Cookies are best enjoyed warm, paired with a glass of cold milk or a cup of coffee. For a fun twist, serve them alongside a scoop of vanilla ice cream for an irresistible dessert. You might also enjoy these Raspberry Coconut Magic Bars for another sweet treat.
Storage
Store cookies in an airtight container at room temperature for up to a week. For longer storage, freeze them in a freezer-safe bag for up to three months. Thaw at room temperature or warm briefly in the microwave before serving.
Common Mistakes
- Using cold butter: Make sure the butter is softened at room temperature for easy creaming.
- Overmixing the dough: Mix until just combined to avoid tough cookies.
- Not spacing cookies properly: Leave enough room on the baking sheet to allow for spreading.
- Baking too long: Watch for the edges turning golden; the centers should be slightly soft for a chewy texture.
Helpful Notes
- For a nut-free version, substitute the peanut butter with sunbutter or almond butter.
- If you prefer a less sweet cookie, reduce the sugar by ¼ cup.
- Feel free to add in chopped nuts or dried fruit for extra texture and flavor.
- To enhance chewiness, chill the dough for 30 minutes before baking.
Frequently Asked Questions
Can the recipe be frozen?
Yes, you can freeze the cookie dough or the baked cookies. For dough, scoop it into balls, freeze on a baking sheet, then transfer to a freezer bag for up to three months. For baked cookies, store in an airtight container or freezer bag.Can ingredients be substituted?
Absolutely! You can substitute creamy peanut butter with almond butter or sunbutter for a nut-free option. Additionally, you can use coconut sugar instead of granulated sugar for a healthier twist.How to store leftovers?
Store the cookies in an airtight container at room temperature for up to a week. If you want to keep them longer, consider freezing them for up to three months.Can the recipe be made ahead?
Yes! You can prepare the dough in advance and refrigerate it for up to 48 hours before baking. This allows the flavors to meld together beautifully.Final Thoughts
As you gather your loved ones to enjoy these delightful Peanut Butter Butterfinger Cookies, I hope you find the same joy and comfort that I do. The harmonious blend of creamy peanut butter and crunchy Butterfinger bits makes every bite a nostalgic treat. So, roll up your sleeves, let the sweet aromas fill your kitchen, and share these cookies with family and friends. They're not just cookies; they're a celebration of moments spent together, creating memories that will last a lifetime. For more sweet inspiration, check out these Butterfinger Caramel Bars.

Peanut Butter Butterfinger Cookies
Equipment
- Mixing bowl
- Baking sheet
Ingredients
For the Cookie Base
- 1 cup butter, softened
- 1 cup granulated sugar
- 1 cup light brown sugar
- 1½ cups creamy peanut butter
- 2 large eggs
- 1 teaspoon vanilla extract
For the Dry Ingredients
- 3 cups all-purpose flour
- 1 teaspoon baking soda
For the Mix-ins
- 1 cup peanut butter chips
- 1 cup chopped Butterfinger candy bars about 3 bars
Instructions
- Preheat your oven to 350°F (175°C).
- In a mixing bowl, cream together the softened butter, granulated sugar, and brown sugar until smooth.
- Add the peanut butter, eggs, and vanilla extract, and mix until well combined.
- In another bowl, whisk together the flour and baking soda. Gradually add this mixture to the wet ingredients, mixing until just combined.
- Fold in the peanut butter chips and chopped Butterfinger bars.
- Drop spoonfuls of dough onto a baking sheet and bake for 10-12 minutes, or until lightly golden.
- Let the cookies cool on the baking sheet for a few minutes before transferring to a wire rack.

Leave a Reply