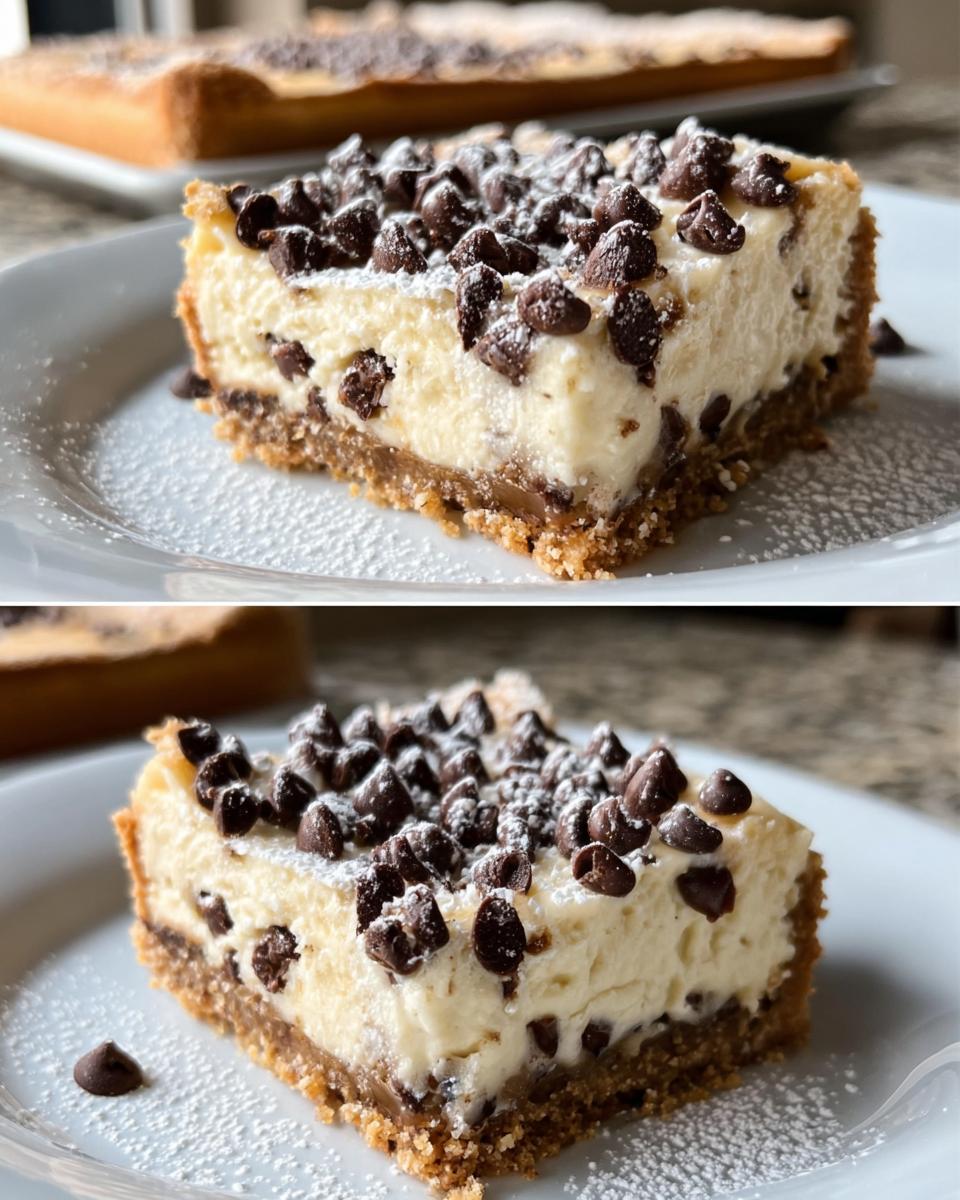
Every holiday season, my family gathers around the table, and the air fills with the sweet smell of baked goods. This is when I whip up my beloved Cannoli Cheesecake Bars, a delightful blend of creamy cheesecake and traditional cannoli flavors. With a buttery graham cracker crust and rich filling, these bars bring comfort and joy, making them a cherished part of our festive celebrations. They're simple to make, yet their taste feels like a warm hug on a chilly evening, perfect for sharing with loved ones.

What Is Cannoli Cheesecake Bars?
Cannoli Cheesecake Bars are a delightful fusion of classic cannoli flavors and creamy cheesecake, all nestled in a buttery graham cracker crust. These bars are perfect for any celebration, combining the richness of ricotta and mascarpone with the sweetness of chocolate chips. They're a delicious, easy-to-make dessert that everyone will love.
- Prep Time: 20 minutes
- Cook Time: 30 minutes
- Total Time: 50 minutes
- Servings: 12 bars
Why You'll Love Cannoli Cheesecake Bars
- Quick preparation: With just 20 minutes of prep time, these bars come together effortlessly.
- Simple ingredients: Using basic pantry staples, you can create a dessert that tastes gourmet.
- Beginner-friendly method: Even novice bakers will find success with this straightforward recipe.
- Perfect for holidays or gatherings: These bars are a crowd-pleaser, making them ideal for festive occasions.
- Make-ahead convenience: Prepare them in advance and chill for a delightful treat ready to serve.
Ingredients You'll Need
- For the Crust:
- 1.5 cups graham cracker crumbs (use finely crushed for a smoother texture)
- 0.25 cup granulated sugar (can substitute with brown sugar for a deeper flavor)
- 6 tablespoons unsalted butter, melted (ensure it's unsalted for better control of sweetness)
- For the Filling:
- 1.5 cups ricotta cheese, well-drained (for a creamier texture, use whole milk ricotta)
- 1 cup mascarpone cheese, or cream cheese (mascarpone gives a richer taste)
- 0.5 cup powdered sugar (sifted for a smoother consistency)
- 0.25 cup granulated sugar
- 1 teaspoon vanilla extract (pure vanilla extract enhances flavor)
- 1 large egg (bring to room temperature for better mixing)
- 0.5 cup mini chocolate chips, plus extra for topping (dark chocolate chips add a nice contrast)
- To Finish:
- Powdered sugar, for dusting (adds a beautiful touch before serving)
Step-by-Step Instructions
Preparing the Crust
- Preheat your oven to 325°F (160°C). This ensures the bars bake evenly.
- In a mixing bowl, combine 1.5 cups of graham cracker crumbs, 0.25 cup of granulated sugar, and 6 tablespoons of melted unsalted butter. Stir until the mixture resembles wet sand.
- Press the crumb mixture firmly into the bottom of a baking dish, creating an even layer for the crust. Make sure it's compact to hold the filling.
Making the Filling
- In another mixing bowl, add 1.5 cups of well-drained ricotta cheese, 1 cup of mascarpone cheese (or cream cheese), 0.5 cup of powdered sugar, 0.25 cup of granulated sugar, 1 teaspoon of vanilla extract, and 1 large egg.
- Mix these ingredients until smooth and creamy, ensuring there are no lumps. This is where the magic happens!
- Gently fold in 0.5 cup of mini chocolate chips. Be careful not to overmix; you want those little pockets of chocolate.
Baking the Bars
- Pour the creamy filling over the prepared crust, spreading it evenly to ensure each bite is as delicious as the last.
- Bake in the preheated oven for about 30 minutes or until the filling is set and slightly golden around the edges. You can gently shake the pan; if the center jiggles slightly, it's ready.
Cooling and Serving
- Once baked, remove the bars from the oven and allow them to cool in the pan at room temperature for about 15 minutes.
- For the best slicing, chill the bars in the refrigerator for a few hours or overnight if possible. This will help them set and firm up beautifully.
- Before serving, dust the top with powdered sugar for that lovely finishing touch. Cut into squares and enjoy!
Variations
- Add a pinch of cinnamon to the filling for a warm spice twist.
- Incorporate seasonal fruits like raspberries or strawberries for a fresh touch.
- Make it gluten-free by using gluten-free graham cracker crumbs.
- Top with whipped cream and a sprinkle of crushed pistachios for added texture.
- Try swapping mini chocolate chips with toffee bits for a different flavor profile.
Serving and Storage Tips
Serving
Serve your Cannoli Cheesecake Bars chilled, garnished with a dusting of powdered sugar and a few extra mini chocolate chips on top. They pair beautifully with a cup of coffee or a scoop of vanilla ice cream, making for a delightful dessert experience.
Storage
Store any leftovers in an airtight container in the refrigerator for up to 5 days. For longer storage, freeze the bars wrapped tightly in plastic wrap and aluminum foil for up to 2 months. Thaw in the refrigerator before serving.
Common Mistakes
- Not chilling the bars long enough: Chilling helps them set properly for clean cuts.
- Overmixing the filling: This can make the texture grainy; mix until just smooth.
- Using wet ricotta: Ensure it's well-drained to avoid a soggy crust.
- Skipping the dusting of powdered sugar: This adds both sweetness and a lovely presentation.
Helpful Notes
- For a lighter version, use low-fat ricotta and cream cheese.
- Feel free to add ¼ cup of chopped nuts for extra crunch.
- If you're dairy-free, swap out cheeses for vegan alternatives.
- For a citrus twist, add the zest of one lemon to the filling.
- To enhance flavor, consider a splash of almond extract in addition to vanilla.
Frequently Asked Questions
Can the recipe be frozen?
Yes, you can freeze Cannoli Cheesecake Bars! Just wrap them tightly in plastic wrap and aluminum foil to prevent freezer burn. They can be stored in the freezer for up to 2 months. When you're ready to enjoy them, thaw in the refrigerator overnight before serving.Can ingredients be substituted?
Absolutely! You can use cream cheese in place of mascarpone if needed. For the crust, gluten-free graham cracker crumbs are a great alternative. If you're looking for a lower sugar option, consider using a sugar substitute suitable for baking.How to store leftovers?
Store any leftover Cannoli Cheesecake Bars in an airtight container in the refrigerator for up to 5 days. This keeps them fresh and delicious for your next sweet craving!Can the recipe be made ahead?
Yes, this recipe is perfect for making ahead of time! Prepare the bars a day or two in advance and let them chill in the refrigerator. This enhances the flavors and ensures they’re ready to serve when you are.Final Thoughts
I hope you feel inspired to try these Cannoli Cheesecake Bars! They embody the warmth of home and the joy of sharing delicious moments with family and friends. Whether it's a holiday gathering or a cozy night in, these bars are sure to bring smiles all around. Enjoy each creamy, chocolatey bite, and don't forget to share your experience with loved ones. Happy baking, and may your kitchen always be filled with love and laughter!

Cannoli Cheesecake Bars
Equipment
- Mixing bowl
- baking dish
Ingredients
For the Crust
- 1.5 cups graham cracker crumbs
- 0.25 cup granulated sugar
- 6 tablespoons unsalted butter, melted
For the Filling
- 1.5 cups ricotta cheese, well-drained
- 1 cup mascarpone cheese, or cream cheese
- 0.5 cup powdered sugar
- 0.25 cup granulated sugar
- 1 teaspoon vanilla extract
- 1 large egg
- 0.5 cup mini chocolate chips, plus extra for topping
To Finish
- to taste powdered sugar, for dusting
Instructions
- Preheat your oven to 325°F (160°C). In a mixing bowl, combine graham cracker crumbs, granulated sugar, and melted butter. Press the mixture into the bottom of a baking dish to form the crust.
- In another bowl, mix the ricotta cheese, mascarpone cheese, powdered sugar, granulated sugar, vanilla extract, and egg until smooth. Fold in mini chocolate chips. Pour the filling over the crust and spread evenly.
- Bake for 30 minutes or until the filling is set. Allow to cool, then dust with powdered sugar before serving.

Leave a Reply