Every summer, as the sun began to warm the earth, my family would gather in the kitchen, the air filled with laughter and the sweet scent of strawberries. It was during one of those cherished afternoons that I created these Strawberry Cheesecake Protein Balls. They're not just a treat; they embody the joy of togetherness with their creamy texture and delightful bursts of strawberry flavor. Perfect for a quick snack or a post-workout boost, they always bring back those sunny memories.

What Is Strawberry Cheesecake Protein Balls?
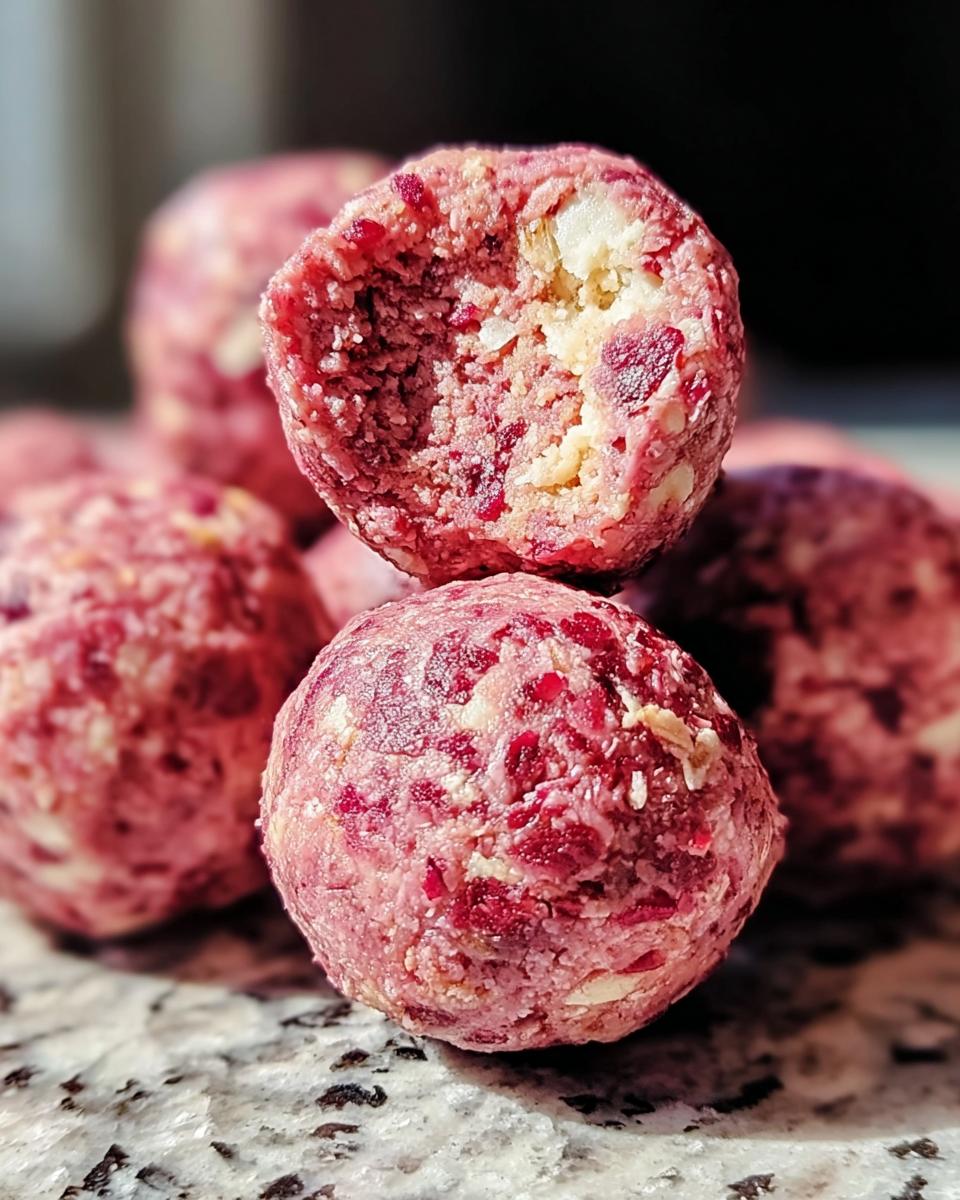
Strawberry Cheesecake Protein Balls are a deliciously healthy snack that combines the creamy richness of cheesecake with the fruity freshness of strawberries, all while packing a protein punch. These no-bake treats are simple to make and perfect for satisfying your sweet tooth without the guilt.
- Prep Time: 15 minutes
- Cook Time: 0 minutes
- Total Time: 15 minutes
- Servings: 12 balls
Why You'll Love Strawberry Cheesecake Protein Balls
- Quick Preparation: With just 15 minutes of prep time, you can whip these up in no time, making them perfect for busy days.
- Simple Ingredients: Made with wholesome and easily accessible ingredients, these protein balls are a delightful treat you can feel good about.
- Beginner-Friendly Method: Even novice cooks can master this recipe, as it requires no baking and minimal steps.
- Perfect for Gatherings: These tasty bites are a hit at parties, picnics, or family gatherings, bringing joy to everyone who tries them.
- Make-Ahead Convenience: You can prepare them in advance and store them in the fridge, making healthy snacking easy all week long.
Ingredients You'll Need
- ½ cup rolled oats - for a hearty base, choose certified gluten-free oats if necessary.
- 1 cup almond flour - adds a subtle nutty flavor; can be replaced with whole wheat flour for a different texture.
- 2 scoops vanilla protein powder - opt for your favorite brand; plant-based options work well too.
- ¼ cup cream cheese, softened - provides that creamy cheesecake essence; use a dairy-free alternative if needed.
- ¼ cup freeze-dried strawberries, crushed - these add intense strawberry flavor; fresh strawberries can be used but may alter consistency.
- 2 tablespoon honey or maple syrup - adds natural sweetness; adjust to taste based on preference.
- 1 teaspoon vanilla extract - enhances the overall flavor; pure extract is best for depth.
- 1-2 tablespoon milk (any kind, as needed) - use dairy or plant-based milk to achieve desired consistency.
Step-by-Step Instructions
Preparing Ingredients
- Gather all your ingredients to ensure a seamless cooking experience. This makes the process enjoyable and organized.
- In a large bowl, combine ½ cup rolled oats, 1 cup almond flour, and 2 scoops of vanilla protein powder. Stir them together to blend the dry ingredients evenly.
Mixing the Dough
- Add ¼ cup softened cream cheese, ¼ cup crushed freeze-dried strawberries, 2 tablespoons honey or maple syrup, and 1 teaspoon vanilla extract to the dry mixture.
- Mix everything together until the ingredients are thoroughly combined. The mixture should start to come together into a dough-like consistency.
- If the mixture seems too dry, add milk, one tablespoon at a time, until you achieve a smooth and cohesive dough. Pro Tip: The dough should be moist but not sticky to the touch.
Shaping the Protein Balls
- Once your mixture is ready, use your hands to roll small portions of the dough into balls, about 1 inch in diameter.
- Place the rolled balls on a lined baking sheet, ensuring they're spaced apart to prevent sticking.
- For a fun twist, you can roll some of the balls in crushed nuts or coconut flakes for added texture and flavor. Pro Tip: Wet your hands slightly to prevent the mixture from sticking to your palms while rolling.
Refrigerating
- Once all the balls are shaped, place the baking sheet in the refrigerator.
- Chill the protein balls for at least 30 minutes to firm them up. This step is essential for the best texture!
- After chilling, they are ready to enjoy! Store any leftovers in an airtight container in the fridge. Pro Tip: These treats keep well for up to a week, making them perfect for meal prep.
Variations
- Chocolate Strawberry: Add cocoa powder to the mixture for a chocolatey twist.
- Nutty Delight: Incorporate chopped nuts like walnuts or pecans for added crunch.
- Seasonal Spice: Mix in a pinch of cinnamon or nutmeg for a warm, cozy flavor.
- Dairy-Free Option: Substitute cream cheese with a vegan cream cheese alternative.
- Fruit Fusion: Swap freeze-dried strawberries with other freeze-dried fruits like raspberries or blueberries.
Serving and Storage Tips
Serving
These Strawberry Cheesecake Protein Balls are delightful as a quick snack or an energizing post-workout treat. Serve them chilled for a refreshing bite, or pair them with a cup of yogurt for a wholesome breakfast option.
Storage
Store the protein balls in an airtight container in the refrigerator for up to one week. They can also be frozen for longer storage; just thaw them in the fridge before enjoying.
Common Mistakes
- Using too much liquid: Adding too much milk can make the mixture overly wet; add it gradually until the right consistency is achieved.
- Not chilling long enough: Skipping the refrigeration step can result in softer balls; ensure they chill for at least 30 minutes.
- Overmixing: Mixing too vigorously can lead to a tough texture; stir until just combined for the best result.
- Using fresh strawberries instead of freeze-dried: Fresh strawberries can alter the texture; stick with freeze-dried for the best flavor and consistency.
Helpful Notes
- For a nut-free option, replace almond flour with oat flour or sunflower seed flour.
- Add a scoop of chia seeds or flaxseeds for an extra nutritional boost.
- If you're avoiding sugar, consider using stevia or erythritol instead of honey or maple syrup.
- To enhance flavor, consider adding a pinch of salt or a squeeze of lemon juice.
Frequently Asked Questions
Can the recipe be frozen?
Yes, you can freeze the Strawberry Cheesecake Protein Balls! Place them in a single layer on a baking sheet until frozen, then transfer them to an airtight container or freezer bag. They’ll keep well for up to three months. Just thaw them in the fridge before enjoying.Can ingredients be substituted?
Absolutely! You can replace almond flour with oat flour for a nut-free version. If you don’t have protein powder, you can use additional rolled oats. For a dairy-free option, substitute cream cheese with a vegan alternative or use Greek yogurt.How to store leftovers?
Store any leftover protein balls in an airtight container in the refrigerator for up to one week. This keeps them fresh and ready for snacking whenever you need a quick energy boost!Can the recipe be made ahead?
Yes, these protein balls are perfect for meal prep! You can make them ahead of time and store them in the fridge, ensuring you have a healthy snack ready whenever cravings hit.Final Thoughts
I hope you feel inspired to try these Strawberry Cheesecake Protein Balls in your own kitchen. They are not just a snack; they're a way to share joy and nourishment with family and friends. Whether you enjoy them after a workout or as a delightful treat during a cozy evening, each bite will remind you of the sunny moments spent in the kitchen. So gather your ingredients, roll up your sleeves, and enjoy the process of creating something special!

Strawberry Cheesecake Protein Balls
Ingredients
Dry Ingredients
- ½ cup rolled oats
- 1 cup almond flour
- 2 scoops vanilla protein powder
Wet Ingredients
- ¼ cup cream cheese, softened
- ¼ cup freeze-dried strawberries, crushed
- 2 tablespoon honey or maple syrup
- 1 teaspoon vanilla extract
- 1-2 tablespoon milk (any kind, as needed)
Instructions
- In a large bowl, combine the rolled oats, almond flour, and vanilla protein powder.
- Add the cream cheese, freeze-dried strawberries, honey or maple syrup, and vanilla extract to the dry ingredients. Mix until well combined.
- If the mixture is too dry, add milk a tablespoon at a time until you reach the desired consistency.
- Roll the mixture into small balls and place them on a lined baking sheet. Refrigerate for at least 30 minutes before serving.


Leave a Reply