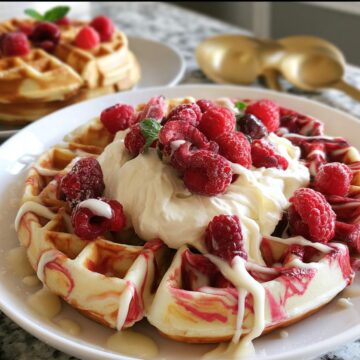
Every time I whip up a batch of Red Velvet Marble Waffles, it takes me back to those cozy Saturday mornings when the whole family would gather around the table, laughter echoing off the walls. The scent of something sweet wafting through the air always brought an extra spark of joy. I remember my kids peeking over the counter, eyes wide in anticipation, as I poured the batters into the waffle maker, creating that gorgeous marbled effect. It's like painting with flavors, and it never fails to impress!
These waffles are perfect for special occasions or just a fun breakfast treat that makes any day feel festive. With their rich red velvet flavor and fluffy texture, they're a delightful twist on a classic breakfast staple. Plus, who doesn't love a delicious, colorful breakfast that brings smiles to faces? Red Velvet Marble Waffles are not only a feast for the eyes but also a treat for the taste buds, and they're sure to become a cherished family favorite!

Why You'll Love "Red Velvet Marble Waffles"
- Quick and easy prep time of just 15 minutes!
- Perfect for making breakfast feel special without extra effort.
- Family-friendly and fun to make with kids; they'll love the marbling!
- Minimal ingredients with a delightful twist that impresses guests.
- Great for batch cooking; freeze extras for busy mornings.
- Versatile toppings make it easy to customize for everyone's taste.
Ingredients You'll Need
- For the Classic Waffle Batter:
- 1 ½ cups all-purpose flour
- 1 tablespoon sugar
- 1 teaspoon baking powder
- ½ teaspoon baking soda
- ¼ teaspoon salt
- 1 cup buttermilk (can substitute with milk mixed with a tablespoon of vinegar for a quick buttermilk alternative)
- 2 large eggs
- ¼ cup melted butter
- 1 teaspoon vanilla extract
- For the Red Velvet Batter:
- 1 cup all-purpose flour
- 2 tablespoons cocoa powder (unsweetened)
- ¼ cup sugar
- 1 teaspoon baking powder
- ½ teaspoon baking soda
- ¼ teaspoon salt
- ¾ cup buttermilk (same substitution as above applies)
- 1 large egg
- ¼ cup melted butter
- 1 teaspoon vanilla extract
- 1 tablespoon red food coloring
Step-by-Step Instructions
Make the Classic Waffle Batter
- In a large mixing bowl, combine 1 ½ cups of all-purpose flour, 1 tablespoon of sugar, 1 teaspoon of baking powder, ½ teaspoon of baking soda, and ¼ teaspoon of salt. Whisk these dry ingredients together until they're well blended.
- In another bowl, whisk together 1 cup of buttermilk, 2 large eggs, ¼ cup of melted butter, and 1 teaspoon of vanilla extract until smooth.
- Pour the wet ingredients into the dry ingredients and stir gently until just combined. Don't worry if it's a little lumpy; that's perfectly okay! We want to avoid overmixing.
Make the Red Velvet Batter
- In a separate bowl, mix together 1 cup of all-purpose flour, 2 tablespoons of unsweetened cocoa powder, ¼ cup of sugar, 1 teaspoon of baking powder, ½ teaspoon of baking soda, and ¼ teaspoon of salt. Again, whisk these dry ingredients until they're nicely blended.
- In another bowl, combine ¾ cup of buttermilk, 1 large egg, ¼ cup of melted butter, 1 teaspoon of vanilla extract, and 1 tablespoon of red food coloring. Mix until fully combined.
- Pour the wet ingredients into the dry ingredients and stir gently until just combined. You want to see that gorgeous red color, so mix just enough to incorporate everything!
Preheat the Waffle Maker
- While you're mixing the batters, preheat your waffle maker according to the manufacturer's instructions. Make sure it's nice and hot so those waffles come out crispy and golden!
Create the Marble Effect
- Once your waffle maker is preheated, it's time to get artistic! Start by pouring a ladleful of the classic waffle batter onto one side of the waffle maker.
- Next, pour a ladleful of the red velvet batter right next to it, allowing the two batters to slightly overlap. Keep alternating between the batters to create that beautiful marbled effect.
- Don't stress about perfection; the marble effect is meant to be a little whimsical!
Cook the Waffles
- Close the waffle maker and cook according to your appliance's instructions. Usually, this takes about 3 to 5 minutes, or until the waffles are golden brown and crispy.
- Once done, carefully open the waffle maker and use a fork to lift the waffles out. They should come out easily, but if they stick, give them a little nudge!
Serve the Waffles
- Serve the waffles warm, straight from the waffle maker. They're delicious on their own but feel free to dress them up!
- Top with your favorite toppings such as whipped cream, fresh berries, maple syrup, or even a drizzle of cream cheese frosting for that extra indulgence.
- Gather your family, enjoy the smiles, and dig in!
Variations
- For a lighter option, swap half the all-purpose flour for whole wheat flour.
- Add a teaspoon of cinnamon to the classic batter for extra warmth and flavor.
- For a seasonal twist, incorporate pumpkin puree into the red velvet batter during fall.
- Try making mini waffles for a fun bite-sized treat that's perfect for kids!
- For a dairy-free version, use almond milk or oat milk as a buttermilk substitute.
Serving and Storage Tips
Serving
Serve your Red Velvet Marble Waffles warm for the best flavor. Dress them up with toppings like whipped cream, fresh strawberries, or a drizzle of maple syrup. For an extra treat, consider a dollop of cream cheese frosting-it's a delightful match!
Storage
Store any leftover waffles in an airtight container in the fridge for up to 3 days. To freeze, place them in a single layer on a baking sheet until solid, then transfer to a freezer bag. They'll keep well for up to 2 months. Reheat in the toaster or oven for a quick breakfast!
Helpful Notes
- If you don't have buttermilk, mix regular milk with a tablespoon of vinegar and let it sit for 5 minutes.
- For a gluten-free version, use a gluten-free all-purpose flour blend.
- Consider adding chocolate chips or nuts to the batters for extra texture and flavor.
- Leftover waffles can be reheated in the toaster for a quick and delicious breakfast.
- For a lower sugar option, reduce the sugar in both batters without compromising taste.
Frequently Asked Questions
Can I freeze Red Velvet Marble Waffles?
Yes, you can freeze Red Velvet Marble Waffles! Allow them to cool completely, then place them in a single layer on a baking sheet until solid. Transfer the frozen waffles to a freezer bag or airtight container. They'll keep well for up to 2 months. Just pop them in the toaster or reheat in the oven for a quick breakfast!
How can I substitute the buttermilk?
If you don't have buttermilk on hand, you can easily make a substitute! Just mix 1 cup of regular milk with 1 tablespoon of vinegar or lemon juice and let it sit for about 5 minutes. This will give you a similar tangy flavor that works perfectly in your batter.
What toppings go well with these waffles?
There are so many delicious options for toppings! You can go classic with maple syrup or honey, or get a little fancy with whipped cream and fresh strawberries. For a fun twist, try drizzling cream cheese frosting on top for that extra indulgence! Chocolate chips or nuts also make great additions if you're feeling adventurous.
Final Thoughts
Making Red Velvet Marble Waffles is not just about breakfast; it's about creating memories with your loved ones. I encourage you to gather your family in the kitchen, let the laughter fill the air, and enjoy the process of whipping up these delightful treats together. Whether it's a special occasion or a cozy weekend morning, these waffles are sure to bring smiles and satisfaction to your table. So go ahead, try this recipe, and watch as it becomes a cherished part of your family traditions. Happy cooking!
Red Velvet Marble Waffles
Equipment
- Waffle Maker
- mixing bowls
Ingredients
For the Classic Waffle Batter
- 1 ½ cups all-purpose flour
- 1 tablespoon sugar
- 1 teaspoon baking powder
- ½ teaspoon baking soda
- ¼ teaspoon salt
- 1 cup buttermilk
- 2 large eggs
- ¼ cup melted butter
- 1 teaspoon vanilla extract
For the Red Velvet Batter
- 1 cup all-purpose flour
- 2 tablespoons cocoa powder
- ¼ cup sugar
- 1 teaspoon baking powder
- ½ teaspoon baking soda
- ¼ teaspoon salt
- ¾ cup buttermilk
- 1 large egg
- ¼ cup melted butter
- 1 teaspoon vanilla extract
- 1 tablespoon red food coloring
Instructions
- In a bowl, combine the ingredients for the classic waffle batter and mix until smooth.
- In another bowl, mix the ingredients for the red velvet batter until well combined.
- Preheat your waffle maker according to the manufacturer's instructions.
- Pour the classic batter and red velvet batter into the waffle maker, alternating them to create a marbled effect.
- Cook according to your waffle maker's instructions until golden brown.
- Serve warm with your favorite toppings.

Leave a Reply