
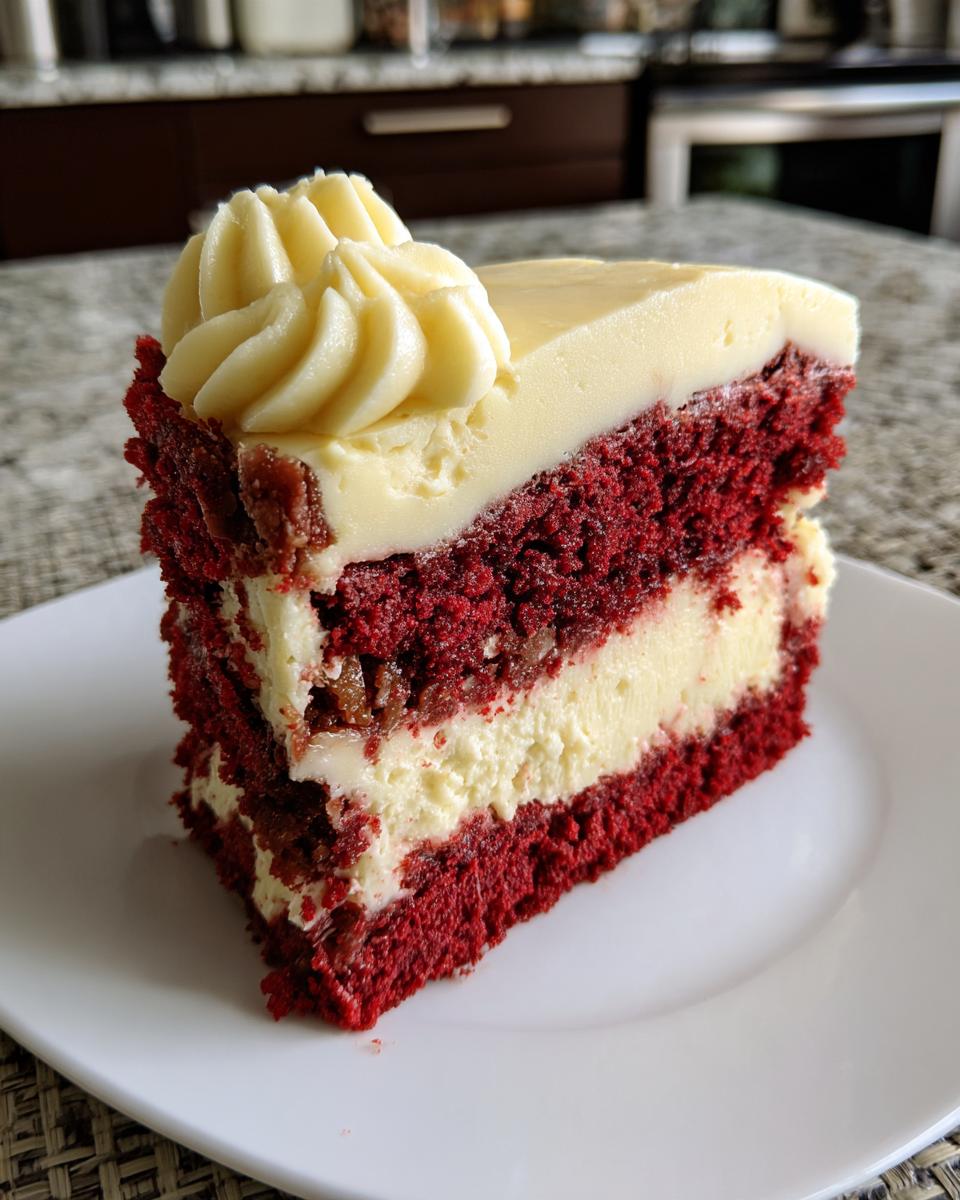
Every holiday season, my kitchen fills with the rich, inviting aroma of baking, and one dessert that always makes an appearance is my beloved Red Velvet Cheesecake. It's the perfect blend of velvety cake and creamy cheesecake, creating a texture that's both decadent and comforting. The vibrant red hue and luscious cream cheese frosting make it not just a treat for the taste buds, but a feast for the eyes, making every gathering feel a little more special.

What Is Red Velvet Cheesecake?
Red Velvet Cheesecake is a delightful hybrid dessert that combines the classic flavors of red velvet cake with a rich and creamy cheesecake filling. This show-stopping treat is perfect for any special occasion, bringing joy and indulgence to your table. It is simple to make and guarantees smiles all around!
- Prep Time: 20 minutes
- Cook Time: 60 minutes
- Total Time: 80 minutes
- Servings: 10 slices
Why You'll Love Red Velvet Cheesecake
- This recipe is incredibly quick to prepare, making it perfect for last-minute gatherings.
- With just a box of cake mix and a few simple ingredients, it's both accessible and delicious.
- Even novice bakers can master this dessert, thanks to its straightforward steps.
- Its stunning appearance and rich flavor make it a showstopper for holidays and special occasions.
- Make it ahead of time; it tastes even better after chilling in the fridge for a few hours!
Ingredients You'll Need
- For the Cake:
- 1 box red velvet cake mix (plus ingredients called for on the box)
- For the Cheesecake Filling:
- 24 oz cream cheese, softened (quality matters for a smooth texture)
- ¾ cup granulated sugar
- 3 large eggs
- ½ cup sour cream (adds richness; Greek yogurt can be a substitute)
- 1 teaspoon vanilla extract
- For the Frosting:
- 8 oz cream cheese, softened
- 1 cup heavy cream (for a fluffy texture)
- 1 teaspoon vanilla extract
- ¾ cup powdered sugar (sifted for easier mixing)
Step-by-Step Instructions
Preparing the Red Velvet Cake
- Preheat your oven according to the cake mix instructions, usually around 350°F (175°C).
- Prepare the red velvet cake mix as directed on the box, mixing in the required ingredients like eggs and oil until smooth.
- Pour the prepared cake batter into a greased springform pan, spreading it evenly.
- Bake in the preheated oven for about 25-30 minutes, or until a toothpick inserted in the center comes out clean.
- Let the cake cool in the pan while you prepare the cheesecake filling.
Making the Cheesecake Filling
- In a large mixing bowl, beat the softened cream cheese with granulated sugar until smooth and creamy.
- Add the eggs, one at a time, mixing well after each addition to ensure a smooth batter.
- Stir in the sour cream and vanilla extract, blending until everything is well combined and creamy.
Combining the Layers
- Once the red velvet cake has cooled, carefully pour the cheesecake filling over the top of the cake.
- Use a spatula to spread the filling evenly over the cake, ensuring it covers the entire surface.
Baking the Cheesecake
- Bake the cheesecake for an additional 60 minutes, or until the edges are set and the center has a slight jiggle.
- Once baked, turn off the oven and crack the door, allowing the cheesecake to cool slowly for about an hour.
- After cooling, transfer the cheesecake to the refrigerator to cool completely.
Preparing the Frosting
- In a separate mixing bowl, beat the softened cream cheese and powdered sugar until smooth and fluffy.
- Gradually add the heavy cream and vanilla extract, mixing until the frosting is light and airy.
Finishing Touches
- Once the cheesecake is fully cooled, spread the cream cheese frosting evenly over the top.
- Chill the cheesecake in the refrigerator for at least 4 hours, or overnight for the best flavor.
- Before serving, slice into pieces and admire the beautiful layers of red velvet and creamy cheesecake!
Variations
- Add a layer of chocolate ganache on top for extra richness.
- Incorporate crushed Oreo cookies into the cheesecake filling for a delightful crunch.
- Try using a gluten-free red velvet cake mix for a gluten-free option.
- Top with fresh berries or a berry compote for a fruity twist.
- Experiment with flavored extracts, like almond or peppermint, for unique variations.
Serving and Storage Tips
Serving
Serve the Red Velvet Cheesecake chilled, garnished with chocolate shavings or fresh berries for a pop of color. It pairs wonderfully with a dollop of whipped cream or a scoop of vanilla ice cream, making it a delightful end to any meal.
Storage
Store any leftovers in an airtight container in the refrigerator for up to 5 days. You can also freeze the cheesecake for up to 3 months; just be sure to wrap it tightly in plastic wrap and foil before freezing. Thaw in the fridge overnight before serving.
Common Mistakes
- Overmixing the cheesecake filling can lead to cracks; mix just until combined.
- Baking at too high a temperature may cause the cheesecake to puff up and crack; keep it at the recommended temperature.
- Not allowing the cheesecake to cool properly can affect texture; always let it cool in the oven before refrigerating.
- Skipping the chilling time can result in a soft cheesecake; be patient and chill for at least 4 hours.
Helpful Notes
- For a lighter cheesecake, use low-fat cream cheese and sour cream.
- Feel free to add mini chocolate chips to the cheesecake filling for extra sweetness.
- If you're short on time, use store-bought cream cheese frosting instead of making your own.
- For an allergy-friendly option, substitute eggs with ¼ cup of unsweetened applesauce per egg.
Frequently Asked Questions
Can the recipe be frozen?
Yes, the Red Velvet Cheesecake can be frozen. Once it’s completely cooled and frosted, wrap it tightly in plastic wrap and then in aluminum foil. It will stay fresh for up to 3 months in the freezer. To enjoy, simply thaw it overnight in the refrigerator before serving.Can ingredients be substituted?
Absolutely! You can substitute the sour cream with Greek yogurt for a lighter option. For a gluten-free version, use a gluten-free red velvet cake mix. You can also swap eggs with ¼ cup of unsweetened applesauce per egg to make it egg-free.How to store leftovers?
Store any leftovers in an airtight container in the refrigerator for up to 5 days. If you want to maintain its freshness, make sure it’s well sealed to prevent it from absorbing any odors.Can the recipe be made ahead?
Yes, this cheesecake is perfect for making ahead of time! In fact, it tastes even better after chilling in the fridge for at least 4 hours, or overnight. This makes it an ideal dessert for gatherings or special occasions.Final Thoughts
I hope you find joy in making this Red Velvet Cheesecake, as it has a wonderful way of bringing people together. The rich layers of cake and creamy cheesecake create a delightful experience that will surely warm your heart and satisfy your sweet tooth. Whether you're celebrating a special occasion or simply indulging in a cozy evening at home, this dessert is perfect for sharing with family and friends. Give it a try, and let the smiles come pouring in!
Red Velvet Cheesecake
Equipment
- Mixing bowl
- Springform pan
Ingredients
For the Cake
- 1 box red velvet cake mix plus ingredients called for on box
For the Cheesecake Filling
- 24 oz cream cheese softened
- ¾ cup granulated sugar
- 3 large eggs
- ½ cup sour cream
- 1 teaspoon vanilla extract
For the Frosting
- 8 oz cream cheese softened
- 1 cup heavy cream
- 1 teaspoon vanilla extract
- ¾ cup powdered sugar
Instructions
- Preheat your oven according to the cake mix instructions.
- Prepare the red velvet cake mix as directed on the box and pour it into a springform pan.
- In a mixing bowl, beat the cream cheese and sugar until smooth. Add eggs, sour cream, and vanilla extract, mixing until combined.
- Pour the cheesecake filling over the baked red velvet cake.
- Bake for an additional 60 minutes or until set. Let cool completely.
- For the frosting, beat the cream cheese and powdered sugar until smooth. Add heavy cream and vanilla, mixing until fluffy.
- Spread the frosting over the cooled cheesecake. Chill before serving.
Leave a Reply