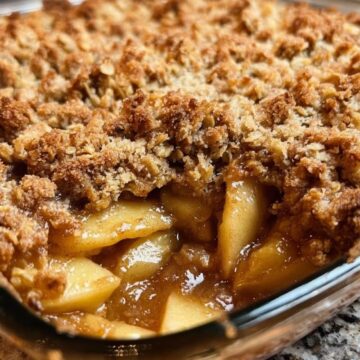
When the air turns crisp and the leaves start to fall, there's nothing quite as comforting as the smell of Old Fashioned Apple Crisp baking in the oven. It's that unmistakable aroma of cinnamon, brown sugar, and warm apples that fills your whole home and takes you straight back to simpler times.

Growing up, apple crisp was the first dessert I learned to make alongside my mom. Every autumn, we'd visit the orchard, fill up baskets with apples, and come home to peel, slice, and bake. The best part? Scooping out a warm serving and topping it with a big scoop of vanilla ice cream - watching it melt slowly into the golden crumble. This Old Fashioned Apple Crisp is a timeless recipe that captures all the cozy, homemade goodness of fall in every bite.
Why You'll Love Old Fashioned Apple Crisp
- Simple, Classic Ingredients: No fancy equipment or special ingredients - just pantry staples and fresh apples.
- Perfect Fall Dessert: Warm, cozy flavors of cinnamon and apples make this a seasonal favorite.
- Crisp, Buttery Topping: The oat crumble turns perfectly golden and crisp in the oven.
- Customizable: Works with a mix of apple varieties, nuts, or even caramel drizzle.
- Crowd-Pleasing: Ideal for potlucks, family dinners, and holiday gatherings.
- Smells Like Heaven: The scent alone is enough to make everyone wander into the kitchen!
Ingredients You'll Need
Let's break down what you'll need to make this delicious Old Fashioned Apple Crisp:
For the Filling:
- 6-7 medium apples (Granny Smith, Honeycrisp, or a mix) - A combination of tart and sweet apples gives the best balance of flavor and texture. Granny Smiths hold their shape well, while Honeycrisps add sweetness and juiciness.
- ½ cup granulated sugar - Sweetens the apples just enough without overpowering their natural flavor.
- 1 teaspoon cinnamon - The essential spice that makes apple desserts feel like fall.
- ¼ teaspoon nutmeg (optional) - Adds depth and a warm, slightly spicy aroma.
- 1 tablespoon all-purpose flour - Helps thicken the apple filling as it bakes.
- 1 teaspoon lemon juice - Brightens up the flavor and prevents the apples from browning.

For the Topping:
- ¾ cup old-fashioned rolled oats - Adds texture and a hearty crunch.
- ½ cup all-purpose flour - Helps bind the topping together.
- ½ cup brown sugar (light or dark) - Dark brown sugar gives a deeper molasses flavor, while light brown sugar adds gentle sweetness.
- ½ teaspoon cinnamon - Because one layer of cinnamon just isn't enough!
- ¼ teaspoon salt - Enhances all the sweet and buttery flavors.
- ½ cup unsalted butter, cold and cut into small cubes - Cold butter is key for that perfect crumbly texture.
Optional Add-Ins:
- ½ cup chopped pecans or walnuts - Adds extra crunch and a nutty flavor.
- A drizzle of caramel sauce before baking for a gooey, indulgent twist.
Step-by-Step Instructions
Making this Old Fashioned Apple Crisp is easier than pie - literally! Here's how to do it step by step:
1. Preheat the oven
- Set your oven to 350°F (175°C) and lightly grease a 9x13-inch baking dish with butter or nonstick spray.
2. Prepare the apples
- Peel, core, and slice 6-7 medium apples into thin, even slices.
- Place the apple slices in a large mixing bowl.
3. Season the apples
- Add granulated sugar, cinnamon, nutmeg, flour, and lemon juice to the bowl.
- Gently toss until the apple slices are evenly coated with the mixture.
- The apples should look glossy and well-seasoned.
Tip: Don't overmix - you don't want to break the apple slices.
4. Transfer to baking dish
- Pour the coated apple mixture into the prepared baking dish and spread it out evenly.
5. Make the crisp topping
- In another bowl, combine oats, flour, brown sugar, cinnamon, and salt.
- Add cold butter cubes to the dry ingredients.
- Using your fingertips or a pastry cutter, work the butter into the mixture until it forms coarse crumbs. You want some small clumps and some loose crumbs - that's what makes the texture irresistible.
Tip: If your kitchen is warm, pop the topping mixture in the fridge for 10 minutes before baking to keep the butter cold.
6. Assemble the crisp
- Sprinkle the crumbly oat topping evenly over the apple filling. Make sure all the apples are covered so the topping bakes into a golden crust.
7. Bake to perfection
- Bake in the preheated oven for 40-45 minutes, or until the topping is golden brown and the apple filling is bubbling around the edges.
Tip: If the topping browns too quickly, cover loosely with foil for the last 10 minutes of baking.
8. Cool slightly and serve
- Allow the apple crisp to cool for 10-15 minutes before serving. This helps the filling thicken and makes it easier to scoop.
Serve warm with a generous scoop of vanilla ice cream or a dollop of fresh whipped cream - the contrast of warm crisp and cold cream is pure heaven!
Serving and Storage Tips
Serving Suggestions:
- Serve warm for the coziest experience.
- Pair with vanilla ice cream, caramel drizzle, or whipped cream for an indulgent dessert.
- For breakfast (yes, dessert for breakfast!), enjoy a small portion with a spoonful of Greek yogurt instead of ice cream.
Storage Tips:
- Refrigerate: Store leftovers in an airtight container in the fridge for up to 4 days.
- Reheat: Warm individual portions in the microwave for 30 seconds or in a 350°F oven for 10 minutes.
- Freeze: You can freeze apple crisp for up to 3 months. Let it cool completely, wrap tightly, and thaw overnight before reheating.
Make-Ahead Tip:
You can assemble the filling and topping separately up to one day in advance. Store both covered in the fridge, then assemble and bake when ready to serve.

Helpful Notes
- Best Apples for Crisp: A mix of tart (Granny Smith) and sweet (Honeycrisp or Fuji) apples gives the best flavor and texture. Avoid soft apples like Red Delicious - they turn mushy when baked.
- Keep the Butter Cold: Cold butter helps create that perfect crumbly, crisp topping. If the butter melts too soon, your topping will turn greasy instead of crunchy.
- Gluten-Free Option: Substitute the flour with a 1:1 gluten-free blend and make sure your oats are certified gluten-free.
- Vegan Version: Use plant-based butter to make the recipe dairy-free - the flavor and texture remain delicious!
- Want More Spice? Add a pinch of cloves, ginger, or allspice to the filling for a warm spiced apple flavor.
- Serving for a Crowd: Double the recipe and bake it in two pans - perfect for holidays or potlucks.
Frequently Asked Questions
1. What's the difference between apple crisp and apple crumble?
Apple crisp typically includes oats in the topping, giving it a crunchier texture. Apple crumble usually has a streusel-like topping without oats.
2. Can I use instant oats instead of rolled oats?
You can, but the texture will be softer. Old-fashioned rolled oats give the topping that perfect chew and crunch.
3. Can I prepare apple crisp ahead of time?
Yes! You can assemble the unbaked crisp, cover it tightly, and refrigerate for up to 24 hours before baking. Just add an extra 5-10 minutes to the bake time.
4. Why is my apple crisp soggy?
If your filling is too watery, try adding an extra tablespoon of flour or cornstarch to absorb the liquid. Also, make sure to bake long enough for the topping to fully crisp up.
5. Can I make individual servings?
Absolutely! Divide the ingredients among ramekins and bake for about 25-30 minutes. They make adorable single-serve desserts.
Final Thoughts
There's a reason Old Fashioned Apple Crisp has been a staple in family kitchens for generations - it's simple, comforting, and endlessly satisfying. The tender, spiced apples pair perfectly with the buttery oat topping, creating that cozy "taste of home" feeling with every bite.
I've tested many variations over the years, but this classic recipe remains my favorite. It's foolproof, versatile, and always a hit at the table. Whether you're baking it for a holiday dessert or just craving something warm and sweet on a chilly evening, this apple crisp will never let you down.
So grab a bag of apples, preheat your oven, and let your kitchen fill with the scent of cinnamon and butter. Once you take that first bite of this Old Fashioned Apple Crisp, you'll understand why it's stood the test of time - and why it'll always have a special place in your recipe box.
Old Fashioned Apple Crisp
Ingredients
For the Filling:
- 6 -7 medium apples Granny Smith, Honeycrisp, or a mix
- ½ cup granulated sugar
- 1 teaspoon cinnamon
- ¼ teaspoon nutmeg optional
- 1 tablespoon all-purpose flour
- 1 teaspoon lemon juice
For the Topping:
- ¾ cup old-fashioned rolled oats
- ½ cup all-purpose flour
- ½ cup brown sugar light or dark
- ½ teaspoon cinnamon
- ¼ teaspoon salt
- ½ cup unsalted butter cold and cut into small cubes
Instructions
- Preheat oven to 350°F (175°C) and lightly grease a 9x13-inch baking dish.
- Peel, core, and slice the apples into thin slices. Place them in a large bowl.
- Add granulated sugar, cinnamon, nutmeg, flour, and lemon juice to the apples. Toss gently until evenly coated.
- Transfer the apple mixture to the prepared baking dish and spread evenly.
- In another bowl, combine oats, flour, brown sugar, cinnamon, and salt.
- Add the cold butter cubes and blend with your fingertips or a pastry cutter until the mixture resembles coarse crumbs.
- Sprinkle the oat topping evenly over the apple mixture.
- Bake for 40-45 minutes, or until the topping is golden brown and the filling is bubbling.
- Let cool slightly before serving. Enjoy warm with vanilla ice cream or whipped cream.
Notes
- Use a mix of tart and sweet apples (like Granny Smith and Honeycrisp) for the best flavor balance.
- Keep butter cold while preparing the topping for a perfectly crumbly texture.
- Add chopped nuts or a drizzle of caramel sauce for extra crunch and flavor.
- To make gluten-free, use a certified gluten-free flour blend and oats.
- Store leftovers covered in the fridge for up to 4 days; reheat in the oven for best results.


Leave a Reply