I still remember the first time I bit into a warm, milky donut ball-it was like tasting a cloud dipped in sugar. My aunt used to make them for special Sunday breakfasts, and the smell alone was enough to get me out of bed. Now, whenever I whip up a batch of these Milky Donut Balls, it feels like a little celebration, no matter what day it is.

The best part? They're ridiculously easy to make. Just a handful of pantry staples transform into these pillowy-soft bites that disappear within minutes. Whether you're craving a sweet afternoon pick-me-up or need a crowd-pleasing dessert that won't keep you chained to the kitchen, these golden little puffs with their milky-sweet dusting are absolute magic. Trust me, once you try them fresh from the fryer, you'll be hooked.
Why You'll Love These Milky Donut Balls
Okay, let's be real-these Milky Donut Balls are basically little bites of happiness. Here's why you'll be making them on repeat:
Soft and Fluffy Texture
Imagine biting into something so light it practically melts on your tongue-that's these donut balls. The yeast gives them this airy, cloud-like crumb that's impossible to resist. No dense, doughy disappointments here!
Perfectly Sweetened
They're sweet, but not *too* sweet. The sugar in the dough keeps things balanced, and the dusting? Oh, the dusting! You can go classic with just milk powder and sugar, or add cocoa powder for a chocolatey twist. (I always do both-because why choose?)
Quick and Simple to Make
No fancy equipment, no weird ingredients. Just mix, knead, let rise (perfect time to binge an episode of your favorite show), then fry and dust. Even if you're not a baker, you've got this. And hey, if the dough balls aren't perfectly round? Call them "rustic" and eat them anyway.
Seriously, these disappear faster than I can fry them. You've been warned!
Ingredients You'll Need for Milky Donut Balls
Gather these simple ingredients - I bet you've got most of them already! The magic of this recipe is how ordinary stuff becomes extraordinary when combined just right.
For the Dough
- ⅔ cup lukewarm milk - Not hot! Test it on your wrist like baby's bottle temperature.
- 1 teaspoon yeast - Instant or active dry both work here.
- 2 tablespoon milk powder - The secret weapon for that extra milky flavor.
- 3 tablespoon sugar - Regular white sugar does the trick.
- 3 tablespoon butter - Unsalted, softened. Or salted works too - just skip the extra salt.
- 1 ½ cups all-purpose flour - Spoon it in lightly, don't pack it down.
- Pinch of salt - Like, literally two finger-pinches. Balances the sweetness perfectly.
For Dusting
- 1 tablespoon milk powder - For that signature milky finish.
- 1 tablespoon sugar - Superfine works best but regular is fine.
- 1 teaspoon cocoa powder - Optional but oh-so-good. Dutch-processed gives deeper flavor.
See? Nothing fancy. Now let's turn these basics into something magical!
Step-by-Step Instructions for Milky Donut Balls
Preparing the Dough
First, grab a big mixing bowl - bigger than you think you'll need, because this dough likes to grow! Pour in your lukewarm milk (if it's too hot, it'll kill the yeast - tragedy!), then sprinkle in the yeast and let it sit for a minute. It should get a little foamy - that's how you know your yeast is alive and ready to work. Now, whisk in the milk powder, sugar, and softened butter until everything looks like a creamy, dreamy liquid. Don't worry if the butter doesn't fully incorporate yet - it'll melt into perfection later.
Next, dump in the flour and that tiny pinch of salt. Stir with a wooden spoon at first, then get your hands in there when it starts coming together. Knead for about 5 minutes right in the bowl - you're not making bread, so no need to overdo it. Just until it's smooth and slightly sticky. Cover the bowl with a damp towel (or I sometimes just use plastic wrap) and let it rise in a warm spot for about an hour. You'll know it's ready when it's puffy and nearly doubled - if you poke it gently, the indentation should stay.
Shaping and Frying
Time for the fun part! Punch down the dough (so satisfying) and turn it out onto a lightly floured surface. Tear off small pieces - about the size of a ping pong ball - and roll them between your palms. They don't need to be perfect spheres (mine never are), but try to keep them roughly the same size so they cook evenly. Pro tip: if your hands get sticky, rub a tiny bit of oil on them instead of more flour - keeps the dough tender.
Heat about 2 inches of neutral oil (vegetable or canola works great) in a heavy pot over medium heat. Test the oil with a tiny dough scrap - if it sizzles gently and floats to the top, you're golden (literally). Fry the balls in batches - don't crowd them! They'll need about 2-3 minutes per side, turning occasionally with a slotted spoon until they're evenly golden brown. Drain them on paper towels - but don't let them sit too long before the next step!
Dusting and Serving
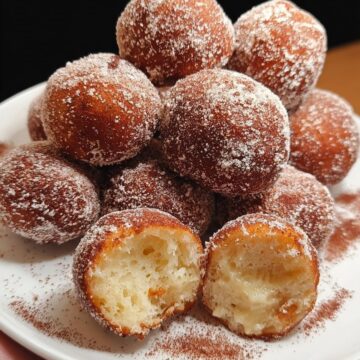
While the donut balls are still warm (but not scalding hot), mix your dusting ingredients in a shallow bowl. I like to do half with just milk powder and sugar, half with the cocoa added - gives people options. Gently roll each ball in the mixture until coated - the residual heat helps the powder stick beautifully. Serve immediately while they're at their absolute peak: crisp outside, cloud-soft inside, with that sweet milky aroma. Warning: these disappear FAST, so claim yours early!
Variations for Your Milky Donut Balls
Once you've mastered the classic version, why not play around? These Milky Donut Balls are like a blank canvas - here are some fun ways to mix them up without any extra fuss.
Chocolate-Filled Option
Oh boy, this one's dangerous. When shaping your dough balls, tuck a few chocolate chips (or a small square of your favorite chocolate bar) right into the center before sealing them up. As they fry, the chocolate melts into a gooey surprise that'll make everyone's eyes light up. Semi-sweet is my go-to, but milk chocolate or even white chocolate work beautifully. Just don't overfill - a little goes a long way when it's molten!
Spiced Dusting
Sometimes I swap out the cocoa powder in the dusting mix for warm spices. A half teaspoon of cinnamon makes them taste like churros, while cardamom gives this lovely floral note that pairs perfectly with the milky flavor. For holiday vibes, try a pinch of nutmeg or pumpkin spice blend. Pro tip: mix your spices with the sugar first to distribute them evenly - no one wants a mouthful of pure cinnamon!
See? Same easy recipe, brand new experiences. Next time, I might even try rolling some in crushed freeze-dried strawberries... ooh, or matcha powder! The possibilities are endless.
Serving and Storage Tips for Milky Donut Balls
Best Served Warm
Let's be honest - these Milky Donut Balls are at their absolute best about 30 seconds after dusting, when they're still warm enough to melt the sugar slightly but cool enough not to burn your tongue. That crisp exterior giving way to the fluffy interior? Pure magic. If you're serving them at a gathering, I recommend frying in batches and dusting right before serving - the "oohs" and "aahs" will be worth the extra effort!
Storing Leftovers
If by some miracle you have leftovers (it happens!), pop them in an airtight container at room temperature for up to a day. They'll lose some crispness but still taste delicious. To revive them, I like a quick 10-second zap in the microwave or a minute in a toaster oven - just enough to warm them through without drying out. Pro tip: wait to dust any leftovers until after reheating, otherwise the sugar can get sticky.
Helpful Notes for Perfect Milky Donut Balls
Yeast Activation
That "lukewarm milk" instruction isn't just a suggestion - it's the difference between fluffy clouds and hockey pucks! Too hot, and you'll kill the yeast; too cold, and it won't wake up properly. I test it like baby formula - a few drops on my wrist should feel warm but not hot. If your dough isn't rising after 30 minutes, your yeast might be old (I keep mine in the freezer to extend its life) or your kitchen's too chilly. No judgment - just pop the bowl in a slightly warmed oven (turn it off first!) to coax it along.
Oil Temperature
Frying is all about that Goldilocks zone - not too hot, not too cold. If the oil smokes, it's way too hot (burnt donuts = sad times). If the dough sinks and soaks up oil, it's too cold (greasy donuts = sadder times). Medium heat is your friend here - around 350°F if you're using a thermometer. No thermometer? The bread cube test never fails: if a tiny dough cube sizzles and floats to the surface in about 15 seconds, you're good to go. And remember - the oil temp drops when you add dough, so adjust the heat as needed between batches!
Frequently Asked Questions About Milky Donut Balls
Can I Bake Instead of Fry?
You totally can, but fair warning - they won't have that same irresistible crisp exterior. If you're baking, roll the dough balls in melted butter before popping them in a 375°F oven for about 12-15 minutes, turning halfway. They'll be more like soft dinner rolls with a sweet coating - still delicious, just different! I sometimes bake half and fry half when I'm feeling indecisive.
Can I Use Plant-Based Milk?
Absolutely! Almond milk, oat milk, or even coconut milk work great here. Just make sure it's unsweetened and warmed to that same lukewarm temperature. The milk powder is what gives that signature milky flavor, so don't skip it - most grocery stores carry plant-based milk powder now too if you're going fully dairy-free. The dough might behave slightly differently depending on your milk choice, but it'll still taste amazing.
My Dough Didn't Rise - What Now?
First, don't panic! Check if your yeast is expired (it happens to the best of us). If your kitchen's cold, try placing the bowl near a warm oven or in a slightly warmed microwave. No luck? You can still fry the dough - they'll be denser, more like donut holes, but still tasty. Next time, test your yeast in warm water with a pinch of sugar first to make sure it bubbles.
Final Thoughts
At the end of the day, these Milky Donut Balls are more than just a dessert-they're tiny edible hugs. There's something magical about how such simple ingredients can transform into these golden puffs of joy that make everyone gather around the kitchen. Whether it's a lazy Sunday morning or a last-minute "I need something sweet" moment, this recipe never lets me down. And honestly? The best part isn't even eating them (though that's pretty great)-it's watching faces light up at that first milky-sweet bite. Go make some memories with this recipe. Just don't blame me when your friends start texting you for the recipe!
Milky Donut Balls
Ingredients
For the Dough
- ⅔ cup lukewarm milk
- 1 teaspoon yeast
- 2 tablespoon milk powder
- 3 tablespoon sugar
- 3 tablespoon butter
- 1 ½ cups all-purpose flour
- salt to taste
For Dusting
- 1 tablespoon milk powder for dusting
- 1 tablespoon sugar for dusting
- 1 teaspoon cocoa powder for dusting
Instructions
- In a bowl, mix lukewarm milk, yeast, milk powder, sugar, and butter until well combined.
- Add all-purpose flour and salt to the mixture, then knead into a smooth dough.
- Cover the dough and let it rise until doubled in size.
- Shape the dough into small balls and fry them in hot oil until golden brown.
- Dust the fried donut balls with a mixture of milk powder, sugar, and cocoa powder.


Leave a Reply