
Every time I make Homemade Crunch Bars, I'm transported back to my childhood kitchen, where the sweet aroma of melting chocolate mingled with laughter and chatter. These delightful treats, with their rich chocolatey goodness and crispy texture, are not just a snack; they're a comforting hug in bar form. Quick to prepare and loved by everyone, they are perfect for sharing with family on cozy evenings or at festive gatherings.

What Is Homemade Crunch Bars?
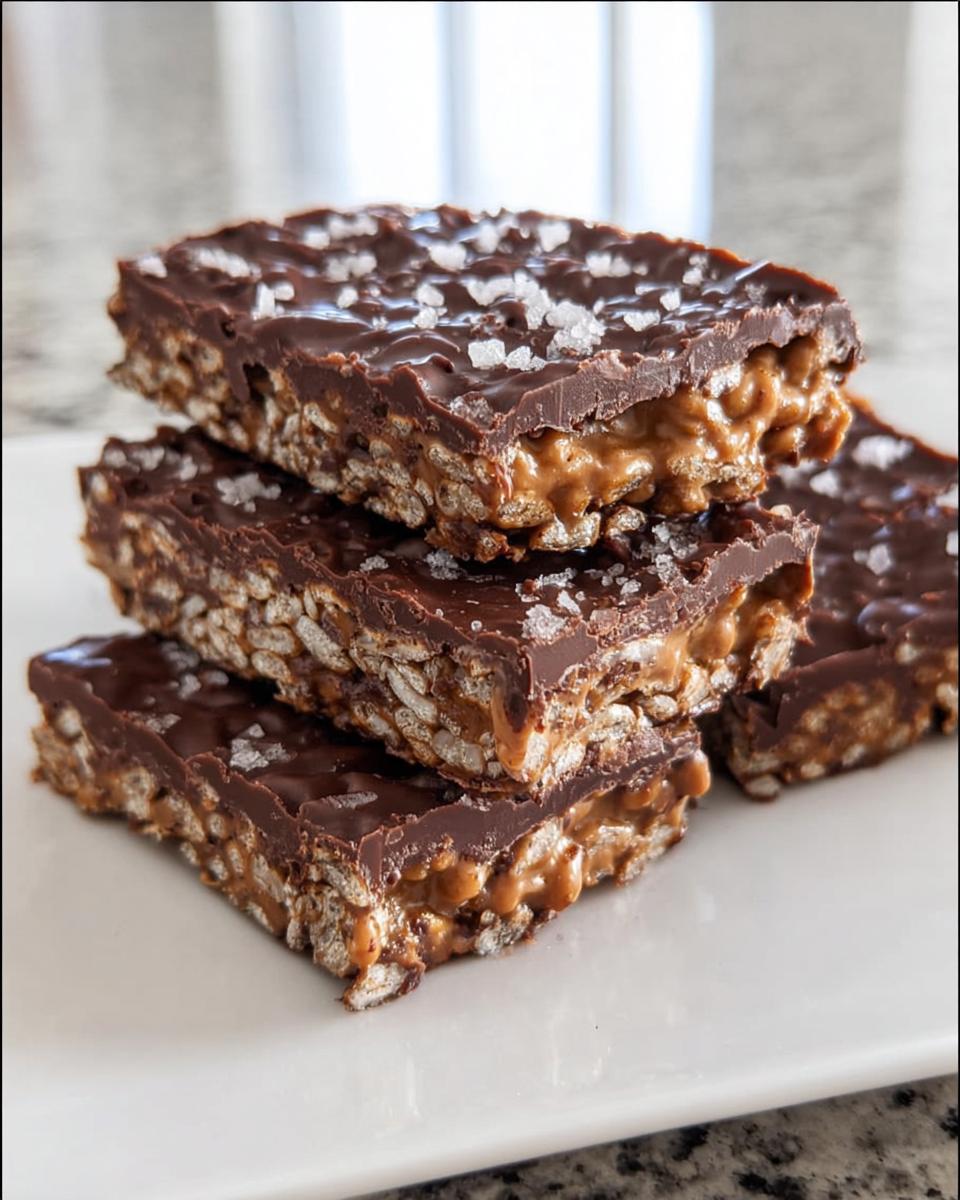
Homemade Crunch Bars are a delightful treat that combines the richness of chocolate and peanut butter with the satisfying crunch of rice krispies. These bars are incredibly simple to make and require no baking, making them a favorite for snack time or dessert. You can whip them up in just a few minutes!
- Prep Time: 10 minutes
- Cook Time: 0 minutes
- Total Time: 10 minutes
- Servings: 12 bars
Why You'll Love Homemade Crunch Bars
- Quick preparation: You can have these bars ready in just 10 minutes, making them a perfect last-minute treat.
- Simple ingredients: With just a few pantry staples, you can create a delicious snack that everyone will love.
- Beginner-friendly: This no-bake recipe is easy to follow, making it ideal for cooks of all skill levels.
- Perfect for gatherings: Whether it's a holiday party or a cozy get-together, these bars are sure to impress your guests.
- Make-ahead convenience: Prepare these bars in advance, and they'll be ready whenever a sweet craving strikes!
Ingredients You'll Need
- 1 ½ cups chocolate chips (use semi-sweet for a classic taste)
- ⅓ cup peanut butter (creamy or crunchy, depending on your preference)
- 1 cup rice krispies (for the perfect crunch, fresh is best)
- Flaked sea salt (optional, for a delightful contrast to the sweetness)
For a nut-free option, you can substitute the peanut butter with sunflower seed butter or any other nut-free spread. Always choose high-quality chocolate chips for a richer flavor. If you prefer a vegan version, look for dairy-free chocolate chips and natural peanut butter without added sugars. For more information on allergen labeling, consult official guidelines.
Step-by-Step Instructions
Preparing the Ingredients
- Gather all your ingredients: chocolate chips, peanut butter, and rice krispies. Having everything ready makes the process seamless.
- Measure out 1 ½ cups of chocolate chips, ⅓ cup of peanut butter, and 1 cup of rice krispies. Use a dry measuring cup for accurate amounts.
Mixing the Chocolate and Peanut Butter
- In a mixing bowl, combine the measured chocolate chips and peanut butter.
- Melt the mixture in the microwave in 30-second intervals, stirring after each interval until smooth. This usually takes about 1-2 minutes.
- Ensure the mixture is completely melted and well combined for a creamy texture that will coat the rice krispies beautifully.
- Pro Tip: Avoid overheating the chocolate to prevent it from seizing. Stir gently to maintain that silky smoothness.
Adding the Rice Krispies
- Once your chocolate and peanut butter mixture is smooth, gently fold in the 1 cup of rice krispies.
- Stir until the rice krispies are fully coated, ensuring every crunchy piece is enveloped in that decadent chocolate-peanut butter blend.
- Be careful not to crush the rice krispies; you want to maintain that delightful crunch!
Spreading and Topping
- Lightly grease a baking dish (an 8x8 inch dish works well) or line it with parchment paper for easy removal.
- Transfer the mixture into the baking dish, using a spatula to spread it evenly.
- If desired, sprinkle flaked sea salt over the top for a touch of gourmet flair and to balance the sweetness.
Cooling and Cutting
- Allow the mixture to cool at room temperature for about 30 minutes, or refrigerate for faster setting.
- Once set, lift the mixture out of the dish using the parchment paper (if used) and place it on a cutting board.
- Cut into 12 equal bars, using a sharp knife for clean edges.
- Pro Tip: Wipe the knife with a damp cloth between cuts for neater bars and to avoid sticking.
Variations
- Add ½ cup of mini marshmallows for a gooey twist.
- Incorporate dried fruit like cranberries or raisins for a fruity flavor.
- Substitute almond butter or cashew butter for a different nutty taste.
- Drizzle melted white chocolate over the top for extra sweetness and visual appeal.
- For a seasonal touch, mix in crushed peppermint candies during the holidays.
Serving and Storage Tips
Serving
These Homemade Crunch Bars are perfect for serving at parties, picnics, or as an after-school snack. Pair them with a glass of cold milk or a warm cup of tea for a delightful treat that everyone will love!
Storage
Store the bars in an airtight container at room temperature for up to one week. For longer storage, you can refrigerate them for up to two weeks or freeze for up to three months. Just make sure to separate layers with parchment paper to prevent sticking.
Common Mistakes
- Overheating the chocolate: Melt in short intervals and stir frequently to prevent seizing.
- Not greasing the baking dish: This can make removal difficult; use parchment paper for easy lifting.
- Overmixing the rice krispies: Gently fold them in to maintain their crunch and texture.
- Cutting bars too soon: Allow the mixture to set completely for cleaner cuts and better structure.
Helpful Notes
- For a healthier option, use dark chocolate chips with a higher cocoa content.
- Feel free to add protein powder to the mixture for an extra nutritional boost.
- Use puffed rice instead of rice krispies for a different texture.
- If you have nut allergies, opt for seed butters like sunflower seed butter.
Frequently Asked Questions
Can the recipe be frozen?
Yes, you can freeze Homemade Crunch Bars! Simply wrap them tightly in plastic wrap or aluminum foil and place them in an airtight container. They will keep well in the freezer for up to three months. Just thaw them at room temperature for a bit before enjoying!Can ingredients be substituted?
Absolutely! You can substitute peanut butter with any nut or seed butter, like almond or sunflower seed butter, to accommodate allergies. For a dairy-free option, choose dairy-free chocolate chips. You can also use honey or agave syrup instead of peanut butter for a different flavor profile.How to store leftovers?
Store any leftover crunch bars in an airtight container at room temperature for up to a week. If you want to keep them fresh longer, refrigerate them for up to two weeks. Just make sure to separate layers with parchment paper to prevent sticking.Can the recipe be made ahead?
Yes, this recipe is perfect for making ahead! You can prepare the bars a day or two in advance. Just store them in an airtight container at room temperature or in the refrigerator until you’re ready to serve. They’ll be just as delicious!Final Thoughts
Homemade Crunch Bars are not just a treat; they're a sweet reminder of the joy that comes from sharing delicious moments with loved ones. I encourage you to gather your family or friends and whip up a batch of these delightful bars. They're perfect for any occasion and will surely bring smiles to faces young and old. Enjoy the process, savor the flavors, and create memories that will last a lifetime! For more sweet treat inspiration, check out these raspberry coconut magic bars or these monster cookie bars.
Homemade Crunch Bars
Equipment
- Mixing bowl
- baking dish
Ingredients
For the Crunch Bars
- 1 ½ cups chocolate chips
- ⅓ cup peanut butter
- 1 cup rice krispies
Optional Topping
- Flaked sea salt optional
Instructions
- Melt the chocolate chips and peanut butter in a mixing bowl, stirring until smooth.
- Stir in the rice krispies until fully coated. Spread the mixture into a baking dish.
- Sprinkle flaked sea salt on top if desired. Let it cool and set before cutting into bars.
Leave a Reply