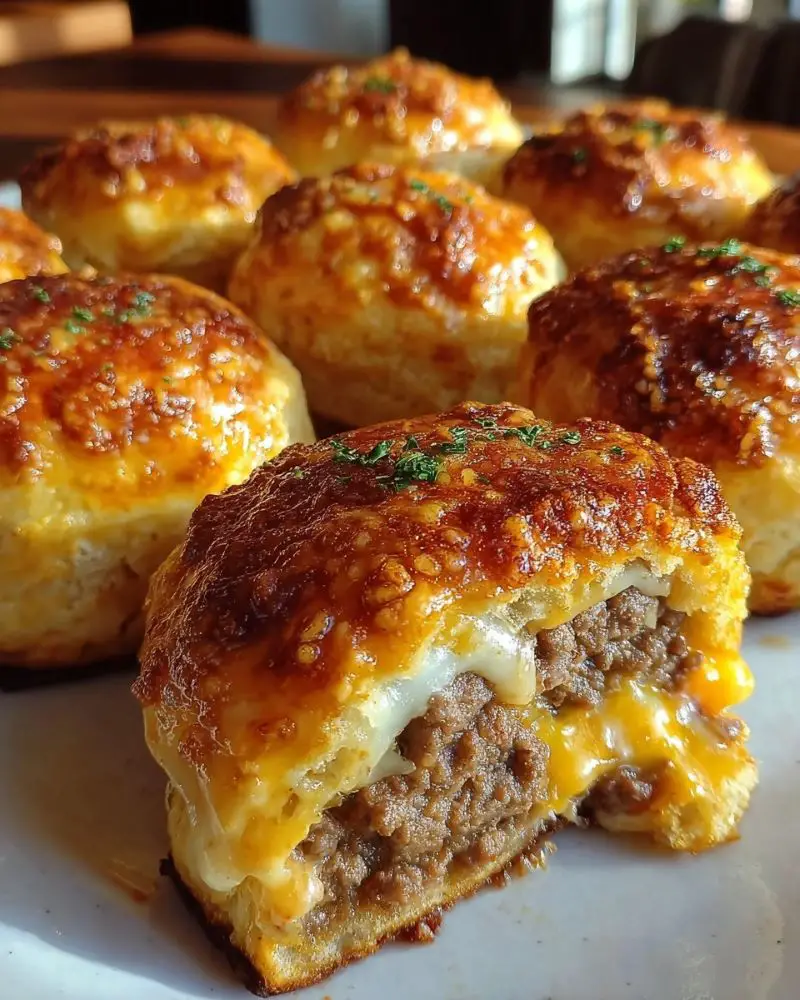
There's something downright magical about bite-sized, golden, gooey, meaty treats straight from the oven-and these Garlic Parmesan Cheeseburger Bombs are exactly that kind of magic. The first time I made them was on a rainy Friday evening when the kids wanted burgers but I didn't want to fire up the grill. I had some biscuit dough in the fridge and ground beef on hand, and inspiration struck! I wrapped all the savory goodness of a cheeseburger into a warm, buttery, garlicky dough pocket, and it was love at first bite.
Perfect for game day, busy weeknights, or a casual party appetizer, these cheeseburger bombs are a crowd-pleaser. They're also an excellent way to get creative with leftovers and pantry staples. The crispy, golden exterior is brushed with garlic butter and sprinkled with fresh Parmesan, making every bite as irresistible as the last.
Why You'll Love Garlic Parmesan Cheeseburger Bombs
- Quick and Easy: Ready in just about 35 minutes from start to finish.
- Kid-Friendly: Even picky eaters love these cheesy, hand-held bites.
- Customizable Fillings: Add bacon, pickles, caramelized onions-whatever you love in a burger!
- Freezer-Friendly: Make a batch and freeze for a grab-and-go snack or lunch.
- Minimal Cleanup: Only one skillet and one baking sheet needed.
- Perfect for Parties: These are the ultimate finger food for gatherings and potlucks.
Ingredients You'll Need
- 1 pound ground beef
Choose 85/15 for a good balance of flavor and less grease. - Salt, pepper, garlic powder, and onion powder to taste
Season generously-the dough will mellow out the flavor. - 1 tablespoon Worcestershire sauce
Adds deep, savory umami flavor. - 1 cup shredded cheddar or mozzarella cheese
Or try a mix for the perfect gooey melt. - Optional fillings: crispy bacon, pickles, or caramelized onions
Adds texture and boosts burger flavor. - 1 tube refrigerated biscuit or pizza dough
Cut into 8-12 pieces and flatten into discs. - 2 tablespoons butter, melted
For brushing the tops before baking. - 1 teaspoon minced garlic or garlic powder
Mix with butter for that garlic bread aroma. - 2 tablespoons Parmesan cheese, freshly grated
Sprinkle over tops for a crispy, savory crust.
Step-by-Step Instructions
- Preheat the Oven
Set your oven to 375°F (190°C) so it's hot and ready when you are. - Cook the Beef
- In a large skillet over medium heat, add the ground beef.
- Season with salt, pepper, garlic powder, onion powder, and Worcestershire sauce.
- Cook until fully browned, about 6-8 minutes.
- Drain any excess fat, then remove from heat.
- Add the Cheese and Optional Fillings
- While the beef is still warm, stir in the shredded cheese.
- Add any extras like chopped bacon, diced pickles, or caramelized onions.
- Prepare the Dough
- Open the tube of biscuit or pizza dough.
- Cut into 8 to 12 even pieces, depending on how large you want each bomb.
- Flatten each piece into a round disc using your hands or a rolling pin.
- Fill and Seal the Bombs
- Place a heaping spoonful of the beef mixture in the center of each disc.
- Gently pull the edges up and around the filling.
- Pinch to seal completely, forming a ball.
- Place seam-side down on a parchment-lined baking sheet.
- Make Garlic Butter Topping
- In a small bowl, mix melted butter with minced garlic or garlic powder.
- Brush generously over each dough ball.
- Sprinkle the tops with grated Parmesan cheese.
- Bake
- Place the baking sheet in the preheated oven.
- Bake for 15-20 minutes, or until the tops are golden brown and puffed.
- Cool Slightly and Serve
- Let the cheeseburger bombs cool for 5 minutes before serving.
- They'll be piping hot inside!
Serving and Storage Tips
Serving Ideas:
- Serve these warm with classic burger condiments-ketchup, mustard, ranch, or even a spicy aioli.
- Great alongside fries, a crisp green salad, or coleslaw.
- Perfect for party platters or as a hearty snack for game day.
Storage:
- Store cooled leftovers in an airtight container in the fridge for up to 4 days.
- To reheat, place in a 350°F oven for 10 minutes or microwave in 30-second bursts until warmed through.
Freezing:
- Let the baked bombs cool completely.
- Freeze in a single layer on a baking sheet, then transfer to a freezer-safe bag.
- To reheat from frozen, bake at 350°F for 15-20 minutes.
Helpful Notes
- Dough Choice: Biscuit dough gives a flakier, buttery crust, while pizza dough offers a chewier texture-both work great.
- Add-Ins: Diced jalapeños, sautéed mushrooms, or even a slice of cheese-stuffed jalapeño for a spicy twist.
- Cheese Options: Try pepper jack, Swiss, or gouda for a unique flavor.
- Allergy-Friendly Adjustments: Use gluten-free dough or dairy-free cheese as needed.
- Mini Version: Cut smaller dough pieces and reduce filling for bite-sized bombs-perfect for appetizers.
Frequently Asked Questions
- Can I freeze Garlic Parmesan Cheeseburger Bombs?
Yes! They freeze beautifully. Let them cool fully, freeze on a tray, then transfer to a zip bag. Reheat at 350°F until warmed through. - What if I don't have biscuit dough?
Pizza dough is a great substitute, or you can even use homemade dough if you prefer. - Can I make these ahead of time?
Absolutely. Assemble the bombs, store in the fridge covered for up to 24 hours, and bake when ready. - What dipping sauces go well with this?
Ketchup, mustard, ranch, garlic aioli, or even marinara all work deliciously. - Do these reheat well?
Yes! Reheat in the oven for the best texture. The microwave works in a pinch but may soften the crust.
Final Thoughts
Whether you're feeding a hungry family, planning your next party, or just craving something cheesy and comforting, these Garlic Parmesan Cheeseburger Bombs deliver every single time. They're simple, satisfying, and endlessly adaptable-everything you want in a homemade comfort food.
I've tested this recipe more times than I can count, and it never fails to earn rave reviews. Don't be surprised if these become a new family favorite! If you give them a try, I'd love to hear how they turned out. Leave a comment below or tag your cheesy creations with #CheeseburgerBombs on social media!

Garlic Parmesan Cheeseburger Bombs
Ingredients
- 1 pound ground beef
- Salt pepper, garlic powder, and onion powder to taste
- 1 tablespoon Worcestershire sauce
- 1 cup shredded cheddar or mozzarella cheese
- Optional: crispy bacon pickles, or caramelized onions
- 1 tube refrigerated biscuit or pizza dough cut into 8-12 pieces and flattened
- 2 tablespoons butter melted
- 1 teaspoon minced garlic or garlic powder
- 2 tablespoons Parmesan cheese freshly grated
Instructions
- Preheat oven to 375°F (190°C).
- In a skillet over medium heat, cook the ground beef with seasonings and Worcestershire sauce until browned. Drain fat.
- Remove from heat and stir in cheese and optional fillings.
- Flatten dough pieces into discs.
- Spoon filling into the center of each disc. Fold and pinch edges to seal.
- Place seam-side down on a parchment-lined baking sheet.
- Mix melted butter with garlic and brush over each dough ball.
- Sprinkle tops with grated Parmesan.
- Bake for 15-20 minutes until golden brown.
- Cool for 5 minutes before serving.
Notes
- Pizza dough = chewier texture; biscuit dough = flakier crust.
- Add-ins like jalapeños, mushrooms, or different cheeses are great!
- Freezer-friendly: bake first, cool, then freeze and reheat as needed.
- Allergy-friendly swaps: use gluten-free dough or dairy-free cheese.


Leave a Reply