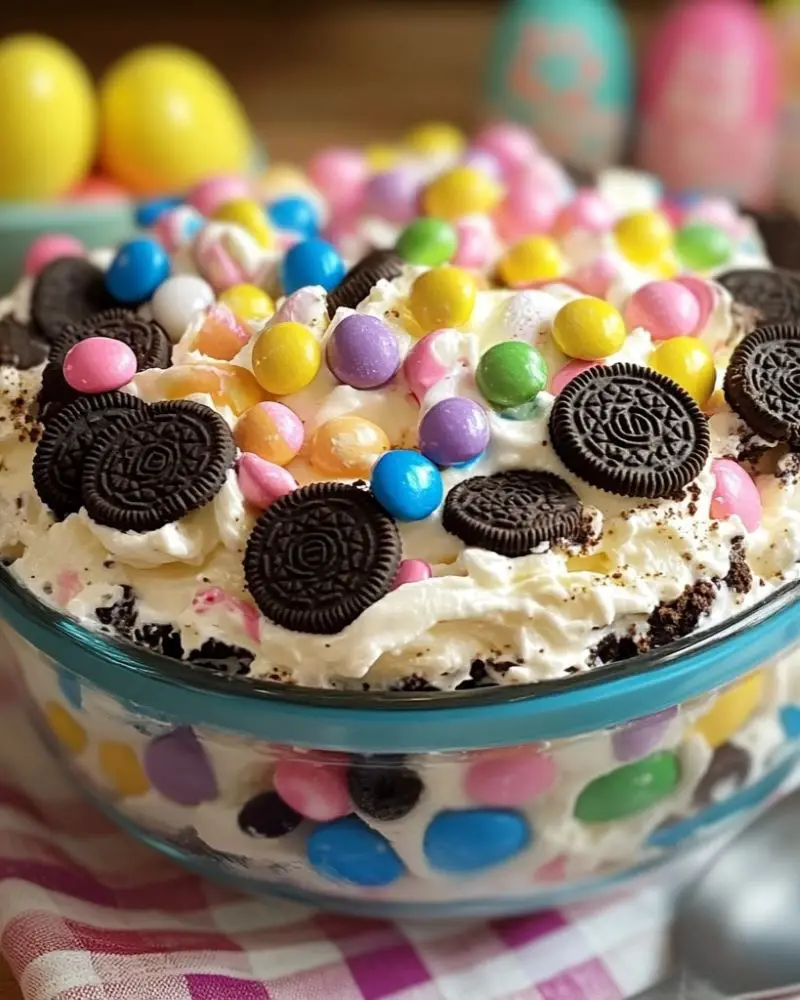
Easter celebrations in our home have always been about fun, color, and delicious desserts. One year, I decided to take a classic Oreo dessert and give it a festive spring makeover-and that's how the Easter Oreo Cookie Casserole was born. With layers of creamy filling, pastel candy eggs, and a crunchy cookie crust, it quickly became an Easter must-have.

This no-bake treat is just as cute as it is tasty, making it a hit with kids and adults alike. It's easy to prepare, can be made ahead, and is perfect for potlucks or family dinners.
Why You'll Love This Recipe
- Festive and Fun: Perfect for Easter gatherings and spring celebrations.
- No-Bake Wonder: No oven required, just mix, layer, and chill.
- Kid-Friendly: Easy to make and fun to decorate.
- Rich and Creamy: Layers of Oreo, pudding, and whipped topping.
- Make-Ahead Friendly: Prepares beautifully a day in advance.
- Customizable Toppings: Switch candies to match any holiday.
Ingredients You'll Need
- 1 package (14 oz) chocolate sandwich cookies, finely crushed
- 8 oz cream cheese, softened
- ¼ cup unsalted butter, softened
- 1 cup powdered sugar
- 1 package (3.4 oz) instant vanilla pudding mix
- 2 cups cold milk
- 8 oz whipped topping, thawed
- 1 cup pastel-colored candy-coated chocolates (like M&Ms or candy eggs)
- ½ cup mini chocolate sandwich cookies, for garnish
Substitution Ideas:
- Use golden Oreos for a vanilla twist.
- Swap vanilla pudding for lemon or cheesecake flavor.
- Add coconut flakes or sprinkles for extra texture and color.
Step-by-Step Instructions
Step 1: Prepare the Crust
Crush the cookies using a food processor or a zip-top bag and rolling pin. Set aside ½ cup for topping. Press the remaining crumbs into the bottom of a 9x13-inch dish to form a crust.
Tip: For a firmer crust, chill the base while preparing the filling.
Step 2: Make the Cream Cheese Layer
In a large mixing bowl, beat together the cream cheese, butter, and powdered sugar until smooth and fluffy.
Step 3: Prepare the Pudding
In a separate bowl, whisk the vanilla pudding mix with cold milk for 2 minutes, or until thickened.
Step 4: Combine Layers
Fold the pudding into the cream cheese mixture, then gently fold in half of the whipped topping.
Spread the mixture evenly over the crust.
Step 5: Top and Decorate
Spread the remaining whipped topping over the cream layer.
Sprinkle the reserved cookie crumbs, pastel candies, and mini sandwich cookies on top.
Step 6: Chill and Serve
Cover and chill for at least 2 hours, or overnight for best results.
Slice into 12 squares and serve chilled.
Serving and Storage Tips
Serve cold from the fridge for best texture. Garnish with additional candy just before serving if needed. Store covered in the refrigerator for up to 3 days.
Avoid freezing, as the texture of the cream layers and cookies may change.
Helpful Notes
- Use Full-Fat Cream Cheese: For a creamier texture.
- Chill Tools: Use a cold bowl for whipping to maintain consistency.
- Decorate Creatively: Add sugar bunnies, sprinkles, or edible flowers.
- Neat Slicing: Use a clean, sharp knife and wipe between cuts.
Frequently Asked Questions
- Can I make this dessert the night before?
Yes, and it's even better when chilled overnight. - Can I use homemade whipped cream?
Absolutely! Use 3 cups of whipped cream in place of store-bought. - What if I don't have a food processor?
Use a rolling pin and zip-top bag to crush the cookies. - Can I freeze this casserole?
Freezing is not recommended as it alters the creamy texture. - What other toppings can I use?
Crushed cookies, sprinkles, coconut, jelly beans, or chocolate shavings all work great. - Is this safe to leave out for a party?
Keep refrigerated until serving and don't leave out longer than 2 hours.
Final Thoughts
Easter Oreo Cookie Casserole is a charming, creamy dessert that brings smiles with every bite. It's easy, festive, and perfect for making memories around the table. Whether you're hosting brunch or need a sweet spring treat, this no-bake beauty is sure to please.
Have you made this Easter treat? Let me know your favorite candy mix-ins or topping twists!

Easter Oreo Cookie Casserole
Ingredients
- 1 package 14 oz chocolate sandwich cookies, finely crushed
- 8 oz cream cheese softened
- ¼ cup unsalted butter softened
- 1 cup powdered sugar
- 1 package 3.4 oz instant vanilla pudding mix
- 2 cups cold milk
- 8 oz whipped topping thawed
- 1 cup pastel-colored candy-coated chocolates like M&Ms or candy eggs
- ½ cup mini chocolate sandwich cookies for garnish
Substitution Ideas:
- Use golden Oreos for a vanilla twist.
- Swap vanilla pudding for lemon or cheesecake flavor.
Instructions
Step 1: Prepare the Crust
- Crush the cookies using a food processor or a zip-top bag and rolling pin. Set aside ½ cup for topping. Press the remaining crumbs into the bottom of a 9×13-inch dish to form a crust.
- Tip: For a firmer crust, chill the base while preparing the filling.
Step 2: Make the Cream Cheese Layer
- In a large mixing bowl, beat together the cream cheese, butter, and powdered sugar until smooth and fluffy.
Step 3: Prepare the Pudding
- In a separate bowl, whisk the vanilla pudding mix with cold milk for 2 minutes, or until thickened.
Step 4: Combine Layers
- Fold the pudding into the cream cheese mixture, then gently fold in half of the whipped topping.
- Spread the mixture evenly over the crust.
Step 5: Top and Decorate
- Spread the remaining whipped topping over the cream layer.
- Sprinkle the reserved cookie crumbs, pastel candies, and mini sandwich cookies on top.
Step 6: Chill and Serve
- Cover and chill for at least 2 hours, or overnight for best results.
- Slice into 12 squares and serve chilled.
Notes
- Use Full-Fat Cream Cheese: For a creamier texture.
- Chill Tools: Use a cold bowl for whipping to maintain consistency.
- Decorate Creatively: Add sugar bunnies, sprinkles, or edible flowers.
- Neat Slicing: Use a clean, sharp knife and wipe between cuts.


Leave a Reply