Every winter, as the first snowflakes start to dance down from the sky, I find myself craving something warm and indulgent. That's when I whip up my Decadent Hot Cocoa Cheesecake, a dessert that beautifully marries two of my favorite treats: rich chocolate cheesecake and cozy hot cocoa. I remember the joy on my kids' faces as they dig into a slice on chilly evenings, their laughter filling the kitchen as they sip cocoa and share stories from their day. It's a tradition that warms my heart and brings us all closer together.
Perfect for holiday gatherings or just a sweet treat to brighten a winter day, this cheesecake is creamy, luscious, and entirely unforgettable. The combination of velvety cream cheese and the comforting flavors of hot cocoa creates a dessert that feels like a big hug. Plus, it's a showstopper on any dessert table, making it a go-to for special occasions. Trust me, once you try this Decadent Hot Cocoa Cheesecake, it'll become a cherished favorite in your home too!

Why You'll Love "Decadent Hot Cocoa Cheesecake"
- Quick prep time of just 30 minutes, perfect for busy evenings.
- Minimal ingredients that you probably already have in your pantry.
- Family-friendly dessert that kids and adults alike will adore.
- Can be made ahead of time, saving you stress on special occasions.
- Freezer-friendly, so you can prepare it in advance and enjoy it later.
- Ultimate comfort food that combines the best of cheesecake and hot cocoa.
Ingredients You'll Need
For the Crust
- 2 cups chocolate cookie crumbs (Use store-bought chocolate crust if short on time)
- ½ cup unsalted butter, melted
For the Cheesecake Filling
- 16 oz cream cheese, at room temperature (This ensures a smooth texture)
- 1 cup granulated sugar
- 3 large eggs, at room temperature
- 1 cup hot cocoa mix (Your favorite brand for the best flavor)
For the Topping
- 1 cup heavy cream (Whip until soft peaks form for a light texture)
- 1 cup marshmallow fluff (Available in bulk, adds a fun touch)
Step-by-Step Instructions
Preheat the Oven
- First things first, let's get that oven preheating! Set it to 325°F (163°C). This is the perfect temperature for creating a beautifully baked cheesecake.
Make the Crust
- In a mixing bowl, combine the chocolate cookie crumbs with the melted unsalted butter. The mixture should look like wet sand - this is what will hold it all together!
- Press this mixture firmly into the bottom of a springform pan. I like to use the bottom of a measuring cup to really pack it down. This crust is key, so don't skip this step!
Prepare the Filling
- In another bowl, beat the room temperature cream cheese and granulated sugar together until it's smooth and creamy. You want to make sure there are no lumps - so take your time with this!
- Now, add the eggs one at a time, mixing well after each addition. This helps to incorporate air into the batter, making it light and fluffy.
- Stir in the hot cocoa mix until fully combined. This is where the magic happens - the aroma is already heavenly!
Bake the Cheesecake
- Pour the cheesecake filling over your prepared crust. Take a spatula and smooth the top, making it look pretty.
- Pop it into the oven and bake for about 60 minutes. You'll know it's done when the center is set but still slightly jiggly. Don't worry, it'll firm up as it cools!
Cool and Refrigerate
- Once the baking time is up, turn off the oven and let the cheesecake cool in there for about an hour. This helps prevent cracks on the surface.
- After that, transfer it to the fridge and let it chill for at least 4 hours, or even overnight if you can wait! This step is crucial for the best texture and flavor.
Whip the Topping
- When you're ready to serve, grab that heavy cream and whip it until soft peaks form. It should be fluffy and just hold its shape - perfect for spreading!
- Spread the whipped cream generously over the chilled cheesecake. Don't be shy with this topping!
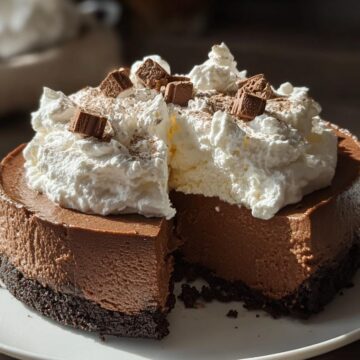
- Finally, top it off with a dollop of marshmallow fluff. This adds that fun, cozy hot cocoa vibe that makes this dessert extra special.
Variations
- Use dark chocolate cookie crumbs for a richer crust flavor.
- Add a sprinkle of peppermint extract to the cheesecake for a festive twist.
- Substitute the cream cheese with dairy-free cream cheese for a dairy-free version.
- Incorporate crushed candy canes into the topping for a holiday theme.
- Try adding a layer of chocolate ganache on top before the whipped cream for extra indulgence!
Serving and Storage Tips
Serving
Serve your Decadent Hot Cocoa Cheesecake chilled for the best flavor. A drizzle of chocolate sauce or a sprinkle of cocoa powder on top can elevate the presentation. Pair it with a warm cup of hot cocoa for the ultimate cozy experience!
Storage
Store any leftovers in an airtight container in the fridge for up to 5 days. If you want to save it for later, wrap it tightly in plastic wrap and freeze for up to 2 months. Just thaw in the fridge overnight before serving!
Helpful Notes
- If you prefer a lighter cheesecake, consider using reduced-fat cream cheese.
- For a nutty flavor, you can add crushed nuts to the crust mixture.
- Make sure your cream cheese is at room temperature for optimal mixing.
- For a gluten-free version, swap chocolate cookie crumbs with gluten-free cookies.
- Optional add-ins like chocolate chips can enhance the filling for extra texture.
Frequently Asked Questions
Can I freeze the Decadent Hot Cocoa Cheesecake?
Absolutely! You can freeze the cheesecake for up to 2 months. Just wrap it tightly in plastic wrap and then in aluminum foil to prevent freezer burn. When you're ready to enjoy it, let it thaw in the fridge overnight.
What can I use instead of cream cheese?
If you're looking for a substitute, you can use mascarpone cheese for a similar creamy texture. For a dairy-free option, try a dairy-free cream cheese or blended silken tofu, which can work surprisingly well!
How do I make this cheesecake gluten-free?
To make this cheesecake gluten-free, simply swap the chocolate cookie crumbs with gluten-free chocolate cookies or graham crackers. Just make sure to check the labels to ensure they are certified gluten-free.
Can I use a different type of cocoa mix?
Yes! Feel free to use any hot cocoa mix you love. Just keep in mind that different brands may have varying levels of sweetness, so you might want to adjust the sugar in the recipe accordingly to get that perfect balance.
Final Thoughts
I hope you're feeling inspired to whip up this Decadent Hot Cocoa Cheesecake! It's a dessert that not only satisfies your sweet tooth but also creates those cozy moments with loved ones, like sharing stories over slices after dinner. Remember, it's all about enjoying the process, even if things get a bit messy. So gather your ingredients, channel your inner chef, and let the delightful aromas fill your kitchen. I can't wait for you to taste it and see those smiles on your family's faces. Trust me, this cheesecake is going to be a new favorite!
Decadent Hot Cocoa Cheesecake
Equipment
- Springform pan
- Mixing bowl
Ingredients
For the Crust
- 2 cups chocolate cookie crumbs Use store-bought chocolate crust if short on time
- ½ cup unsalted butter Melted
For the Cheesecake Filling
- 16 oz cream cheese Room temperature
- 1 cup granulated sugar
- 3 large eggs Room temperature
- 1 cup hot cocoa mix Your favorite brand
For the Topping
- 1 cup heavy cream Whip until soft peaks form
- 1 cup marshmallow fluff Available in bulk
Instructions
- Preheat the oven to 325°F (163°C).
- In a mixing bowl, combine chocolate cookie crumbs and melted butter. Press mixture into the bottom of a springform pan to form the crust.
- In another bowl, beat cream cheese and sugar until smooth. Add eggs one at a time, mixing well after each addition. Stir in hot cocoa mix until fully combined.
- Pour the cheesecake filling over the crust and smooth the top. Bake for 60 minutes or until the center is set.
- Let the cheesecake cool, then refrigerate for at least 4 hours or overnight.
- Before serving, whip heavy cream until soft peaks form and spread over the cheesecake. Top with marshmallow fluff.


Leave a Reply