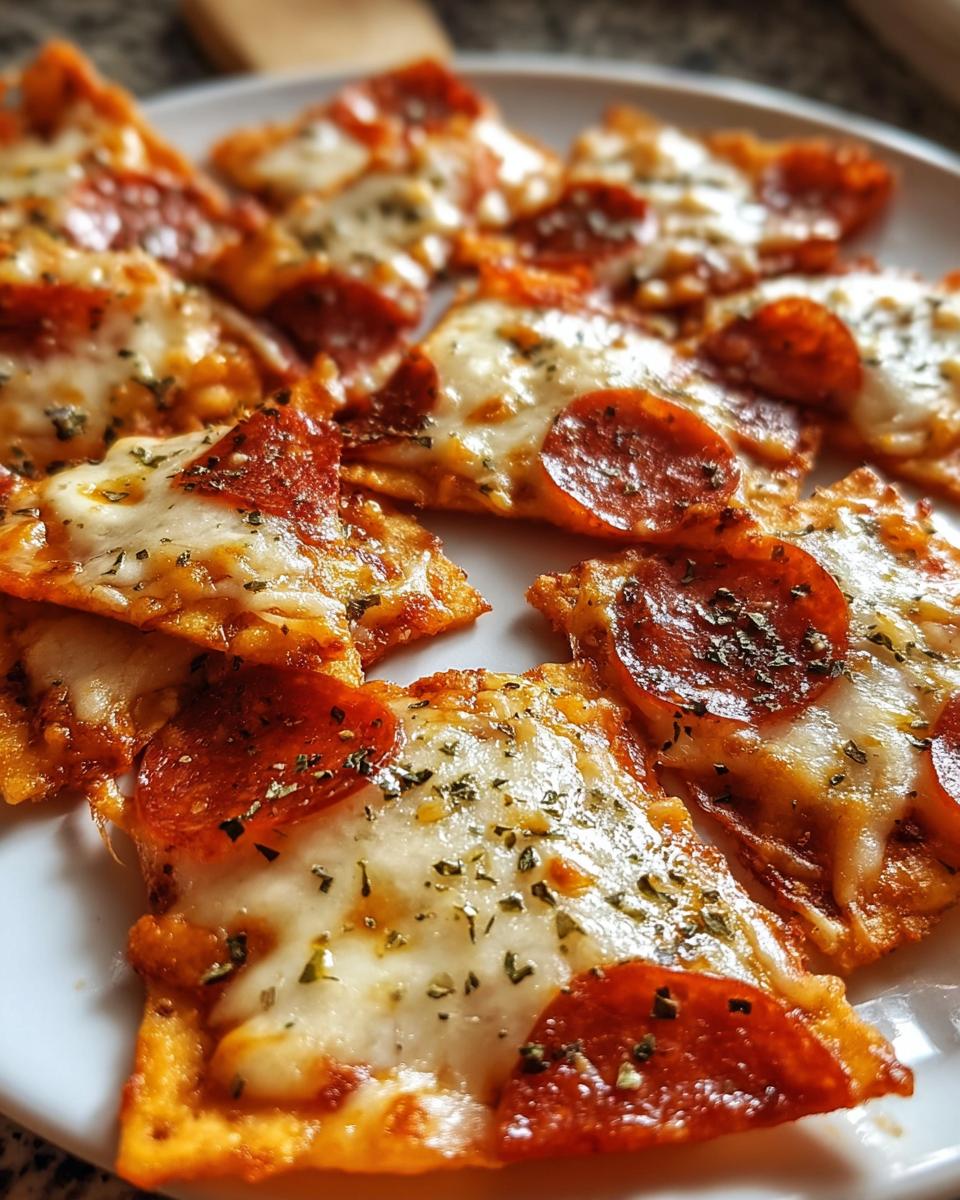
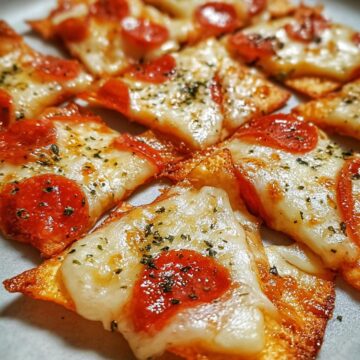
Oh my gosh, you guys, I have to tell you about my latest snack obsession-Crispy Pizza Chips! You know those nights when you're craving pizza but don't want to deal with delivery or making dough? Yeah, me too. That's how these little crispy miracles were born in my kitchen last movie night. I was rummaging through my pantry, found some tortillas, and thought-why not turn these into pizza bites? Twenty minutes later, I was dunking these golden, cheesy triangles into marinara sauce like they were the best thing since sliced bread (or should I say, sliced pizza?).
What I love most about Crispy Pizza Chips is how ridiculously easy they are to make. Seriously, if you can spread sauce and sprinkle cheese, you're already halfway there. They're perfect for game day, after-school snacks, or when you need a quick appetizer that'll disappear faster than you can say "more please!" And the best part? You can customize them with whatever toppings you have on hand-pepperoni for the classic lovers, veggies for the health-conscious, or even pineapple if you're one of those controversial pineapple-on-pizza people (no judgment here!).

Why You'll Love Crispy Pizza Chips
Listen, I don't want to oversell these, but… okay, I totally do. These Crispy Pizza Chips are about to become your new favorite snack, and here's why:
- Crunch-tastic texture: That perfect golden crispiness? It's like the best part of a pizza crust and a tortilla chip had a delicious baby.
- Customizable AF: Got picky eaters? No problem. Make half pepperoni, half veggie-everyone gets exactly what they want.
- Ready in 20 minutes: From pantry to plate faster than delivery could even find your address.
- Kid-approved magic: My niece calls them "pizza cookies" and honestly? She's not wrong. They disappear faster than crayons in a toddler's hands.
- Party superstar: Stack 'em high on a platter at your next gathering and watch them vanish. Bonus: way more impressive than plain chips!
Seriously, once you try these, you'll wonder how you ever snacked without them. They're like pizza's fun, bite-sized cousin who always brings the good vibes.
Ingredients You'll Need for Crispy Pizza Chips
Okay, let's talk ingredients-this is where the magic starts! The beauty of these pizza chips is you probably have most of this stuff already. And if you don't? No stress, because substitutions are totally welcome here. Here's what you'll need:
For the Chips
- 4 tortillas (6-inch size) - Corn gives you that extra crunch I love, but flour works great if you want a slightly softer bite. Go wild with flavored ones like spinach or tomato if you're feeling fancy!
- ½ cup pizza sauce - The thicker the better here, folks. I usually grab marinara in a pinch, but if your store has actual pizza sauce? Even better. Pro tip: if your sauce is runny, simmer it for 5 minutes to thicken it up.
For the Toppings
- 1 cup shredded mozzarella (packed) - That's about 4 oz if you're buying a block to grate yourself (which I highly recommend-it melts so much better!). Feel free to mix in cheddar, provolone, or even a sprinkle of Parmesan for extra flavor.
- Your favorite toppings! Here's where you make it yours:
- Pepperoni - Thinly sliced or chopped into bits
- Bell peppers - Finely diced (about ¼ cup)
- Black olives - Sliced (2 tbsp)
- Mushrooms - Thinly sliced (¼ cup)
Seriously, raid your fridge-leftover grilled chicken, bacon bits, even pineapple chunks work!
For Seasoning
- 1 teaspoon Italian seasoning - That classic pizza flavor. No Italian blend? Just use dried oregano or basil.
- ½ teaspoon garlic powder - Because everything's better with garlic. Always.
- Pinch of crushed red pepper flakes (optional) - If you like a little heat like I do!
See? Nothing crazy here. Just good, simple ingredients ready to transform into something magical. Now let's get cooking!
Step-by-Step Crispy Pizza Chips Instructions
Alright, let's turn those ingredients into crispy, cheesy perfection! Don't worry-this is so easy you could probably do it half-asleep (though I don't recommend cooking while sleeping, safety first!). Here's exactly how to make your new favorite snack:
Prep the Tortillas
- Preheat your oven to 375°F (190°C) - This is the sweet spot for getting crispy edges without burning the cheese. Trust me, I've tested higher temps and ended up with little blackened hockey pucks. Not cute.
- Line a baking sheet with parchment paper - No sticking, no scrubbing pans later. Win-win! If you're out of parchment, a light spray of cooking oil works in a pinch.
- Cut your tortillas into triangles - I like to stack 2 tortillas at a time and cut them into 8 wedges each (like you're slicing a pizza). Want smaller bites? Go for 12 pieces per tortilla. Uneven shapes are totally fine-rustic is charming!
Add Sauce and Toppings
- Spread a thin layer of sauce - About ½ teaspoon per triangle is perfect. Use the back of a spoon to spread it almost to the edges but not quite-leave about ¼-inch border so the edges get extra crispy.
- Sprinkle on the cheese - A generous pinch per chip (about 1 tablespoon total). Don't overdo it or they'll get soggy. Pro tip: hold your hand high when sprinkling for more even coverage-it's like snow falling on a pizza landscape!
- Add your toppings - Keep them small and light so they don't weigh down the chips. One tiny pepperoni slice, a few veggie bits-you get the idea. This isn't a loaded pizza, it's pizza jewelry!
- Season it up - A light dusting of Italian seasoning, garlic powder, and red pepper flakes (if using) takes these from good to "OMG what is this sorcery?!"
Bake to Perfection
- Bake for 8-10 minutes - Set your timer for 8 minutes, but keep an eye out. You're looking for:
- Edges curling up slightly
- Tortilla turning golden brown
- Cheese fully melted with maybe a few bubbly brown spots
If your oven runs hot like mine does, they might be ready at 7 minutes. If you like them extra crispy, go the full 10.
- Let cool for 5 minutes - I know, waiting is hard! But this lets the cheese set so you don't burn your mouth (learned that the hard way). They'll crisp up even more as they cool.
And that's it! You've just made the easiest, crunchiest, most addictive pizza snack ever. Now try not to eat them all before they hit the serving plate-I believe in you!
Crispy Pizza Chips Variations
Okay, now for the fun part-let's talk variations! These pizza chips are like a blank canvas waiting for your creative touch. Here are some of my favorite ways to mix things up when I'm feeling adventurous:
- Gluten-free friends, rejoice! Just swap in your favorite GF tortillas. The corn ones actually get extra crispy, which I love.
- Vegan vibes? No problem. Use dairy-free cheese (the meltable kind works best) and load up with all the veggies. Mushrooms and caramelized onions make it next-level.
- BBQ Chicken Style - Swap pizza sauce for BBQ sauce, use cheddar cheese, and add shredded rotisserie chicken. Throw on some red onions after baking for crunch!
- Taco Tuesday Twist - Mexican-blend cheese, refried beans instead of sauce, and top with diced tomatoes and jalapeños after baking. Serve with salsa for dipping-YES.
- Breakfast Pizza Chips - Scramble some eggs with cheese, bake the chips plain, then top with the eggs and crumbled bacon. Brunch game = strong.
Honestly? The possibilities are endless. Whatever flavors you're craving, you can probably pizza-chip-ify them. Have fun with it-that's half the joy of cooking!
Serving and Storage Tips for Crispy Pizza Chips
Okay, real talk-these Crispy Pizza Chips are absolutely best eaten fresh out of the oven when they're at their peak crispiness. I mean, can you really resist that melty cheese and golden edges? Didn't think so. But if you somehow end up with leftovers (no judgment if you don't), here's how to handle them:
- Serve immediately for maximum crunch. Pile them high on a platter with extra marinara or ranch for dipping. Party trick: stand them up in a bowl like little pizza soldiers!
- Store leftovers (if any!) in an airtight container at room temp for up to 2 days. Layer them between parchment paper so they don't stick together.
- Reheat like a pro by popping them back in a 350°F oven for 3-5 minutes. The microwave will make them soggy-trust me, it's worth waiting for the oven.
Pro tip: They're surprisingly good cold the next day too-like fancy pizza croutons for your salad. Don't knock it 'til you try it!
Helpful Notes for Crispy Pizza Chips
Alright, let me share some hard-earned pizza chip wisdom with you-consider this your cheat sheet for crispy success:
- Sauce is a sneaky saboteur! Too much = soggy chips. Aim for a thin layer-you should still see some tortilla through it. Think "stain," not "paint job."
- Rotate that baking sheet halfway through if your oven heats unevenly (like mine that's apparently hotter on the left side). Nobody wants pale chips next to burnt ones!
- Low-fat cheese works fine if you're watching calories, but it won't brown as nicely. Mix in a little regular cheese for best results.
- Parchment paper is non-negotiable unless you enjoy scrubbing baked-on cheese. Speaking from experience here.
- Cut veggies super small-big chunks slide right off those tiny chips mid-bite. Dice them finer than you think you need to.
There you go-now you're armed with all my pizza chip secrets. Go forth and bake with confidence!
Frequently Asked Questions
I've gotten so many questions about these Crispy Pizza Chips since I started making them-here are the ones that pop up most often with my tried-and-true answers:
- Can I use pita bread instead of tortillas?
Absolutely! Pita makes great pizza chips-just split them in half first so they're thinner, then cut into wedges. They'll be a bit breadier than tortilla chips but still delicious. - How do I prevent sogginess?
Three golden rules: 1) Go light on the sauce (seriously, less is more), 2) Don't overload with toppings, and 3) Make sure your oven is fully preheated before baking. If they're still not crisp enough, try baking an extra minute or two. - Can I make these ahead of time?
You can prep the topped chips on the baking sheet and refrigerate for up to 2 hours before baking. But for best texture, bake them right before serving. - What's the best way to cut tortillas evenly?
I stack 2-3 at a time and use a pizza wheel-it's way faster than a knife! But honestly, rustic uneven chips taste just as good.
Got more questions? Slide into my DMs-I could talk pizza chips all day!
Final Thoughts
If there's one snack that never fails to make people's eyes light up, it's these Crispy Pizza Chips. They're the perfect mix of nostalgia (hello, pizza night!) and novelty (but bite-sized and extra crunchy!). What started as a lazy pantry raid has turned into my go-to for last-minute guests, after-school snacks, and those "I deserve a treat" moments. The best part? There are no rules-experiment with flavors, get the kids involved with toppings, or make a fancy version for your next wine night. Just promise me you'll make a double batch, because trust me-they disappear fast. Happy crunching!
Crispy Pizza Chips
Equipment
- Baking sheet
- Parchment paper
Ingredients
For the Chips
- Tortillas (corn or flour) Corn for crunch, flour for softer bite
- Pizza sauce or marinara sauce Thicker sauces work best
For the Toppings
- Shredded mozzarella cheese Mix in cheddar, provolone, or Parmesan for variety
- Toppings (pepperoni, bell peppers, olives, etc.) Customize as desired
For Seasoning
- Italian herbs (basil or oregano)
- Garlic powder
- Crushed red pepper flakes Optional for heat
Instructions
- Preheat your oven to 375°F (190°C) and line a baking sheet with parchment paper.
- Cut tortillas into small triangles or desired chip shapes.
- Spread a thin layer of pizza sauce on each tortilla piece.
- Sprinkle shredded cheese and your chosen toppings evenly over the sauce.
- Season with Italian herbs, garlic powder, and red pepper flakes if using.
- Bake for 8-10 minutes or until the edges are golden and crispy.
- Let cool slightly before serving.
Leave a Reply