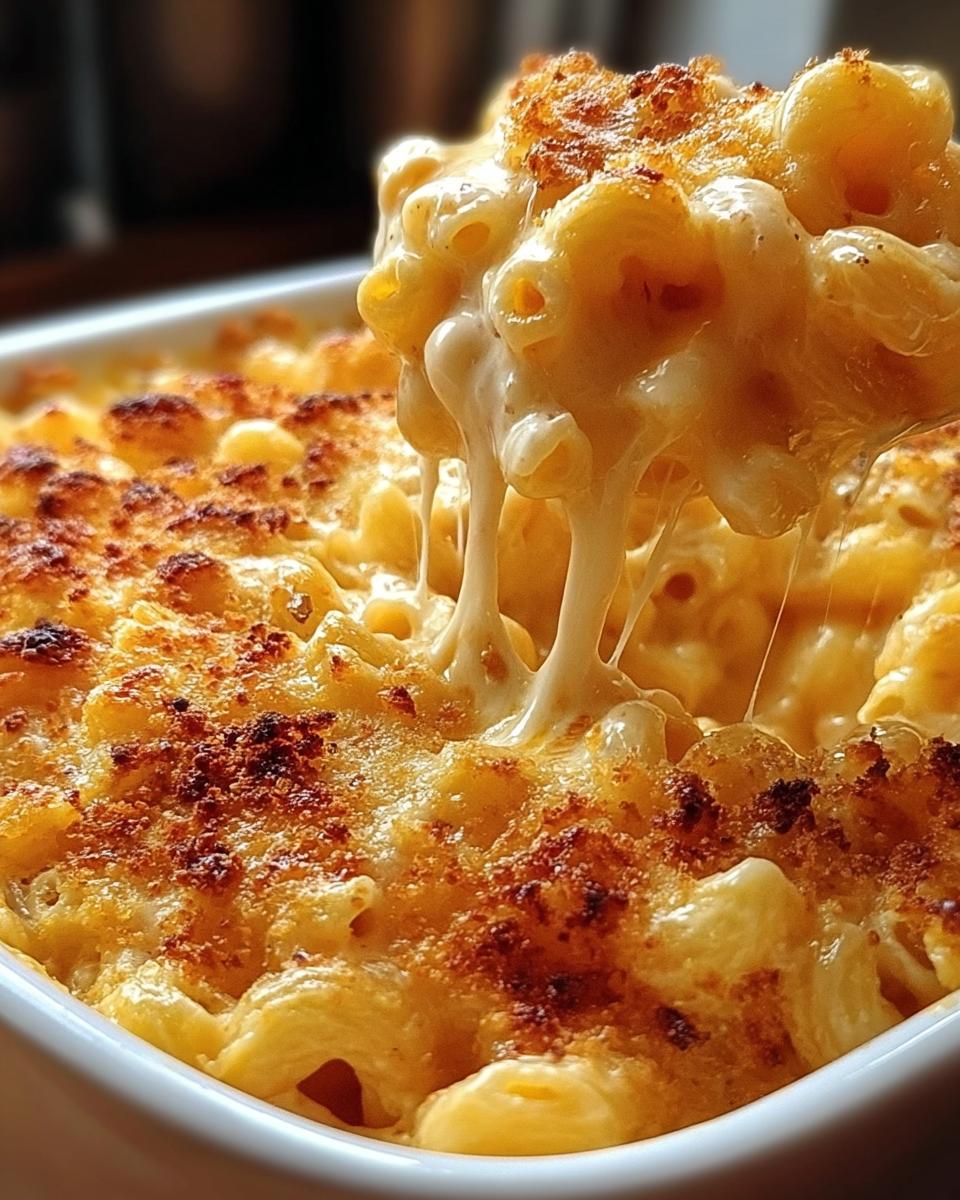
I still remember the first time I made mac and cheese from scratch. I was in college, broke, and desperately missing my mom's cooking-so I called her in a panic, scribbled down her recipe on a napkin, and attempted to recreate that creamy, cheesy magic. Let's just say my first try was… lumpy. But after years of tweaking (and a few cheese-related disasters), I finally nailed it. This mac and cheese is my ultimate comfort food-the kind of dish that turns a bad day around with one bite. It's rich from the sharp cheddar, extra creamy thanks to a foolproof roux, and has that irresistible crunch from panko breadcrumbs. Perfect for cozy nights, potlucks, or when you just need a big ol' hug in a baking dish.

What makes it a classic? It's simple enough for weeknights but fancy enough to impress guests (just add a sprinkle of smoked paprika and pretend you're a gourmet chef). Plus, kids and adults both go wild for it-mine fight over the crispy edges. Whether you're a mac and cheese purist or a rebel who adds hot sauce, this recipe is your new best friend.
Why You'll Love This Mac and Cheese
Oh, where do I even start? This mac and cheese is basically a big, cheesy hug in a bowl-the kind of dish that makes everyone at the table go quiet because they're too busy shoveling it into their mouths. Here's why you'll be obsessed:
- Creamy dreaminess: That silky cheese sauce clings to every noodle like it's its job. No sad, dry macaroni here!
- **Weeknight magic:** 30 minutes from pot to table. Yes, even faster than waiting for delivery.
- **Crowd-pleaser alert:** Picky kids, hungry partners, your carb-loving bestie-this dish makes you a hero.
- **Crunchy surprise:** The panko topping? It's like a golden crown of crispy goodness. (Pro tip: steal the corner piece before anyone notices.)
- **Play with it:** Swap in gouda, toss in roasted broccoli, or go wild with buffalo sauce. This recipe's your playground.
Seriously, once you try it, you'll understand why I make this at least twice a month. It's the mac and cheese that ruined all other mac and cheeses for me-in the best way.
Ingredients You'll Need for Mac and Cheese
Okay, let's raid the fridge and pantry! Here's your shopping list for the creamiest, cheesiest mac and cheese of your dreams. Pro tip: shred the cheese yourself-it melts way better than the pre-shredded stuff (those anti-caking agents are sneaky).
- 8 oz elbow macaroni (or whatever short pasta you've got-more on that later!)
- 2 cups sharp cheddar cheese, shredded (go for orange if you want that classic look, but white cheddar tastes just as amazing)
- 2 cups whole milk (trust me, the extra fat = extra silkiness. But 2% works in a pinch.)
- 4 tablespoon unsalted butter (because we're already committing to cheese, let's go all in)
- 2 tablespoon all-purpose flour (this plus butter = magic roux that thickens everything up)
- 1 cup panko bread crumbs (the secret weapon for that addictive crunch. Regular breadcrumbs work, but panko's extra crispy!)
That's it! No weird ingredients, no fuss. Just cheesy, carb-y perfection waiting to happen.
Step-by-Step Mac and Cheese Instructions
1. Cook the Pasta
First things first: let's get that pasta going! Grab a large pot (I use my trusty Dutch oven for this) and fill it with salted water-it should taste like the sea. Bring it to a rolling boil, then dump in your elbow macaroni. Now, here's the key: cook it for 1 minute less than the package says. Why? Because it'll keep cooking in the oven later, and nobody wants mushy mac and cheese. Drain it in a colander, but don't rinse it (we want that starch to help the cheese cling later). Give the pot a quick wipe-you'll use it again for the sauce!
2. Make the Cheese Sauce
Okay, magic time! In that same pot (less dishes = winning), melt the butter over medium heat. When it's all bubbly, sprinkle in the flour and whisk like your life depends on it. This is your roux, and it should look like wet sand after about 1 minute of stirring. Now, slowly pour in the milk while whisking constantly-I mean it, don't stop! This keeps lumps from forming. Keep whisking until it thickens enough to coat the back of a spoon (about 3-4 minutes). Lower the heat, then stir in the shredded cheddar until it's all melty and glorious. Pro tip: if the sauce seems too thick, splash in a little extra milk. Too thin? Let it simmer another minute.
3. Combine and Bake
Time for the grand finale! Dump the drained pasta into the cheese sauce and stir until every noodle is coated in that golden goodness. Pour it all into a greased baking dish (I use a 9x13, but anything similar works). Now, the pièce de résistance: sprinkle those panko breadcrumbs evenly over the top. Pop it in a 375°F oven for 15-20 minutes, until the edges are bubbling and the topping is golden brown. Want extra crispiness? Broil for the last 2 minutes-just don't walk away, or you'll have charcoal crumbs (learned that the hard way). Let it cool for 5 minutes before serving, unless you enjoy molten cheese burns (no judgment).
See? Easy peasy mac-and-cheesy. Now go grab that spoon and dig in!
Delicious Mac and Cheese Variations
One of the best things about mac and cheese? It's like a blank canvas for your wildest cheesy dreams. Here are some of my favorite ways to mix it up-because sometimes, you just gotta play with your food:
- Meat lover's delight: Crumble in crispy bacon, diced ham, or even pulled BBQ chicken. (Leftover rotisserie chicken? Yes, please!)
- Veggie boost: Stir in roasted broccoli, sautéed mushrooms, or caramelized onions for a sneaky nutrient kick.
- Spice it up: A dash of smoked paprika, cayenne, or even a swirl of sriracha turns up the heat. My dad adds jalapeños-dangerous but delicious.
- Cheese swap: Try half cheddar, half gruyère for extra depth, or pepper jack for a kick. Heck, throw in some blue cheese if you're feeling fancy.
- Pasta party: Shells, cavatappi, or fusilli work great too-just avoid long noodles (spaghetti mac and cheese? Hard pass).
Honestly, the only rule is to make it yours. Mac and cheese is about joy, so go wild-then tell me what crazy combo you invented!
Serving and Storing Mac and Cheese
Here's the thing about mac and cheese-it's glorious straight out of the oven, but it's also shockingly good as leftovers (if you manage to have any). When serving, let it sit for about 5 minutes after baking-those cheese burns are no joke. I love it with a simple green salad to cut the richness, or just shovel it into my mouth while standing over the stove (we've all been there).
Got leftovers? Lucky you! Pop them in an airtight container and stash in the fridge for 3-4 days. To reheat, splash a teaspoon of milk over the top and microwave in 30-second bursts, stirring between each one. Or, for maximum crispiness, throw it back in the oven at 350°F until warmed through. Freezing works too-just skip the breadcrumbs until you're ready to bake it again. Trust me, future-you will thank past-you for this lifesaving stash.
Helpful Notes for Perfect Mac and Cheese
Alright, let's talk secrets-the little things that take this mac and cheese from good to "where has this been all my life?" First off, that broiling trick I mentioned earlier? Do it. Just 2 minutes under the broiler gives you next-level crunch, but watch it like a hawk-it goes from golden to burnt in seconds (ask my smoke detector). If you're feeling health-conscious, swap in low-fat milk or whole wheat pasta-it'll still taste great, just a tad less indulgent. And here's a game-changer: warm your milk slightly before adding it to the roux. No more lumpy sauce panic! Finally, if your cheese sauce ever seizes up, a splash of hot pasta water can save the day. Now go forth and mac and cheese like a pro!
Mac and Cheese FAQs
1. Can I freeze mac and cheese?
Absolutely! Just skip the breadcrumbs before freezing-they'll get soggy. Cool it completely, then stash in an airtight container for up to 3 months. Thaw in the fridge overnight, top with fresh panko, and bake at 350°F until bubbly. (Pro tip: Freeze individual portions for emergency comfort food.)
2. What's the best cheese substitute if I don't have cheddar?
Gruyère, Monterey Jack, or even Colby work great! Avoid pre-shredded "melting" cheeses-they're coated to prevent clumping (which also means they won't melt smoothly). In a real pinch, American cheese saves the day-it's basically liquid gold for sauces. For more cheese ideas, check out this Parmesan Garlic Chicken Mac and Cheese recipe.
3. Can I use different pasta shapes?
Yes! Shells, cavatappi, or rotini are all awesome-they trap the sauce like little cheese pockets. Just steer clear of long noodles (spaghetti mac and cheese is a texture crime). And remember: adjust cook time based on the pasta's package instructions.
4. Why is my sauce grainy?
Usually means the cheese got too hot. Always melt cheese over low heat, and shred it yourself-pre-shredded cheese has additives that can make sauces gritty. If it happens, whisk in a splash of warm milk or pasta water to smooth it out.
Go Forth and Mac and Cheese Like a Boss
Look at you-armed with the secrets to the creamiest, dreamiest mac and cheese ever! Whether you're cooking for one on a rainy night or feeding a crowd of cheese fanatics, this recipe's got your back. Don't be afraid to make it your own (extra cheese? Always yes). And when you pull that golden, bubbly dish out of the oven, take a second to admire your handiwork-you just made magic happen. Now grab a fork, call dibs on the crispy corner piece, and dig in. Life's too short for mediocre mac and cheese, and honey? This one's a game-changer.

Mac and Cheese
Equipment
- large pot
- Saucepan
- baking dish
Ingredients
For the Mac and Cheese
- 8 oz elbow macaroni
- 2 cups sharp cheddar cheese shredded
- 2 cups whole milk
- 4 tablespoon unsalted butter
- 2 tablespoon all-purpose flour
- 1 cup panko bread crumbs
Instructions
- Cook the elbow macaroni according to package instructions. Drain and set aside.
- In a saucepan, melt the butter over medium heat. Stir in the flour to make a roux.
- Gradually whisk in the milk until smooth. Cook until thickened.
- Add the shredded cheddar cheese and stir until melted.
- Combine the cooked macaroni with the cheese sauce.
- Top with panko bread crumbs and bake until golden brown.

Leave a Reply