There's something magical about the combination of chocolate, peanut butter, and crispy cereal - especially when it comes wrapped in a festive layer of holiday cheer! Every December, I make a big batch of Christmas Chocolate Rice Krispie Balls, and they've become one of my most requested holiday treats.

These no-bake chocolatey bites are crunchy, creamy, and perfectly sweet - a true crowd-pleaser that's as fun to make as it is to eat. My kids love rolling them into little spheres and sprinkling them with red and green sugar. They're the perfect addition to cookie trays, dessert platters, or even wrapped up as homemade gifts for teachers, neighbors, and friends.
Why You'll Love Christmas Chocolate Rice Krispie Balls
- No-Bake Recipe: Perfect for busy holiday bakers - no oven required!
- Quick & Easy: Ready in just 25 minutes with simple pantry ingredients.
- Festive & Fun: Holiday sprinkles make them sparkle with Christmas cheer.
- Perfect Texture: Crunchy from the Rice Krispies, creamy from the peanut butter, and smooth from the chocolate coating.
- Kid-Friendly: Great for little hands to roll, dip, and decorate.
- Perfect for Gifting: Beautifully packaged in a holiday tin or cellophane bag with ribbon.
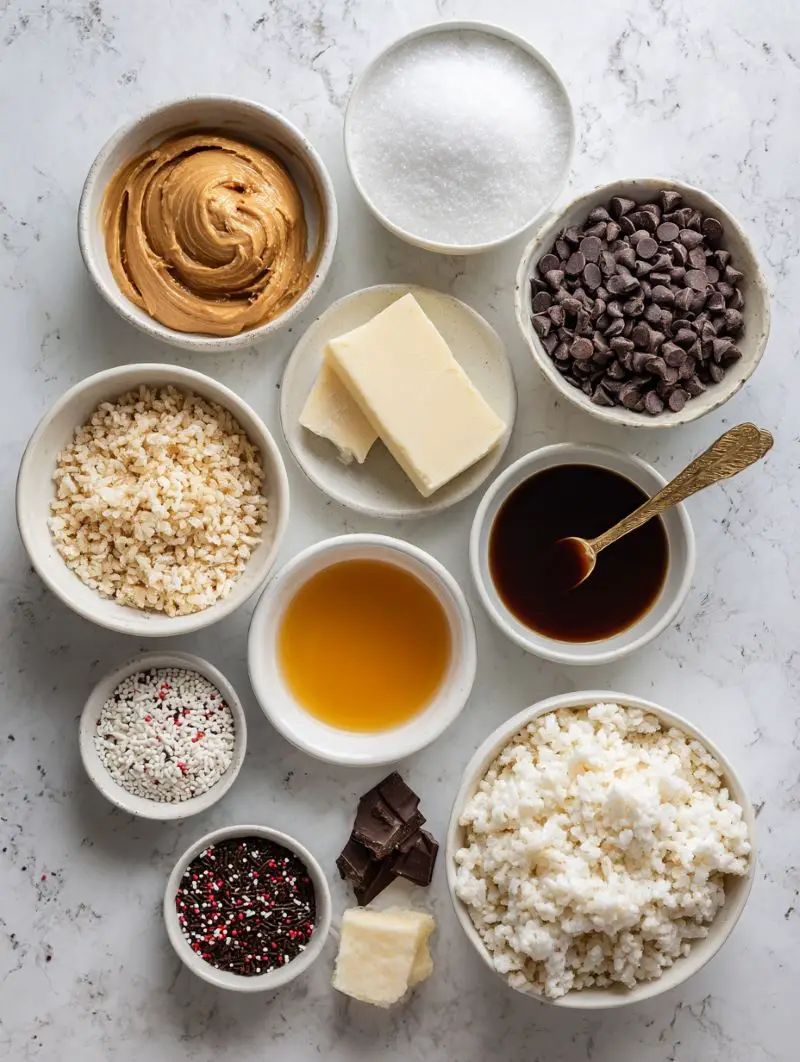
Ingredients You'll Need
To make a batch of these Christmas Chocolate Rice Krispie Balls, you'll need just a few staple ingredients - most of which you probably already have in your pantry!
- 3 cups Rice Krispies cereal - Adds that signature crunch and light texture.
- ½ cup creamy peanut butter - The binding element that brings the mixture together with delicious flavor.
- ½ cup powdered sugar - Sweetens the mix and helps firm up the dough.
- ¼ cup unsalted butter, melted - Adds richness and smooth texture.
- 1 teaspoon vanilla extract - Enhances the flavor with a warm, cozy note.
- 1 cup semi-sweet or milk chocolate chips - For coating; choose your favorite chocolate for a perfect finish.
- 1 tablespoon coconut oil (optional) - Makes the melted chocolate silky and easier to coat the balls evenly.
- Holiday sprinkles (red, green, white, or mixed) - For that festive Christmas touch!
Optional Add-ins:
- Chopped nuts (pecans, almonds, or peanuts) for added crunch.
- A pinch of sea salt for contrast.
- Crushed peppermint candy for a holiday flavor twist.
Step-by-Step Instructions
Follow these simple steps for perfect Christmas Chocolate Rice Krispie Balls every time:
1. Mix the base
In a large mixing bowl, combine Rice Krispies cereal, creamy peanut butter, powdered sugar, melted butter, and vanilla extract.
Use a sturdy spatula or wooden spoon to stir until the ingredients are well mixed. The mixture should hold together easily when pressed - not too sticky or too dry.
Tip: If it feels too crumbly, add a tablespoon of peanut butter. If too sticky, sprinkle in a little more powdered sugar.
2. Form into balls
Scoop out small portions of the mixture (about 1 tablespoon each) and roll them between your hands into 1-inch balls.
Place the rolled balls on a parchment-lined baking sheet, leaving a little space between each one. You should get around 20 Rice Krispie balls from this batch.
For cleaner shaping, dust your hands lightly with powdered sugar to prevent sticking.
3. Melt the chocolate
In a microwave-safe bowl, add chocolate chips and coconut oil (if using). Microwave in 30-second intervals, stirring after each session until the chocolate is completely melted and smooth.
Alternatively, you can melt the chocolate using a double boiler on the stovetop, stirring constantly.
Tip: Don't overheat the chocolate - gentle melting ensures it stays shiny and smooth.
4. Dip and coat
Using a fork or dipping tool, dip each Rice Krispie ball into the melted chocolate, turning to coat it fully.
Lift the ball out of the chocolate and gently tap the fork against the bowl to remove excess coating. Place each coated ball back on the parchment-lined baking sheet.
5. Add the festive touch
While the chocolate is still wet, immediately top each ball with holiday sprinkles. You can alternate colors or use a festive mix of red, green, and white for the ultimate Christmas look.
Tip: Sprinkle over a plate or tray to catch excess sprinkles for easy cleanup.
6. Chill and set
Once all the balls are coated and decorated, place the baking sheet in the refrigerator for about 30 minutes, or until the chocolate is firm.
After chilling, your Christmas Chocolate Rice Krispie Balls are ready to enjoy - perfectly set, beautifully decorated, and full of holiday cheer.
Serving and Storage Tips
Serving Ideas:
- Arrange them on a holiday dessert platter alongside cookies and fudge.
- Package in small cellophane bags tied with red ribbon for gifting.
- Serve as part of a hot cocoa bar - they pair perfectly with peppermint and marshmallows!
- Add to your cookie trays or Christmas dessert boxes for variety and color.
Storage:
- Refrigerator: Store in an airtight container for up to 2 weeks.
- Freezer: Freeze for up to 3 months in a freezer-safe bag or container. Thaw in the fridge before serving.
- Room Temperature: Can sit out for up to 2 days if your kitchen is cool, though refrigeration keeps them fresher longer.
Make-Ahead Tip:
You can prepare and shape the balls ahead of time, refrigerate them, and then dip in chocolate the next day to save time during busy holiday baking sessions.
Helpful Notes
- Use Room Temperature Peanut Butter: It mixes more smoothly with the Rice Krispies and sugar.
- Coconut Oil Is Optional: It's not required, but it makes the melted chocolate thinner and easier to coat evenly.
- Change It Up: Try dark chocolate for a more sophisticated flavor or white chocolate for a "snowball" effect.
- Holiday Variation: Mix crushed candy canes into the Rice Krispie mixture for peppermint crunch.
- Nut-Free Option: Use sunflower butter or cookie butter instead of peanut butter for an allergy-friendly version.
- Neat Dipping Trick: Stick a toothpick in each ball for dipping, then remove it and cover the hole with a dab of melted chocolate.
Frequently Asked Questions
1. Can I use crunchy peanut butter instead of creamy?
Yes! Crunchy peanut butter adds extra texture. Just note that it may make the mixture slightly harder to roll smoothly.
2. How do I keep my Rice Krispie balls from falling apart?
Make sure your mixture is well-combined and sticky enough to hold its shape. If it's too dry, add a bit more peanut butter or melted butter.
3. Can I use white chocolate for coating?
Absolutely! White chocolate looks especially festive when sprinkled with red and green decorations.
4. Do I have to refrigerate them?
Refrigerating helps the chocolate set quickly and keeps the treats firm, especially if your kitchen is warm.
5. Can I make these for other holidays?
Definitely! Just change the sprinkle colors - pastel for Easter, orange and black for Halloween, or pink and red for Valentine's Day.
Final Thoughts
Christmas Chocolate Rice Krispie Balls are everything you want in a holiday treat - festive, fun, and wonderfully easy to make. The combination of crunchy cereal, creamy peanut butter, and rich chocolate makes them irresistibly delicious, and the colorful sprinkles give them that extra bit of holiday sparkle.
I've made these every Christmas for as long as I can remember, and they're always one of the first desserts to disappear. They're perfect for parties, gifting, or sneaking from the fridge late at night (no judgment!). Best of all, they're so simple that even beginner bakers can make them with confidence.
So gather your ingredients, grab some sprinkles, and get ready to create a batch of Christmas Chocolate Rice Krispie Balls that will spread smiles and sweet cheer to everyone this holiday season.
And if you try this recipe, I'd love to see your creations! Share your photos, tag your posts, or leave a comment below - because holiday baking is even sweeter when shared.

Christmas Chocolate Rice Krispie Balls
Ingredients
- 3 cups Rice Krispies cereal
- ½ cup creamy peanut butter
- ½ cup powdered sugar
- ¼ cup unsalted butter melted
- 1 teaspoon vanilla extract
- 1 cup semi-sweet or milk chocolate chips
- 1 tablespoon coconut oil optional, for smoother chocolate
- Holiday sprinkles red, green, white, or mixed
Instructions
- In a large mixing bowl, combine Rice Krispies cereal, peanut butter, powdered sugar, melted butter, and vanilla extract. Mix thoroughly until the mixture holds together when pressed.
- Scoop out small portions (about 1 tablespoon each) and roll into 1-inch balls. Place on a parchment-lined baking sheet.
- In a microwave-safe bowl, melt chocolate chips with coconut oil in 30-second intervals, stirring between each, until smooth.
- Dip each Rice Krispie ball into the melted chocolate, using a fork to coat completely. Let excess chocolate drip off before returning to parchment.
- Decorate with holiday sprinkles immediately before the chocolate sets.
- Refrigerate for at least 30 minutes or until the chocolate hardens.
- Serve chilled or at room temperature and enjoy!
Notes
- Use room-temperature peanut butter for smoother mixing.
- Coconut oil helps make the chocolate glossier and easier to coat.
- For added flavor, sprinkle crushed candy canes or drizzle white chocolate on top.
- Store in an airtight container in the refrigerator for up to 2 weeks or freeze for up to 3 months.
- Perfect for cookie trays, edible gifts, or holiday dessert platters.

Leave a Reply