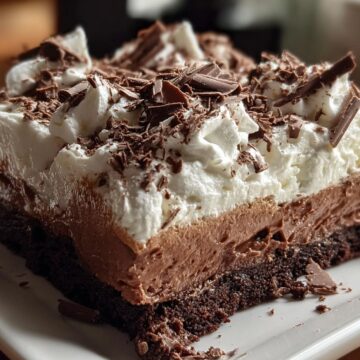
Oh, let me tell you about my absolute favorite dessert: Brownie Refrigerator Cake! This delightful treat takes me back to my childhood, where every family gathering was a reason to celebrate with something sweet. I can still picture my grandmother whipping up layers of chocolatey goodness and creamy filling, her kitchen filled with laughter and the rich scent of cocoa. It was a simple recipe, but boy, did it leave a lasting impression.

Perfect for summer picnics or cozy winter gatherings, this Brownie Refrigerator Cake is a showstopper that never fails to impress. It's cool, creamy, and oh-so-decadent, making it the ideal dessert for any occasion. Whether you're treating your family on a weeknight or bringing a dish to a potluck, this cake will have everyone asking for seconds. Trust me, once you try it, you'll want to make it a staple in your own kitchen!
Why You'll Love "Brownie Refrigerator Cake"
- Quick to prepare and easy to assemble, making it perfect for busy weeknights.
- Family-friendly with layers of chocolate and cream that everyone will adore.
- Minimal ingredients required, so you won't need to make a special trip to the store.
- Can be made ahead of time and stored in the fridge, ideal for gatherings!
- Rich and indulgent, yet surprisingly light and refreshing when chilled.
Ingredients You'll Need
- For the Brownie Layer:
- 1 box brownie mix, prepared according to package instructions
- 1 extra-large egg, or as required by brownie mix instructions
- For the Cream Cheese Layer:
- 1 package cream cheese, softened (I love using Philadelphia for that perfect creaminess)
- 1 cup powdered sugar, sifted to avoid lumps
- 1 container whipped topping, thawed (Cool Whip works wonderfully)
- For the Pudding Layer:
- 1 package instant chocolate pudding
- 1 package instant vanilla pudding
- 3.5 cups milk (I prefer whole milk for a richer texture)
- 1 container whipped topping, for layering
- For Topping:
- 1 bar Hershey bar, grated, or chocolate syrup for drizzling (get creative with your chocolate!)
Step-by-Step Instructions
Prepare the Brownie Layer
- Preheat your oven to 350°F (175°C). This is the perfect temperature to get those brownies nice and gooey.
- In a mixing bowl, prepare the brownie mix according to the package instructions. Don't forget to add that extra-large egg!
- Pour the brownie batter into a greased baking pan. Use a spatula to spread it evenly.
- Bake in the preheated oven for about 30 minutes or until a toothpick inserted in the center comes out with a few moist crumbs. Yum!
- Once baked, take the brownies out and let them cool completely in the pan. Patience is key here - they need to be cool for the layers to come together nicely.
Make the Cream Cheese Layer
- In a mixing bowl, take the softened cream cheese and beat it until it's smooth and creamy. You can use a hand mixer or a whisk, but I find the mixer makes it a breeze!
- Once the cream cheese is nice and fluffy, gradually add the powdered sugar. Mix until combined and smooth.
- Fold in the thawed whipped topping gently until everything is well blended. This will make the cream cheese layer light and airy. You want to eat this with a spoon, trust me!
Prepare the Pudding Layer
- In a large mixing bowl, combine the instant chocolate pudding and instant vanilla pudding mixes.
- Pour in 3.5 cups of milk. Whisk the mixture for about 2 minutes until it thickens to a lovely pudding consistency. It should be a bit wobbly but hold its shape!
- Once thickened, fold in another container of whipped topping for extra creaminess. This layer is going to be divine!
Assemble the Cake
- Now comes the fun part! Grab your cooled brownie layer and cut it into even squares or leave it whole, depending on your serving style.
- In a serving dish, layer half of the brownie pieces at the bottom. It's like creating a cozy chocolate foundation!
- Spread half of the cream cheese mixture over the brownie layer, smoothing it out with a spatula.
- Next, pour half of the pudding mixture over the cream cheese layer. Be generous with this; you want every bite to be rich!
- Repeat with the remaining brownie pieces, cream cheese mixture, and pudding mixture. You're building a sweet tower of happiness!
Add the Topping
- Finally, top the cake with the remaining whipped topping. Smooth it out, or get creative and make swirls - it's all about presentation!
- Grate the Hershey bar on top or drizzle it with chocolate syrup. Use as much or as little as you like; I always go for extra!
- Cover the dish with plastic wrap and place it in the refrigerator for a few hours before serving. This chilling time lets the flavors meld beautifully. Plus, it tastes amazing when it's nice and cold!
Variations
- For a minty twist, add a few drops of mint extract to the cream cheese layer.
- Swap out the chocolate pudding for butterscotch for a different flavor profile.
- Make it gluten-free by choosing a gluten-free brownie mix.
- Try using mascarpone cheese instead of cream cheese for a richer taste.
- Add fresh berries between the layers for a fruity touch in the summer.
Serving and Storage Tips
Serving
Slice the Brownie Refrigerator Cake into generous pieces and serve chilled for the best flavor. It pairs beautifully with a scoop of vanilla ice cream or a dollop of whipped cream. Don't forget to have extra grated chocolate or syrup on the side for drizzling!
Storage
Store any leftovers in an airtight container in the fridge for up to 5 days. For longer storage, you can freeze individual slices wrapped tightly in plastic wrap for up to 3 months. Just let them thaw in the fridge before enjoying!
Helpful Notes
- If you're out of powdered sugar, you can blend granulated sugar in a blender to make your own!
- For a dairy-free version, use a dairy-free cream cheese and whipped topping alternative.
- Add a splash of vanilla extract to the pudding layer for an extra flavor boost.
- Feel free to experiment with different chocolate brands for unique taste profiles.
- Optional add-ins like crushed nuts or chocolate chips can add a delightful crunch!
Frequently Asked Questions
Can I freeze the Brownie Refrigerator Cake?
Yes, you can absolutely freeze the Brownie Refrigerator Cake! Just wrap individual slices tightly in plastic wrap and place them in an airtight container. They'll be good in the freezer for up to 3 months. When you're ready to enjoy, simply thaw them in the fridge overnight.
What can I use instead of cream cheese?
If you're looking for a substitute for cream cheese, you can try using mascarpone cheese for a richer flavor, or even Greek yogurt for a lighter option. Dairy-free cream cheese is also a great alternative if you're avoiding dairy.
How long does the cake last in the fridge?
The Brownie Refrigerator Cake will last in the fridge for up to 5 days when stored in an airtight container. Just remember to keep it covered, so it stays fresh and delicious!
Final Thoughts
I hope you're as excited to make this Brownie Refrigerator Cake as I am! It's truly a treat that brings joy to any table and is perfect for sharing with friends and family. Whether it's a special occasion or just a sweet craving, this dessert never disappoints. Remember, it's all about having fun in the kitchen and making delicious memories. So gather your ingredients, roll up your sleeves, and dive into this delightful recipe. I can't wait for you to experience those "Oh wow, this is really good" moments. Enjoy every bite!
Brownie Refrigerator Cake
Equipment
- Mixing bowl
- baking pan
Ingredients
For the Brownie Layer
- 1 box brownie mix prepared according to package instructions
- 1 extra-large egg egg or as required by brownie mix
For the Cream Cheese Layer
- 1 package cream cheese softened
- 1 cup powdered sugar
- 1 container whipped topping
For the Pudding Layer
- 1 package instant chocolate pudding
- 1 package instant vanilla pudding
- 3.5 cups milk
- 1 container whipped topping
For Topping
- 1 bar Hershey bar grated or chocolate syrup for drizzling
Instructions
- Prepare brownie mix according to package instructions and bake in a baking pan.
- In a mixing bowl, combine softened cream cheese, powdered sugar, and whipped topping until smooth.
- Prepare instant chocolate and vanilla puddings according to package instructions using milk.
- Layer the baked brownie, cream cheese mixture, and pudding in a serving dish.
- Top with additional whipped topping and grated chocolate or drizzle with chocolate syrup.

Leave a Reply