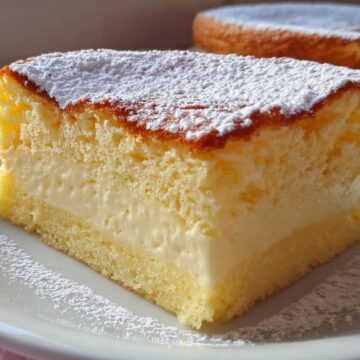
Okay, let me tell you about the first time I made Vanilla Magic Custard Cake. I was skeptical-how could one simple batter magically turn into three distinct layers in the oven? But when I pulled it out and saw that golden top, creamy custard middle, and delicate cake base, I swear I did a little happy dance right there in my kitchen. It's like dessert alchemy, and I'm obsessed.

This cake is perfect for when you want something impressive but don't feel like fussing with layers or frosting. The vanilla flavor is rich but not overpowering, and that custard layer? Pure silk. It's a showstopper for dinner parties, but honestly, I've been known to make it just for myself on a lazy Sunday. The magic happens while it bakes-no fancy tricks, just science (and a little bit of love). Trust me, once you try it, you'll be hooked.
Why You'll Love Vanilla Magic Custard Cake
Okay, let me count the ways this cake will steal your heart (and probably your dessert plate):
- It's pure kitchen magic: One batter, zero layering effort, and-poof!-you get a golden cake top, a dreamy custard middle, and a tender sponge base. It's like a dessert party in every bite.
- Simpler than it looks: No fancy equipment, no stress. Just whip up a basic batter, pour, and let the oven do the hard work. Even beginner bakers can nail this.
- Vanilla done right: That double dose of pure vanilla extract makes it taste like the fanciest bakery treat, but without the fuss (or the price tag).
- Crowd-pleaser alert: Serve it to kids, grandparents, or your pickiest friend-they'll all ask for seconds. Bonus: dust it with powdered sugar, and suddenly it's "gourmet."
- Leftovers? Ha! Good luck having any. But if you do, it's just as delicious cold the next day (if not better).
Seriously, this cake is the unicorn of desserts-magical, low-effort, and impossible to resist.
Ingredients You'll Need for Vanilla Magic Custard Cake
Here's everything you'll need to whip up this magical dessert. Don't worry, it's all pantry staples-no wild ingredients here!
- ½ cup unsalted butter: Melted and cooled to room temperature. I like to use unsalted butter so I can control the saltiness, but if you only have salted, it'll still work.
- 2 cups milk: Warmed to lukewarm temperature. Cold milk can mess with the batter, so take the extra minute to warm it up-it's worth it.
- 1 and ¼ cups confectioners' sugar: Sifted (150g). Sifting helps avoid lumps, so don't skip this step!
- 4 eggs: Yolks and whites separated. Room temperature eggs whip better, so take them out of the fridge ahead of time.
- 1 tablespoon purified water: Just a splash to help blend everything together.
- 1 cup all-purpose flour: Sifted (115g). Again, sifting is your friend here.
- 2 teaspoons pure vanilla extract: Go for the good stuff-it makes all the difference.
- Confectioners' sugar: For garnish. Because everything looks fancier with a dusting of sugar, right?
That's it! Simple, right? Now let's get to the fun part-making the magic happen.
Step-by-Step Vanilla Magic Custard Cake Instructions
Alright, let's make some magic happen! Don't worry-it's easier than it looks. Just follow these steps, and you'll have a showstopping dessert in no time.
Preparing the Batter
- Preheat your oven to 325°F (160°C). Trust me, you want that oven nice and toasty before the batter goes in.
- Grease an 8x8-inch baking pan and line it with parchment paper, leaving some overhang on the sides. This makes it easier to lift the cake out later-no sticking!
- Whip those egg whites: In a clean, dry bowl, beat the egg whites until stiff peaks form. This is key for that magical separation later! Set them aside for now.
- Mix the yolks and sugar: In another bowl, whisk the egg yolks and confectioners' sugar until pale and fluffy. Add the melted butter, vanilla extract, and water, mixing until smooth.
- Alternate the flour and milk: Gently fold in the sifted flour and warmed milk, alternating between the two. Mix just until combined-don't overdo it!
- Fold in the egg whites: Now, carefully fold the whipped egg whites into the batter. Be gentle! You want to keep as much air in them as possible. The batter will be thin and lumpy-that's totally normal.
Baking the Vanilla Magic Custard Cake
- Pour the batter into your prepared pan. It'll look messy and uneven, but that's okay-the magic happens in the oven.
- Bake for 45-50 minutes, or until the top is golden and the center jiggles just slightly when you nudge the pan. If it wobbles like Jell-O, it's not done yet!
- Let it cool completely in the pan before slicing. I know, the wait is torture, but this helps the layers set properly. Patience pays off!
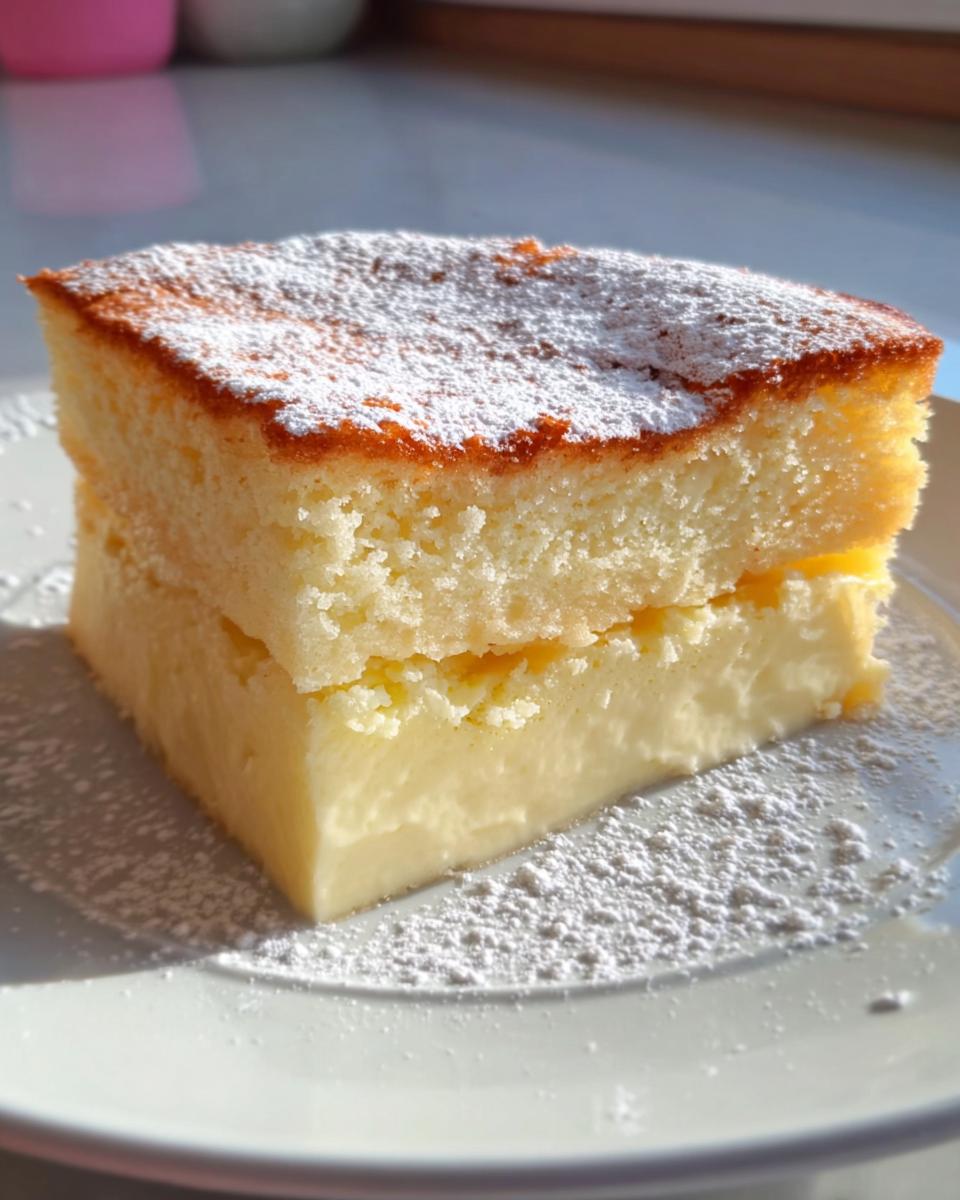
And that's it! One batter, three layers, zero stress. Now, just dust it with powdered sugar and watch everyone's eyes light up when they take that first bite. Magic, right?
Vanilla Magic Custard Cake Variations
Okay, so the classic version is *chef's kiss*, but you know me-I can't resist playing around. Here are some fun twists to keep things exciting (because why not?):
- Lover of citrus? Add a tablespoon of lemon or orange zest to the batter. That bright, tangy kick cuts through the richness beautifully.
- Chocolate dreams: Swap out 2 tablespoons of flour for cocoa powder. You'll get a marbled effect, and who can say no to chocolate custard magic?
- Berry surprise: Drop a handful of fresh raspberries or blueberries into the batter before baking. They'll sink slightly, creating little bursts of fruity goodness.
- Coconut vibes: Replace half the milk with coconut milk and sprinkle toasted coconut on top. Tropical magic, right there.
- Spiced up: A pinch of cinnamon or nutmeg in the batter makes it taste like a cozy hug. Perfect for fall!
See? Endless possibilities. Just remember-the batter's thin, so don't go overboard with add-ins. A little goes a long way in this magical cake!
Serving and Storing Vanilla Magic Custard Cake
So, you've baked your magical cake-now what? First things first: let it cool completely in the pan. I know, I know, it's hard to resist, but this step is crucial. Cooling helps the layers set properly, so when you slice into it, you get those perfect, distinct layers. Trust me, it's worth the wait.
When you're ready to serve, use a sharp knife to cut into neat squares. A light dusting of confectioners' sugar on top makes it look extra fancy (and who doesn't love a little extra sweetness?). This cake is delicious on its own, but if you're feeling indulgent, a dollop of whipped cream or a drizzle of caramel sauce takes it to the next level.
As for leftovers (if there are any!), store them in an airtight container in the fridge for up to 3 days. It's just as delicious cold-maybe even creamier! Just give it a quick dusting of sugar before serving again. And no, I don't recommend freezing it-that custard layer doesn't hold up well in the freezer. So, slice, serve, and enjoy every magical bite!
Helpful Notes for Perfect Vanilla Magic Custard Cake
Okay, let's talk tips and tricks to make sure your cake turns out just right-because even magic needs a little guidance sometimes!
- Egg whites are key: If your layers don't separate, the issue is usually under-whipped egg whites. Get them to stiff peaks-they should stand straight up when you lift the beaters.
- Batter too thick? Gently fold in a splash more milk. It should be thin and pourable, like pancake batter.
- Jiggle test: The cake is done when the top is golden and the center has a slight wobble (like Jell-O). If it's liquidy, bake a few more minutes.
- Cutting clean slices: Use a sharp knife dipped in hot water-it'll glide through those delicate layers without tearing.
- Lighter option: Swap half the sugar for a sugar substitute if you prefer, but don't skip it entirely-the sugar helps with texture.
Don't stress if it's not perfect the first time. Even my early attempts were messy-but guess what? They still tasted amazing. Magic, remember?
Frequently Asked Questions
Got questions? I've got answers! Here are the ones I hear most about this magical cake:
- Can I use vanilla paste instead of extract?
Absolutely! Use the same amount-just know the flecks will give your cake a speckled look (which I think is kinda pretty). The flavor's richer too. - Why didn't my cake separate into layers?
Usually, it's under-whipped egg whites or overmixing the batter. Next time, really beat those whites to stiff peaks, and fold gently-it's okay if the batter looks lumpy! - Can I make this gluten-free?
Yep! Swap the all-purpose flour for a 1:1 gluten-free blend. The texture might be slightly denser, but the magic layers will still happen. - My cake sunk in the middle-what went wrong?
Likely underbaking. The center should jiggle *slightly* but not wobble wildly. If it sinks, no worries-dust it with sugar and call it "rustic." Tastes just as good!
Still stumped? Just ask-I'm happy to troubleshoot your baking adventures!
Final Thoughts on Vanilla Magic Custard Cake
If you've ever wanted to impress someone with minimal effort, this cake is your secret weapon. It's the kind of dessert that makes people pause mid-bite and say, "Wait-how did you *do* this?" And the best part? You barely had to lift a finger. The oven did all the heavy lifting while you basked in the glory of vanilla-scented anticipation.
So, what are you waiting for? Grab those eggs, whip up some magic, and prepare for the compliments to roll in. Whether it's for a special occasion or just because, this cake is pure joy in every bite. Bake it, share it (or not-no judgment!), and enjoy the delicious wonder of Vanilla Magic Custard Cake. Happy baking!
Vanilla Magic Custard Cake
Ingredients
- ½ cup unsalted butter melted and cooled to room temperature
- 2 cups milk warmed to lukewarm temperature
- 1 and ¼ cups confectioners' sugar sifted (150g)
- 4 eggs yolks and whites separated
- 1 tablespoon purified water
- 1 cup all-purpose flour sifted (115g)
- 2 teaspoon pure vanilla extract
- confectioners' sugar for garnish


Leave a Reply