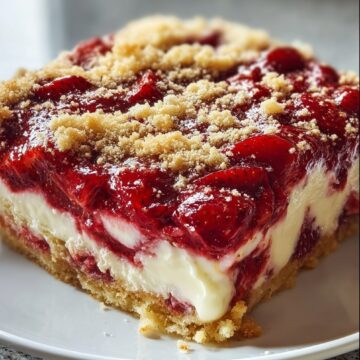
Every family has that one recipe that somehow ends up on the table at every get-together - easy, delicious, and a guaranteed crowd-pleaser. For us, it's this Strawberry Cheesecake Dump Cake. The first time I baked it was for a summer barbecue, and it was love at first bite. One spoonful of that gooey strawberry filling, creamy cheesecake layer, and golden buttery topping had everyone asking for the recipe.

What I love most is how little effort it takes to make something that tastes so indulgent. Just six ingredients and a baking dish, and you've got yourself a dessert that feels fancy but is delightfully fuss-free. Whether you're new to baking or just need a no-fail dessert in your back pocket, this one's a keeper.
Why You'll Love Strawberry Cheesecake Dump Cake
- Insanely easy to make - No mixing bowls beyond one for the cheesecake layer, and no complicated steps.
- Just six ingredients - Most of which you probably already have in your pantry or fridge.
- A dreamy combo of flavors - Sweet strawberries, creamy cheesecake, and a golden buttery cake topping.
- Great for parties or potlucks - It travels well, serves a crowd, and always disappears fast.
- Flexible and forgiving - You can swap out pie filling flavors or use different cake mixes based on what you have on hand.
- Comfort food at its best - This dessert is warm, cozy, and exactly what you want after a home-cooked meal.
Ingredients You'll Need
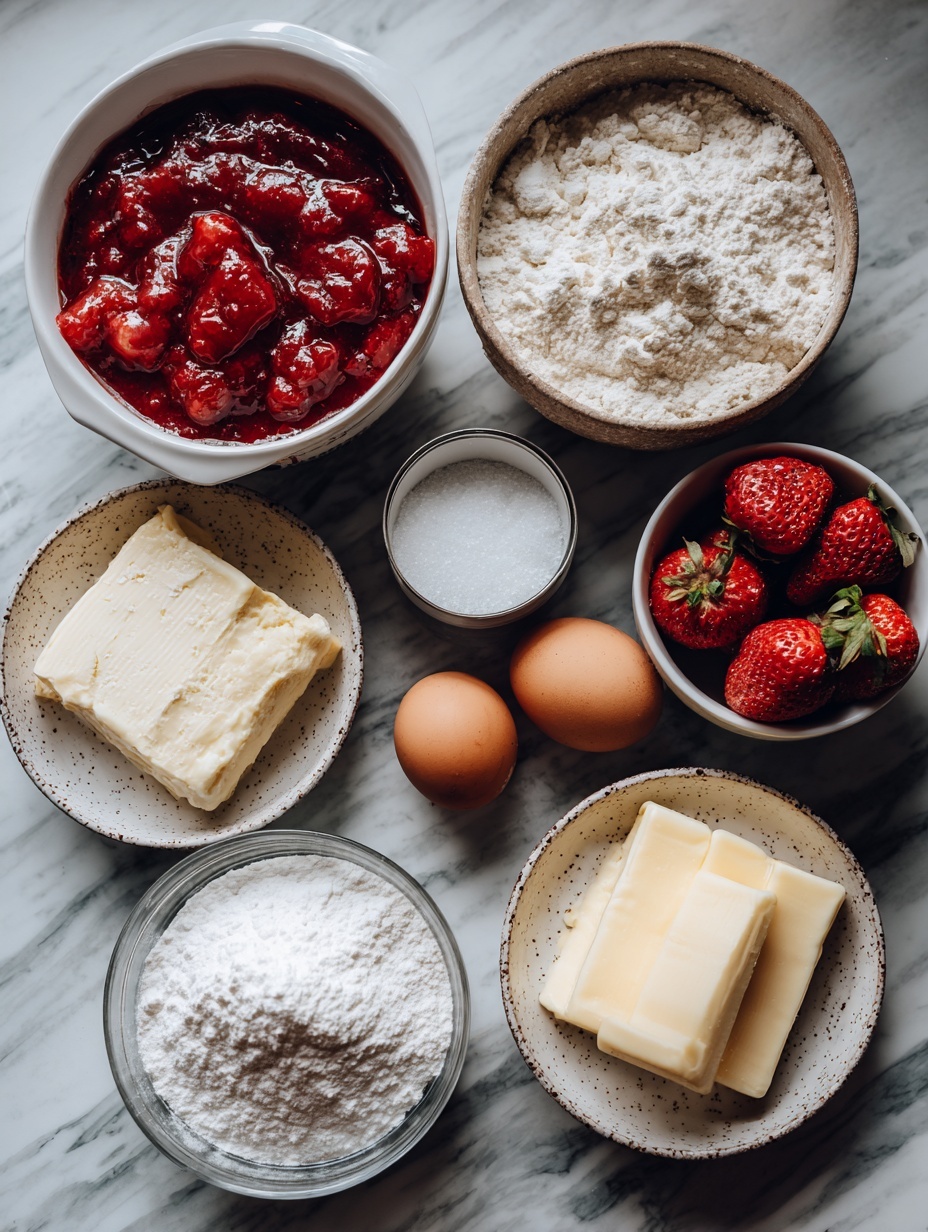
- 2 cans (15 oz each) strawberry pie filling
The juicy, sweet base of the dessert. Choose one with visible fruit chunks for the best texture. - 8 oz full-fat cream cheese, softened
Adds the classic cheesecake flavor and creamy texture. - 1 large egg, room temperature
Helps bind the cream cheese into a custard-like layer. - ¼ cup granulated sugar
Sweetens the cream cheese mixture without overpowering it. - 1 box (15-16 oz) white, yellow, or vanilla cake mix
Use it dry-this forms a crisp, buttery topping when baked. - ½ cup cold unsalted butter, thinly sliced
Essential for browning the top and melting into the cake mix.
Tip: Use cold butter, not melted! Sliced butter melts slowly and evenly, creating that deliciously crispy golden top.
Step-by-Step Instructions
1. Preheat your oven.
Set your oven to 350°F (175°C). Grease a 9x13-inch baking dish with butter or nonstick spray.
2. Make the cheesecake layer.
In a mixing bowl, beat together the softened cream cheese, egg, and sugar until smooth and creamy. This layer bakes into a velvety, tangy swirl.
3. Layer the strawberry filling.
Spread both cans of strawberry pie filling evenly in the bottom of your prepared dish. This becomes the sweet and juicy base.
4. Add the cheesecake mixture.
Drop spoonfuls of the cream cheese mix over the strawberries. Gently spread it out with a spatula. It doesn't have to be perfect-imperfections bake beautifully.
5. Sprinkle the cake mix.
Pour the dry cake mix evenly over the top. Don't stir! The layers bake together as-is.
6. Top with butter slices.
Lay thin slices of cold butter across the surface. Try to cover as much of the cake mix as possible to ensure an even, golden bake.
7. Bake to perfection.
Place in the oven and bake for 50-60 minutes, or until the top is golden brown and the filling is bubbling up the sides.
8. Let it cool.
Remove from the oven and let cool for at least 20 minutes. This helps the layers set, making it easier to slice and serve.
Note: It's okay if it's a little gooey in the middle. That's the magic of a dump cake!
Serving and Storage Tips
- Serve warm or at room temp. This cake is delicious served right out of the oven or after it's cooled. Add a scoop of vanilla ice cream or a swirl of whipped cream for extra indulgence.
- Make it ahead. Bake the cake earlier in the day, let it cool, and just reheat individual portions later. Perfect for parties and holidays.
- Store leftovers in the fridge. Cover with foil or transfer to an airtight container. It will keep for up to 4 days.
- Reheat gently. Warm in the microwave for 20-30 seconds to bring back the gooey, fresh-baked feel.
- Can you freeze it? Yes! Freeze cooled slices in airtight containers for up to 1 month. Thaw in the fridge overnight and warm before serving.
Helpful Notes
- Want to try another flavor? Swap strawberry pie filling with cherry, blueberry, apple, or peach. Any canned pie filling will work!
- Use vanilla cake mix for a flavor boost. While white or yellow cake mixes work great, vanilla adds a rich depth of flavor that pairs beautifully with strawberry and cream cheese.
- Looking for crunch? Sprinkle sliced almonds, chopped pecans, or crushed graham crackers on top before baking for texture.
- Make it gluten-free. Use a gluten-free cake mix and double-check your pie filling is gluten-free.
- For a firmer cheesecake layer… Chill the cake for an hour or two after baking. This helps the cream cheese firm up more like a classic cheesecake texture.
Frequently Asked Questions
1. Can I use fresh strawberries instead of pie filling?
Fresh strawberries need to be cooked down with sugar and thickener to mimic the texture of pie filling. It's doable, but canned filling is much easier for this recipe.
2. What if I don't have cream cheese?
You can skip it entirely and make a basic strawberry dump cake. It'll still be delicious, just without the creamy cheesecake layer.
3. Should I mix the cake mix with butter before adding?
No need! Letting the sliced butter melt over the dry mix in the oven creates the perfect crisp top. No mixing required.
4. Can I use margarine instead of butter?
Real butter gives the best flavor and texture. Margarine may not brown or crisp up the same way.
5. How do I know when it's done baking?
The edges should be bubbling, and the top should be golden brown. A little jiggle is fine-it will set as it cools.
Final Thoughts
If you're looking for a no-fuss dessert that impresses every time, Strawberry Cheesecake Dump Cake is your answer. It's sweet, creamy, slightly tangy, and topped with a buttery crunch that tastes like you spent hours in the kitchen - when really, you just layered a few ingredients and popped it in the oven.
I've made this recipe more times than I can count, and it never disappoints. Whether you're a seasoned home cook or a total beginner, this dump cake will win you over with its simplicity and flavor. Give it a try, and don't forget to share your version - I love seeing how everyone makes it their own!
Happy baking, and enjoy every gooey, buttery bite!
Strawberry Cheesecake Dump Cake
Ingredients
- 2 cans 15 oz each strawberry pie filling
- 8 oz full-fat cream cheese softened to room temperature
- 1 large egg room temperature
- ¼ cup granulated sugar
- 1 box 15-16 oz white, yellow, or vanilla cake mix
- ½ cup cold unsalted butter thinly sliced
Instructions
- Preheat oven to 350°F (175°C).
- In a bowl, beat the softened cream cheese, egg, and sugar until creamy.
- Spread strawberry pie filling evenly in a greased 9x13-inch baking dish.
- Dollop and gently spread the cream cheese mixture over the strawberries.
- Evenly sprinkle the dry cake mix on top.
- Distribute the butter slices over the cake mix to cover as evenly as possible.
- Bake for 50-60 minutes, until top is golden and filling is bubbly.
- Let cool at least 20 minutes before serving for neater slices.
Notes
- Use cold butter for a crisper, golden topping.
- Letting the cake rest helps the layers set for cleaner slices.
- You can swap strawberry pie filling for cherry or blueberry for variation.
- Best served warm or at room temperature - with a scoop of vanilla ice cream if desired!


Leave a Reply