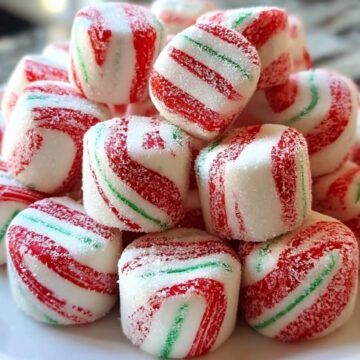
Every Christmas season, I can't resist making a batch of Soft Christmas Peppermints - those melt-in-your-mouth, pastel-colored candies that bring back all the warm, nostalgic holiday feelings. My grandmother used to keep a crystal dish of them on her dining table all through December. Guests would always grab one (or three!) as they walked by, the sweet scent of peppermint filling the air.

These little mints are incredibly easy to make and so much fun to customize. With just a few ingredients and a little patience while they dry, you can create a beautiful array of red, green, and white mints that look as festive as they taste. They're perfect for cookie trays, edible gifts, or simply to enjoy with a cup of hot cocoa by the Christmas tree.
Why You'll Love Soft Christmas Peppermints
- No Baking Required: A completely no-bake recipe - perfect for busy holiday kitchens.
- Festive and Beautiful: Bright red, green, and white mints add instant holiday cheer to any dessert spread.
- Melt-in-Your-Mouth Texture: Soft, creamy, and smooth with that classic peppermint zing.
- Perfect for Gifting: Package them in holiday tins or jars - they make wonderful homemade gifts.
- Fun for Kids: Easy enough for little helpers to roll, twist, and shape.
- Customizable: Try other flavor extracts like spearmint, vanilla, or even almond for variety.
Ingredients You'll Need
These festive mints come together with just a handful of pantry staples. Here's what you'll need to make a batch of Soft Christmas Peppermints:
- 3¾ cups powdered sugar (plus extra for dusting) - The base of your candy dough. Be sure to sift it first to remove lumps for a silky texture.
- ⅓ cup sweetened condensed milk - Provides creaminess and structure while keeping the mints soft.
- ½ teaspoon peppermint extract - Gives that cool, refreshing mint flavor. Adjust slightly to your taste preference.
- Red and green food coloring (gel preferred) - Gel colors produce vibrant hues without making the dough sticky.
- Granulated sugar (for coating) - Adds a sweet, subtle crunch and prevents the candies from sticking together.

Step-by-Step Instructions
Follow these simple steps to make your very own batch of soft, colorful Christmas Peppermints:
1. Prepare the powdered sugar
- In a large mixing bowl, sift 3¾ cups powdered sugar to remove any clumps.
- Reserve a small amount for dusting your work surface later.
Tip: Sifting ensures smooth, lump-free mints - it's worth the extra step!
2. Make the base dough
- To the sifted powdered sugar, add sweetened condensed milk and peppermint extract.
- Mix slowly with a spatula or wooden spoon until the dough begins to come together.
- Once the mixture starts to form a sticky dough, knead it gently by hand until smooth.
The dough should be soft and pliable, like playdough - not dry or crumbly. If it feels too wet, add a tablespoon of powdered sugar at a time until it firms up.
3. Divide and color the dough
- Divide the dough into three equal portions.
- Leave one portion plain (white).
- Color the second portion red and the third green using gel food coloring.
Tip: Use just a drop or two of gel coloring and knead well to evenly distribute the color. You can always add more if you want deeper shades.
If your dough starts to get sticky while kneading in the color, dust your hands and work surface with powdered sugar.
4. Roll and twist
- Lightly dust your countertop with powdered sugar.
- Roll each colored portion into long ropes about ½ inch thick.
- Place one red, one green, and one white rope side by side. Gently twist them together to create a fun candy-cane effect.
Optional: For a more marbled look, don't twist too tightly - a gentle swirl creates a beautiful pattern.
5. Shape the mints
- Cut the twisted dough into 2-inch segments using a sharp knife or dough cutter.
- Roll each piece into a small ball or flatten slightly into a disc shape - whichever you prefer.
- Roll each piece in granulated sugar to coat it completely. This prevents sticking and gives them a lovely sparkle.
6. Dry the mints
- Place the coated mints on a parchment-lined baking sheet.
- Allow them to dry at room temperature for several hours or overnight until firm.
Once dry, your mints will have a slightly crisp exterior with a soft, creamy center that melts in your mouth.
Serving and Storage Tips
Serving Suggestions:
- Arrange your Soft Christmas Peppermints on a holiday candy dish or scatter them around a dessert platter for a colorful accent.
- Pair them with hot cocoa, coffee, or peppermint bark for a festive flavor combo.
- Add them to your holiday cookie tins for a sweet pop of color.
Storage Tips:
- Store in an airtight container at room temperature for up to 2 weeks.
- Separate layers with parchment paper to prevent sticking.
- For longer storage, refrigerate in an airtight container for up to 1 month - just bring them to room temperature before serving.
Make-Ahead Tip:
You can make the dough several days ahead, wrap tightly in plastic, and refrigerate until ready to roll and shape.

Helpful Notes
- Use Gel Food Coloring: Gel or paste colors are best for vibrant results without adding excess moisture to the dough.
- Prevent Stickiness: Lightly dust your hands and tools with powdered sugar while working to keep the dough smooth.
- Adjust Peppermint Strength: Start with ½ teaspoon extract and taste; you can add up to ¾ teaspoon for a stronger mint flavor.
- Add Some Sparkle: For an elegant touch, sprinkle edible glitter or sanding sugar over the mints before drying.
- Shape Variations:
- Roll into small balls and press lightly with a fork for a traditional peppermint look.
- Use small cookie cutters (stars, hearts, or trees) for festive shapes.
- Flavor Variations:
- Try spearmint, wintergreen, or vanilla extract instead of peppermint.
- Make "candy cane" inspired swirls with red and white dough only.
- Color Ideas: Beyond Christmas, you can adapt this recipe for any holiday - pastel colors for Easter, orange and black for Halloween, or red and pink for Valentine's Day!
Frequently Asked Questions
1. How long do homemade mints last?
Properly stored in an airtight container, these mints stay fresh for up to two weeks at room temperature or a month in the fridge.
2. Can I freeze Soft Christmas Peppermints?
Yes! Freeze in a sealed container for up to 3 months. Thaw at room temperature before serving.
3. Why is my dough too sticky or too dry?
If it's sticky, add a bit more powdered sugar until manageable. If it's too dry, mix in a teaspoon of sweetened condensed milk.
4. Can I use natural food coloring?
Absolutely. Beet powder, spinach powder, or natural food dyes work great for a more wholesome option.
5. Do they harden completely?
No - these are soft mints, so even after drying, they'll stay tender and creamy on the inside.
Final Thoughts
There's just something magical about making your own Soft Christmas Peppermints during the holiday season. They're beautiful, nostalgic, and add a personal touch to your festive celebrations. Whether you're gifting them in a jar tied with ribbon, setting them out for guests, or sneaking a few as you wrap presents, these mints will make your holidays a little sweeter.
I've been making this recipe for years, and it never fails to delight. The combination of the creamy texture, peppermint aroma, and cheerful colors captures everything I love about Christmas. Plus, they're simple enough that even kids can join in the fun - making them a perfect family activity.
Soft Christmas Peppermints
Ingredients
- 3¾ cups powdered sugar plus extra for dusting
- ⅓ cup sweetened condensed milk
- ½ teaspoon peppermint extract
- Red and green food coloring gel preferred
- Granulated sugar for coating
Instructions
- In a large bowl, sift the powdered sugar to remove lumps, reserving a small amount for dusting your work surface.
- Add the sweetened condensed milk and peppermint extract to the powdered sugar, mixing until a sticky dough forms. If it's too wet, add more powdered sugar a tablespoon at a time.
- Divide the dough into three portions. Leave one portion plain, and color the others red and green using gel food coloring. Knead until colors are evenly distributed.
- Dust your work surface with powdered sugar. Roll each colored dough into thin ropes, about ½ inch thick.
- Twist the red, green, and plain ropes together gently to create a candy cane effect.
- Cut into 2-inch segments and shape into small rounds or discs.
- Roll each peppermint in granulated sugar to coat.
- Place on a parchment-lined baking sheet and let dry at room temperature for several hours or overnight until firm.
Notes
- Use gel food coloring for bright, festive colors without making the dough sticky.
- Dust hands and surfaces with powdered sugar to prevent sticking while shaping.
- Adjust the peppermint extract to taste; start with ½ teaspoon and add more if desired.
- Store in an airtight container at room temperature for up to 2 weeks, or refrigerate for up to 1 month.
- Perfect for holiday gifts, cookie trays, or as a festive candy dish addition!
Kimberly Croddy says
Looks like what my grandmother used to make. Can’t wait to try and make it with my daughter.