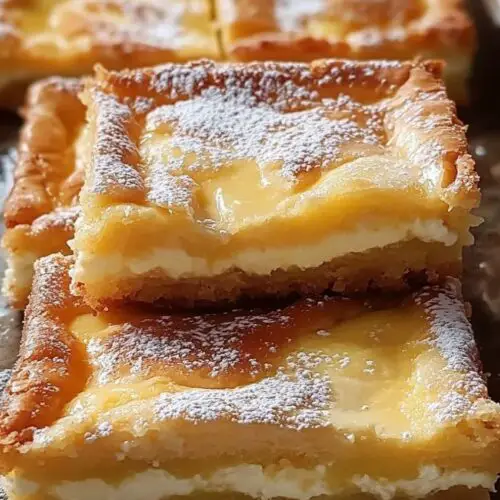
The first time I made Ooey Gooey Bars, I had no idea they would become a household favorite. My grandmother used to bake them for special occasions, and I remember the excitement of biting into that soft, sweet, and buttery goodness. They're rich, indulgent, and incredibly easy to make, requiring just a few simple ingredients. Whether you're a seasoned baker or a beginner, this recipe is foolproof and guaranteed to impress. If you love desserts that melt in your mouth, then this one is for you!

These bars are a perfect combination of a dense, chewy crust and a rich, creamy topping. The buttery base provides a firm foundation, while the filling stays soft, luscious, and gooey-just as the name suggests! The simplicity of this recipe is what makes it so appealing. With minimal prep time and a handful of ingredients, you can create a delicious dessert that will have everyone asking for seconds.
Why You'll Love This Recipe
- Easy to Make: Uses simple pantry ingredients that you probably already have.
- Rich and Indulgent: A perfect balance of buttery crust and creamy filling.
- Crowd Pleaser: Everyone loves these bars, making them great for parties, potlucks, and family gatherings.
- Minimal Prep Time: Just a few steps and into the oven it goes!
- Customizable: You can easily tweak the ingredients to make different variations.
- Great for Storage: These bars keep well, so you can make them ahead of time.
Ingredients You'll Need
For the Crust:
- 1 egg
- 1 stick butter, softened
- 1 box yellow cake mix
For the Filling:
- 2 eggs
- 1 teaspoon vanilla essence
- 16 oz powdered sugar
- 8 oz cream cheese, softened
Step-by-Step Instructions
1. Preheat and Prepare
Preheat your oven to 325°F. While waiting for the oven to heat up, grease a baking dish with butter or non-stick spray to prevent sticking. If you prefer easy removal, line the baking dish with parchment paper, leaving an overhang for easy lifting once baked.
2. Make the Crust
In a large bowl, combine the egg, softened butter, and yellow cake mix. Stir until the ingredients are well incorporated, and you achieve a dry dough-like mixture. This mixture will serve as the base of your bars and provide a sturdy foundation for the gooey filling.
3. Press the Crust
Transfer the mixture into the greased baking dish. Use your hands or the back of a spoon to evenly press the dough into the bottom of the dish. Ensure it covers the entire base in an even layer to create a uniform crust.
4. Prepare the Filling
In another large bowl, beat the softened cream cheese until smooth and creamy. Add the vanilla essence and eggs, mixing until well combined. The mixture should be silky and free of lumps.
5. Incorporate Sugar
Set aside ¼ of the powdered sugar in a small bowl. Slowly mix the remaining powdered sugar into the filling mixture, stirring constantly to prevent clumps. Mixing gradually ensures a smooth, lump-free batter that blends seamlessly into the creamy filling.
6. Assemble and Bake
Pour the prepared filling over the crust, spreading it evenly with a spatula. Bake in the preheated oven for 40-50 minutes until the top is golden brown. The center will still be slightly jiggly, which is fine as it will firm up while cooling.
7. Cool and Serve
Once baked, allow the bars to cool completely before slicing. If the bars appear puffy, don't worry-they will settle as they cool. Sprinkle the reserved powdered sugar over the top for a decorative finish. Cut into squares and serve at room temperature.
Serving and Storage Tips
- Serving: Cut into squares and serve at room temperature.
- Storage: Keep in an airtight container at room temperature for up to 2 days.
- Refrigeration: Store in the fridge for up to a week for best freshness.
- Freezing: Freeze in a sealed container for up to 3 months.
- Reheat: Let frozen bars thaw at room temperature or warm briefly in the microwave.
- Best Enjoyed: These bars taste best the day after baking as the flavors meld together perfectly.
- Pairing: Serve with a cup of coffee, tea, or a scoop of vanilla ice cream for an extra indulgent treat.
Helpful Notes
- For a chocolate twist, use a chocolate cake mix instead of yellow.
- Don't overbake-the center should be slightly gooey and not dry.
- A dusting of cinnamon can add a warm, spiced flavor.
- Use parchment paper for easy removal and slicing.
- If you like crunch, add chopped pecans or walnuts to the crust mixture.
- Want a caramel flavor? Drizzle caramel sauce over the top before serving.
Frequently Asked Questions
1. Can I use a different cake mix flavor?
Yes! Try chocolate, butter pecan, or even spice cake mix for a fun twist on the original recipe. The base will still turn out delicious while adding an extra dimension of flavor.
2. How do I know when the bars are done baking?
They should be golden brown on top but still slightly jiggly in the center. They will firm up as they cool. If the edges appear firm and the center looks set but soft, they're ready.
3. Can I make these bars in advance?
Absolutely! These bars taste even better the next day. Store them in an airtight container overnight for the best texture. They can also be refrigerated and brought to room temperature before serving.
4. What can I use instead of cream cheese?
Mascarpone cheese is a great alternative, though it will have a slightly different texture and flavor. Greek yogurt can also be used for a tangier, slightly lighter version.
5. Why did my bars turn out too runny?
This can happen if they weren't baked long enough. Ensure they are golden on the edges and let them cool completely before cutting. If the mixture was overmixed, it could have affected the consistency, so try gentle mixing next time.
Final Thoughts
Ooey Gooey Bars are the perfect treat when you want something sweet, buttery, and satisfying. They bring warmth and nostalgia with every bite, making them a go-to dessert for family gatherings, holidays, or a simple weekend indulgence. The combination of the firm, cake-like crust and the creamy, soft filling makes for an irresistible dessert.
One of the best parts about these bars is their versatility-you can tweak them in numerous ways to suit your personal taste. Whether you enjoy the classic version, a chocolate variation, or even a nutty twist, this recipe is a fantastic starting point for creativity in the kitchen. Give this recipe a try, and you'll soon understand why they're loved by so many!
Ooey Gooey Bars
Ingredients
For the Crust:
- 1 egg
- 1 stick butter softened
- 1 box yellow cake mix
For the Filling:
- 2 eggs
- 1 teaspoon vanilla essence
- 16 oz powdered sugar
- 8 oz cream cheese softened
Instructions
Preheat and Prepare
- Preheat your oven to 325°F. While waiting for the oven to heat up, grease a baking dish with butter or non-stick spray to prevent sticking. If you prefer easy removal, line the baking dish with parchment paper, leaving an overhang for easy lifting once baked.
Make the Crust
- In a large bowl, combine the egg, softened butter, and yellow cake mix. Stir until the ingredients are well incorporated, and you achieve a dry dough-like mixture. This mixture will serve as the base of your bars and provide a sturdy foundation for the gooey filling.
Press the Crust
- Transfer the mixture into the greased baking dish. Use your hands or the back of a spoon to evenly press the dough into the bottom of the dish. Ensure it covers the entire base in an even layer to create a uniform crust.
Prepare the Filling
- In another large bowl, beat the softened cream cheese until smooth and creamy. Add the vanilla essence and eggs, mixing until well combined. The mixture should be silky and free of lumps.
Incorporate Sugar
- Set aside ¼ of the powdered sugar in a small bowl. Slowly mix the remaining powdered sugar into the filling mixture, stirring constantly to prevent clumps. Mixing gradually ensures a smooth, lump-free batter that blends seamlessly into the creamy filling.
Assemble and Bake
- Pour the prepared filling over the crust, spreading it evenly with a spatula. Bake in the preheated oven for 40-50 minutes until the top is golden brown. The center will still be slightly jiggly, which is fine as it will firm up while cooling.
Cool and Serve
- Once baked, allow the bars to cool completely before slicing. If the bars appear puffy, don't worry-they will settle as they cool. Sprinkle the reserved powdered sugar over the top for a decorative finish. Cut into squares and serve at room temperature.
Notes
- For a chocolate twist, use a chocolate cake mix instead of yellow.
- Don't overbake-the center should be slightly gooey and not dry.
- A dusting of cinnamon can add a warm, spiced flavor.
- Use parchment paper for easy removal and slicing.
- If you like crunch, add chopped pecans or walnuts to the crust mixture.
- Want a caramel flavor? Drizzle caramel sauce over the top before serving.

Leave a Reply