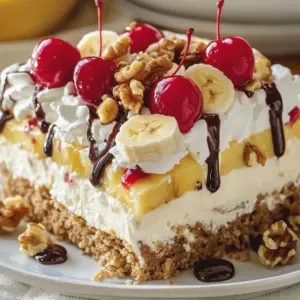
A nostalgic, fruity, and creamy dessert that's perfect for warm days and sweet celebrations!
When I think of summertime desserts that bring a smile to everyone's face, this No-Bake Banana Split Cake is one of the first that comes to mind. It's an old-fashioned, crowd-pleasing treat that I remember from church potlucks and backyard BBQs. Every time someone brought it out, it disappeared in minutes!

What makes it so special is how it takes all the delicious flavors of a banana split-bananas, pineapple, whipped cream, cherries, and chocolate-and layers them into a cool, creamy dessert with a buttery graham cracker crust. And the best part? No oven required. It's perfect for those hot days when you want something sweet without heating up the kitchen.
Why You'll Love This Recipe
- No baking involved - Perfect for summer or when you just want something easy and fuss-free.
- Retro charm - A fun throwback dessert that always delights guests of all ages.
- Great for gatherings - Feeds a crowd and holds up well on dessert tables.
- Customizable - You can tweak the toppings and layers to suit your tastes.
- Cool and creamy - It's like enjoying a banana split in sliceable form!
Ingredients You'll Need
For the Crust:
- 2 cups graham cracker crumbs
- ½ cup unsalted butter, melted
For the Cream Layer:
- 8 oz cream cheese, softened
- ½ cup granulated sugar
- 1 teaspoon vanilla extract
- 8 oz whipped topping (like Cool Whip), thawed
For the Fruit & Toppings:
- 3 to 4 ripe bananas, sliced
- 1 can (20 oz) crushed pineapple, well drained
- 8 oz whipped topping, for the top layer
- ½ cup chopped walnuts
- Chocolate syrup or hot fudge, for drizzling
- Maraschino cherries, for garnish
Step-by-Step Instructions
Step 1: Make the Crust
In a medium mixing bowl, combine graham cracker crumbs and melted butter. Stir until the mixture is fully moistened and resembles wet sand.
Press the mixture firmly and evenly into the bottom of a 9x13-inch dish to form a crust. Place in the refrigerator to chill while you prepare the cream layer.
Tip: Press down with the bottom of a glass to really pack it in for a sturdy crust.
Step 2: Whip Up the Cream Cheese Layer
In a large bowl, beat together the softened cream cheese, sugar, and vanilla extract until smooth and creamy. This will be your luscious cheesecake-style layer.
Fold in 8 oz of whipped topping until well combined. The mixture should be light, fluffy, and spreadable.
Spread this cream mixture evenly over the chilled crust, smoothing it out with a spatula.
Tip: A small offset spatula works great for even layers!
Step 3: Add the Fruit Layers
Next, slice the bananas and arrange them in an even layer over the cream filling.
Then, spoon the well-drained crushed pineapple over the banana layer. Spread it gently to distribute it evenly.
Important: Make sure the pineapple is well drained to avoid excess moisture making the cake soggy.
Step 4: Top with Whipped Cream
Spread the remaining 8 oz of whipped topping over the fruit layers. Use a spatula to smooth it into an even layer, sealing in all that fruity goodness.
Step 5: Decorate!
Now for the fun part-toppings! Sprinkle the chopped walnuts generously over the top. Then drizzle with chocolate syrup or warm fudge in a zigzag pattern. Finally, top with maraschino cherries for that classic banana split look.
Tip: Let little ones help with the decorating-it's a great hands-on kitchen activity!
Serving and Storage Tips
- Chill time: Refrigerate the finished dessert for at least 4 hours, or overnight if possible. This helps the layers set and the flavors meld together.
- To serve: Slice with a sharp knife and use a pie server or spatula to lift out squares. Clean slices are easier if it's well chilled.
- To store: Cover tightly and refrigerate for up to 3 days. It's best enjoyed fresh before the bananas brown.
- Freezing? Not recommended-bananas and whipped topping don't thaw well.
Helpful Notes
- Drain that pineapple well - Place it in a mesh strainer and press out excess liquid with the back of a spoon.
- Use ripe bananas - Not overripe, but soft and sweet for the best texture and flavor.
- Swap the nuts - Allergic to walnuts? Try pecans or skip the nuts entirely.
- Chocolate options - Swap fudge for chocolate shell, or drizzle melted chocolate chips mixed with a bit of cream.
Frequently Asked Questions
- Can I make this dessert ahead of time?
Yes! In fact, it's best chilled for several hours or overnight, which makes it perfect for prepping ahead. - Can I use fresh whipped cream instead of Cool Whip?
You sure can! Whip 2 cups of heavy cream with a few tablespoons of powdered sugar until stiff peaks form. - What can I use instead of graham crackers?
Crushed vanilla wafers or digestive biscuits work beautifully as substitutes. - Can I add other fruits?
Absolutely! Try sliced strawberries, blueberries, or even kiwi for a fun twist. - How do I prevent the bananas from browning?
Make sure they're fully covered by the whipped topping. You can also lightly brush slices with lemon juice before layering.
Final Thoughts
This No-Bake Banana Split Cake is the definition of a feel-good dessert-colorful, creamy, and so easy to make. It's perfect for potlucks, picnics, birthdays, or anytime you want to bring a little extra joy to the table without turning on the oven.
Have you tried this recipe yet? I'd love to hear if you added your own twist or favorite topping-let's make dessert delicious together! 🍌🍫🍒
No-Bake Banana Split Cake
Ingredients
For the Crust:
- 2 cups graham cracker crumbs
- ½ cup unsalted butter melted
For the Cream Layer:
- 8 oz cream cheese softened
- ½ cup granulated sugar
- 1 teaspoon vanilla extract
- 8 oz whipped topping like Cool Whip, thawed
For the Fruit & Toppings:
- 3 to 4 ripe bananas sliced
- 1 can 20 oz crushed pineapple, well drained
- 8 oz whipped topping for the top layer
- ½ cup chopped walnuts
- Chocolate syrup or hot fudge for drizzling
- Maraschino cherries for garnish
Instructions
Step 1: Make the Crust
- In a medium mixing bowl, combine graham cracker crumbs and melted butter. Stir until the mixture is fully moistened and resembles wet sand.
- Press the mixture firmly and evenly into the bottom of a 9×13-inch dish to form a crust. Place in the refrigerator to chill while you prepare the cream layer.
- Tip: Press down with the bottom of a glass to really pack it in for a sturdy crust.
Step 2: Whip Up the Cream Cheese Layer
- In a large bowl, beat together the softened cream cheese, sugar, and vanilla extract until smooth and creamy. This will be your luscious cheesecake-style layer.
- Fold in 8 oz of whipped topping until well combined. The mixture should be light, fluffy, and spreadable.
- Spread this cream mixture evenly over the chilled crust, smoothing it out with a spatula.
- Tip: A small offset spatula works great for even layers!
Step 3: Add the Fruit Layers
- Next, slice the bananas and arrange them in an even layer over the cream filling.
- Then, spoon the well-drained crushed pineapple over the banana layer. Spread it gently to distribute it evenly.
- Important: Make sure the pineapple is well drained to avoid excess moisture making the cake soggy.
Step 4: Top with Whipped Cream
- Spread the remaining 8 oz of whipped topping over the fruit layers. Use a spatula to smooth it into an even layer, sealing in all that fruity goodness.
Step 5: Decorate!
- Now for the fun part-toppings! Sprinkle the chopped walnuts generously over the top. Then drizzle with chocolate syrup or warm fudge in a zigzag pattern. Finally, top with maraschino cherries for that classic banana split look.
- Tip: Let little ones help with the decorating-it's a great hands-on kitchen activity!
Notes
- Drain that pineapple well - Place it in a mesh strainer and press out excess liquid with the back of a spoon.
- Use ripe bananas - Not overripe, but soft and sweet for the best texture and flavor.
- Swap the nuts - Allergic to walnuts? Try pecans or skip the nuts entirely.
- Chocolate options - Swap fudge for chocolate shell, or drizzle melted chocolate chips mixed with a bit of cream.

Leave a Reply