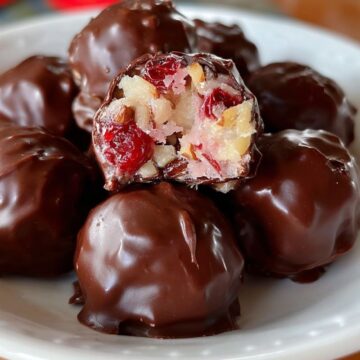
Some recipes are timeless, passed down through generations, and treasured for their nostalgic flavors and simple charm. Martha Washington Candies fall into that category. These bite-sized confections are rich, decadent, and a little old-fashioned in the best way possible. With a sweet coconut base, chewy maraschino cherries, crunchy pecans, and a creamy chocolate coating, they're the kind of candies that bring back memories of holiday dessert trays and family gatherings.

This recipe is believed to have originated in the early 20th century, named after America's first First Lady. Whether Martha Washington herself ever made them is debatable, but the candies have stood the test of time, appearing in community cookbooks, church recipe cards, and holiday spreads for decades. They're especially popular during Christmas, when trays of homemade candies and cookies become the centerpiece of many kitchens. Once you make these, you'll see why - they're easy, festive, and absolutely irresistible.
Why You'll Love Martha Washington Candies
- Old-fashioned charm - A classic candy that feels nostalgic and homey.
- Easy to make - Simple mixing, rolling, and dipping - no candy thermometer needed.
- Festive flavors - Coconut, cherries, and pecans give a rich holiday vibe.
- Perfect for gifting - Package in tins or boxes for thoughtful homemade presents.
- Make-ahead friendly - Candies store well in the fridge for up to 2 weeks.
- Crowd-pleasing - Loved by kids and adults alike.
Ingredients You'll Need
- 1 cup butter, melted - Provides richness and helps bind the mixture.
- 1 pound powdered sugar - Sweetens and gives structure to the filling.
- 1 tablespoon vanilla extract - Adds depth of flavor.
- 14 ounces sweetened shredded coconut - Gives the candies their signature chewy texture.
- 14 ounces sweetened condensed milk - Adds creaminess and holds everything together.
- 10 ounces maraschino cherries, drained and chopped - Adds a pop of color and fruity sweetness.
- 3 cups finely chopped pecans - Provides crunch and nutty flavor.
- 16 ounces candy coating (such as Ghirardelli melting wafers, almond bark, or similar) - Creates the smooth, glossy shell.
Step-by-Step Instructions
Preparing the Filling
- Mix base ingredients - In a large bowl, stir together melted butter, powdered sugar, and vanilla extract until smooth.
- Add coconut and milk - Mix in shredded coconut and sweetened condensed milk until fully combined.
- Fold in cherries and pecans - Gently stir in chopped cherries and pecans, making sure they're evenly distributed.
Forming the Candies
- Shape balls - Line a baking sheet with parchment paper. Using a spoon or your hands, shape the mixture into bite-sized balls and place them on the sheet.
- Chill - Refrigerate for about 1 hour, or until the balls are firm enough to dip.
Coating the Candies
- Melt candy coating - Melt the chocolate coating according to package instructions. Stir until smooth.
- Dip balls - Using a fork or dipping tool, coat each candy ball in melted chocolate. Let excess drip off before placing back on the parchment.
- Chill again - Refrigerate for another 30 minutes until the coating is completely set.

Serving and Storage Tips
These candies are best served chilled, straight from the fridge. They're perfect for parties, cookie exchanges, or simply enjoying with coffee or tea.
Serving ideas:
- Arrange on a festive holiday platter with other homemade candies.
- Place in mini cupcake liners for a polished look.
- Wrap individually in candy wrappers for gifting.
Storage:
- Store in an airtight container in the refrigerator for up to 2 weeks.
- Freeze for up to 3 months. Thaw overnight in the fridge before serving.
Helpful Notes
- Chill before dipping - Cold filling balls are easier to coat and hold their shape better.
- Don't overheat coating - Overheating chocolate can cause it to seize. Melt gently and stir often.
- Customize flavors - Swap pecans for walnuts or almonds, or use dried fruit instead of cherries.
- Decorative toppings - Sprinkle with crushed nuts, coconut, or holiday sprinkles before the coating sets.
- Smaller batches - Halve the recipe if you don't need a large quantity.
Frequently Asked Questions
- Can I use fresh cherries instead of maraschino?
Fresh cherries contain too much moisture, which can make the candies soggy. Stick with maraschino or dried cherries. - Can I use regular chocolate chips instead of candy coating?
Yes, but add a teaspoon of shortening or coconut oil to help the chocolate melt smoothly and set better. - Do these candies have to be refrigerated?
Yes, because of the sweetened condensed milk and cherries, refrigeration keeps them fresh and safe to eat. - Can I make them nut-free?
Absolutely - just leave out the pecans or substitute with more coconut. - How do I keep my coating smooth?
Work quickly and stir the melted chocolate often. If it starts to thicken, reheat briefly in the microwave or over a double boiler.
Final Thoughts
These Martha Washington Candies are a true classic - rich, chewy, and sweet with a satisfying crunch from pecans and a fruity bite from cherries. They're the kind of candy that never goes out of style, perfect for holiday gatherings, gift-giving, or whenever you want to share a homemade treat.
I've made these for years, and every time they earn rave reviews. They're surprisingly simple, but they taste like something special, the kind of recipe you'll want to keep in your family for generations. Whether you're making them for a Christmas candy platter or just because, these candies are guaranteed to bring smiles and sweet memories.
Martha Washington Candies
Ingredients
- 1 cup butter melted
- 1 pound powdered sugar
- 1 tablespoon vanilla extract
- 14 ounces sweetened shredded coconut
- 14 ounces sweetened condensed milk
- 10 ounces maraschino cherries drained and chopped
- 3 cups finely chopped pecans
- 16 ounces candy coating melting wafers, almond bark, or similar
Instructions
- In a large bowl, mix melted butter, powdered sugar, and vanilla extract until smooth.
- Stir in coconut and sweetened condensed milk until fully combined.
- Fold in cherries and pecans until evenly distributed.
- Line a baking sheet with parchment paper. Shape mixture into small bite-sized balls and place on the sheet.
- Refrigerate for 1 hour, or until firm.
- Melt candy coating according to package directions.
- Dip each chilled candy ball into melted coating, letting excess drip off, then return to parchment-lined sheet.
- Refrigerate for 30 minutes or until coating sets.
- Store in an airtight container in the fridge for up to 2 weeks.
Notes
- Always use parchment paper for easy cleanup and non-stick results.
- Chill filling balls thoroughly before dipping for smoother coating.
- Add holiday sprinkles, crushed nuts, or coconut flakes on top before coating sets for decoration.
- Store candies refrigerated; they also freeze well for up to 3 months.
- Swap pecans for almonds or walnuts for a variation in flavor.
Leave a Reply