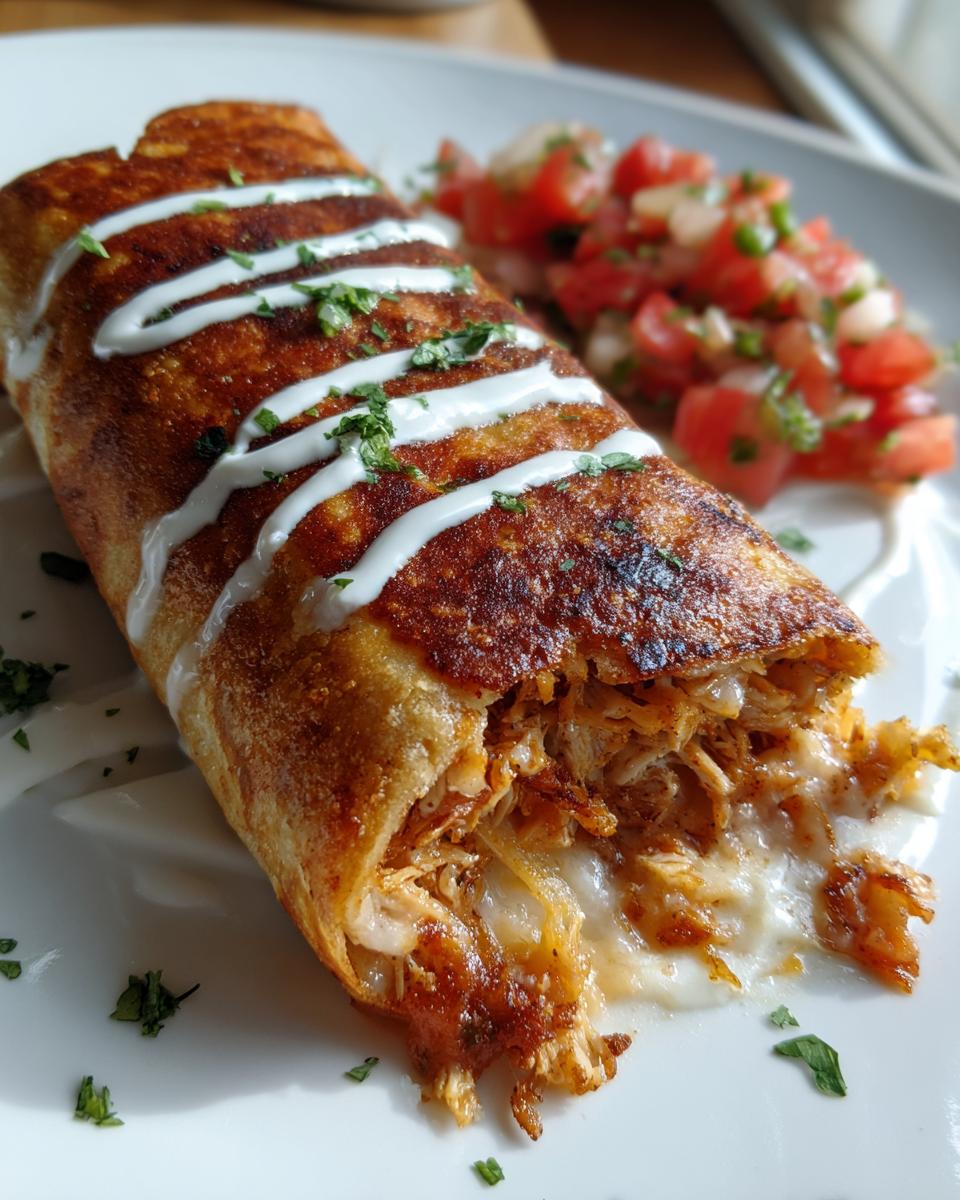
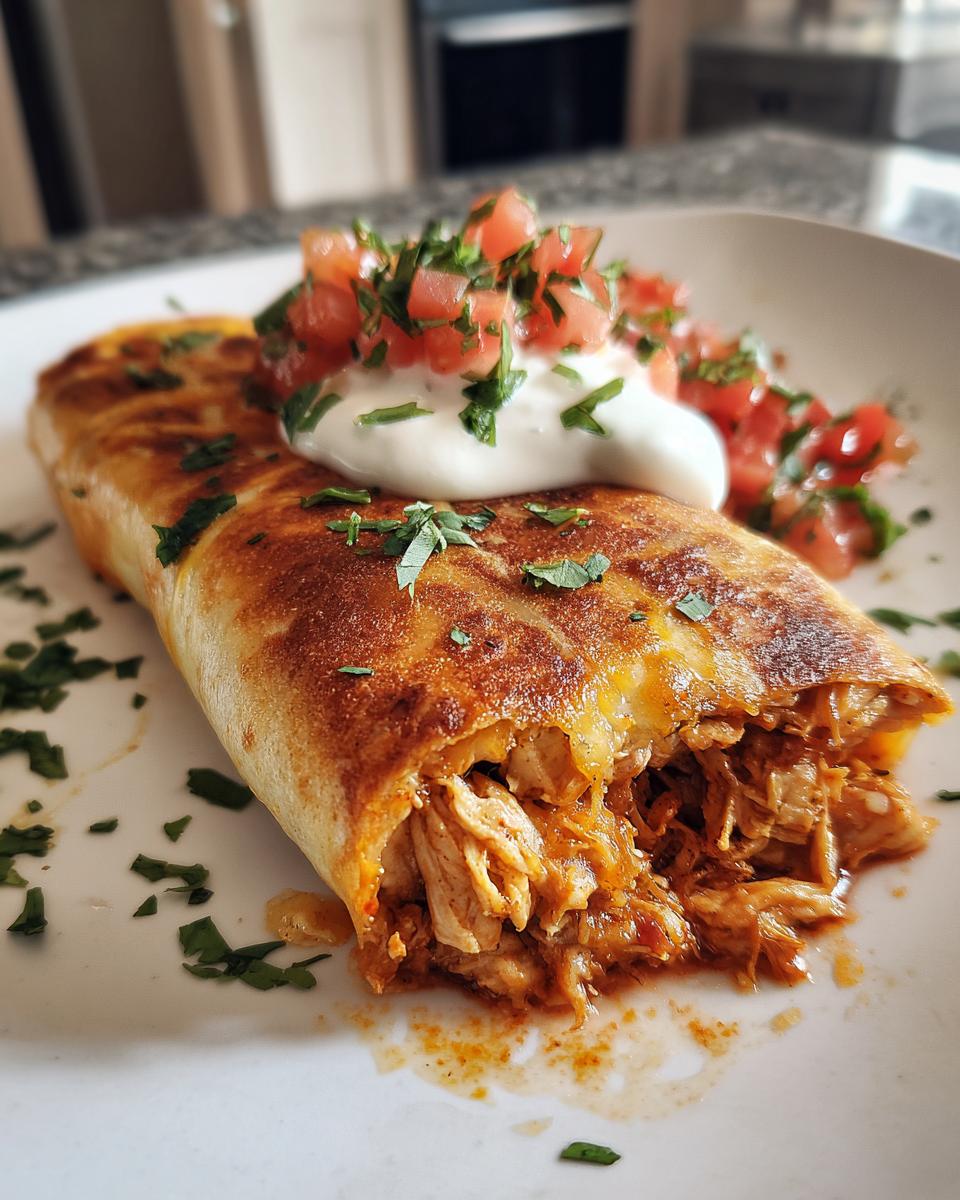
There's something magical about homemade chicken chimichangas that just hits different. That perfect golden crunch giving way to tender, spice-kissed chicken and melty cheese? Forget about it! I've been making these for years, ever since my abuelita showed me her secret for getting that restaurant-quality crisp without deep frying a whole vat of oil. Trust me - once you taste these, those sad takeout versions just won't cut it anymore.

What makes my chicken chimichangas special is how simple they are to whip up, yet they taste like you slaved over them. The combo of creamy refried beans, tangy green chiles, and those warm Mexican spices folded into a crispy tortilla package? Absolute perfection. My neighbors can smell when I'm making a batch because that cumin-garlic aroma drifts halfway down the block. And the best part? You can fry 'em for maximum crunch or bake for a lighter version - both ways are winners in my book.
Why You'll Love These Homemade Chicken Chimichangas
Listen, these aren't your average chimichangas - they're the kind you'll want to make every Taco Tuesday (and let's be real, probably Wednesdays too). Here's why they're absolutely irresistible:
- That perfect crunch: We're talking golden, crispy tortilla shells that shatter when you bite in - just like your favorite Mexican restaurant makes.
- Flavors that dance: Smoky cumin, tangy green chiles, and three kinds of cheese create a party in every bite.
- Your kitchen, your rules: Fry 'em for maximum indulgence or bake for a lighter version - both ways are delicious.
- Weeknight warrior: Ready in 25 minutes flat, even faster than waiting for delivery.
- Crowd-pleaser magic: Kids go nuts for these, and adults? They'll be begging for your recipe.
Ingredients for Homemade Chicken Chimichangas
Gather these simple ingredients - I promise every single one plays a key role in making these chimichangas spectacular:
- ½ cup salsa (I swear by Mateo's medium for that perfect kick)
- ½ cup sour cream (full-fat gives the creamiest texture)
- ½ cup refried beans packed firmly into the measuring cup
- 4 oz. can mild chopped green chiles (don't drain - that liquid adds flavor!)
- 3 cups shredded cooked chicken (rotisserie chicken works like a charm)
- 1 cup freshly shredded Monterrey Jack cheese (please, please shred it yourself - it melts so much better)
- 1 cup freshly shredded sharp cheddar cheese
- 6 burrito-size flour tortillas (10-inch diameter - no substitutions here)
- Vegetable oil for frying (about 1 inch deep in your skillet)
How to Make Homemade Chicken Chimichangas
Okay, let's get down to business - this is where the magic happens! I'll walk you through each step so your chimichangas come out crispy, cheesy, and packed with flavor. Don't worry if you've never made these before - my abuelita's method is foolproof.
Preparing the Filling
First things first - grab that big mixing bowl (you know, the one that always seems too small halfway through). Here's the secret: start with the wet stuff. Mix together your salsa, sour cream, and refried beans until they're basically best friends. Those green chiles go in next - juice and all! That's where the flavor lives.
Now sprinkle in all those gorgeous spices - the chili powder, cumin, garlic powder, onion powder, smoked paprika, oregano, and salt. Stir until every last bit is coated in that aromatic goodness. Your kitchen should be smelling amazing right about now!
Finally, gently fold in the shredded chicken and both cheeses. Don't overmix here - we want those cheese strands to stay intact so they'll melt into glorious gooey pockets later. The filling should hold together when you press it with a spoon - if it seems too wet, add a sprinkle more cheese.
Assembling and Frying
Lay out your tortillas (microwave them for 15 seconds if they're being stubborn - it makes them more pliable). Spoon about ½ cup of filling slightly below the center of each tortilla. Here's my grandma's folding trick: fold the sides in first, like you're tucking in a baby, then bring the bottom flap up and over the filling. Roll it away from you tightly - the filling should be completely enclosed with just a tiny bit of tension on the tortilla.
Heat about 1 inch of oil in a deep skillet over medium-high heat (350°F if you're using a thermometer). Test it with a tiny piece of tortilla - if it sizzles immediately, you're golden (pun intended). Carefully place chimichangas seam-side down using tongs - this seals them shut. Fry for 2-3 minutes per side until they're that perfect deep golden brown. Don't crowd the pan - do two at a time if needed.
Transfer to a paper towel-lined plate to drain (this keeps them crispy!). Let them rest just a minute - I know it's hard to wait, but that molten cheese is basically lava right now. Serve with all the fixings and get ready for the compliments to roll in!
Tips for Perfect Homemade Chicken Chimichangas
After making hundreds of these babies, I've learned a few tricks that'll take your chimichangas from good to "oh my god, give me the recipe!" status:
- Cheese matters: Always shred your own cheese - those pre-shredded bags have anti-caking agents that make melting weird.
- Don't overstuff: About ½ cup filling per tortilla is perfect - any more and they'll burst open while frying.
- Oil test: Toss in a tiny tortilla scrap - if it bubbles immediately but doesn't burn, your oil's at the perfect temp.
- Patience pays: Let them drain on paper towels for a minute before serving - that quick rest makes the crunch even better.
Ingredient Substitutions
Ran out of something? No worries - here are my favorite swaps that still keep the spirit of these chimichangas alive:
- Black beans work great instead of refried beans - just mash them slightly for a similar texture (though you'll miss that creamy richness).
- Greek yogurt can stand in for sour cream - it's tangier but cuts calories while keeping that essential moisture.
- Pepper jack adds nice heat if you're out of Monterrey Jack - just know it'll dominate the flavor profile more.
Serving Suggestions for Homemade Chicken Chimichangas
These crispy beauties deserve an equally amazing supporting cast! My go-to spread always includes:
- Fluffy Mexican rice - the perfect sidekick for soaking up any escaped cheese
- Bright lime crema (just mix sour cream with lime zest and a pinch of salt)
- Chunky guacamole with plenty of cilantro
- Pickled red onions for a tangy crunch
Don't forget the hot sauce on the side - my family fights over who gets the last drop!
Storage and Reheating
These chimichangas keep beautifully in the fridge for up to 3 days - just stash 'em in an airtight container. Want that fresh-from-the-fryer crunch? Reheat in a 375°F oven or air fryer for 5-7 minutes. Microwaving works in a pinch, but expect a softer texture - still tastes amazing though!
Nutritional Information
Just a heads up - nutrition can vary based on your exact ingredients and brands. But for one of these glorious homemade chicken chimichangas, you're looking at roughly 420 calories, 22g fat (10g saturated), and a solid 28g protein to keep you full. Not too shabby for something this delicious!
Frequently Asked Questions
I get asked about these homemade chicken chimichangas all the time - here are the answers to the burning questions everyone seems to have:
Can I bake instead of fry? Absolutely! Brush them with oil and bake at 400°F for 20-25 minutes until golden. They won't get quite as crispy as fried, but they're still deliciously crunchy.
How do I prevent soggy chimichangas? Two secrets: make sure your filling isn't too wet, and don't skip that initial seam-side fry - that quick seal keeps all the goodness inside where it belongs.
Can I freeze them? You bet! Assemble but don't fry, wrap tightly in foil, and freeze for up to 2 months. Fry straight from frozen (just add a minute or two to cooking time).
Share Your Experience
Did you make these homemade chicken chimichangas? I'd love to hear how they turned out! Leave a comment or rating below - your kitchen adventures inspire me!
Print
Irresistible Homemade Chicken Chimichangas That Crunch Perfectly
- Total Time: 25 minutes
- Yield: 6 chimichangas 1x
- Diet: Low Lactose
Description
Crispy, flavorful homemade chicken chimichangas filled with shredded chicken, cheese, and spices, fried to golden perfection.
Ingredients
- ½ cup salsa (medium for more heat, like Mateo's brand)
- ½ cup sour cream
- ½ cup refried beans
- 4 oz. can mild chopped green chiles
- 2 teaspoons chili powder
- 1 teaspoon ground cumin
- 1 teaspoon garlic powder
- ½ teaspoon onion powder
- ½ teaspoon smoked paprika
- ½ teaspoon dried oregano
- ½ teaspoon salt
- 3 cups shredded cooked chicken (rotisserie works well)
- 1 cup freshly shredded Monterrey Jack cheese
- 1 cup freshly shredded sharp cheddar cheese
- 6 burrito-size flour tortillas
- Vegetable oil (if frying)
Instructions
- In a large bowl, mix salsa, sour cream, refried beans, green chiles, and all spices.
- Add shredded chicken and both cheeses. Stir until well combined.
- Divide the mixture evenly among the tortillas, placing it in the center of each.
- Fold the sides of the tortilla inward, then roll tightly from the bottom to form a burrito.
- Heat oil in a deep skillet over medium-high heat. Fry chimichangas seam-side down until golden brown, about 2-3 minutes per side.
- Drain on paper towels before serving.
Notes
- For a lighter version, bake at 400°F for 20-25 minutes until crispy.
- Serve with extra salsa, sour cream, or guacamole.
- Use freshly shredded cheese for best melting.
- Prep Time: 15 minutes
- Cook Time: 10 minutes
- Category: Main Dish
- Method: Frying or Baking
- Cuisine: Mexican
Nutrition
- Serving Size: 1 chimichanga
- Calories: 420
- Sugar: 3g
- Sodium: 890mg
- Fat: 22g
- Saturated Fat: 10g
- Unsaturated Fat: 9g
- Trans Fat: 0g
- Carbohydrates: 32g
- Fiber: 4g
- Protein: 28g
- Cholesterol: 85mg
Leave a Reply