There's something magical about pulling a tray of golden, bubbling Homemade Cheesy Breadsticks from the oven. The smell alone will have everyone crowding your kitchen! I've been making these for years - they're my go-to when friends drop by unexpectedly or when my kids beg for "something cheesy." What I love most is how simple they are - just basic pantry ingredients transformed into pure comfort food.

These breadsticks disappear faster than I can make them at parties. Movie nights? Game days? Just-because Tuesdays? They fit every occasion. The best part is watching people's faces when they realize you made them from scratch - that stretchy mozzarella pull never gets old! Trust me, once you try homemade, those frozen store-bought sticks will never satisfy again.
Ingredients for Homemade Cheesy Breadsticks
Gathering your ingredients is the first step to cheesy perfection! Here's what you'll need to make these irresistible breadsticks:
- 1 ½ cups all-purpose flour - the foundation for that perfect dough texture
- 1 teaspoon active dry yeast - make sure it's fresh for best rising
- ¾ teaspoon salt - just enough to enhance all the flavors
- 1 teaspoon sugar - helps activate the yeast
- 1 tablespoon olive oil - gives the crust that beautiful golden color
- ½ cup warm water (about 110°F) - not too hot or you'll kill the yeast!
- 1 tablespoon garlic powder (optional) - because everything's better with garlic
- 2 cups shredded mozzarella cheese - freshly shredded melts better than pre-packaged
- ½ cup grated parmesan cheese - adds that delicious sharp flavor
- 2 tablespoons butter, melted - for brushing that golden finish
- 1 teaspoon dried oregano or Italian seasoning (optional) - my secret flavor booster
How to Make Homemade Cheesy Breadsticks
Ready to turn those simple ingredients into golden, cheesy perfection? Follow these steps carefully - I've made every mistake so you don't have to! The process is easier than you think, and the results will make you feel like a pizza shop pro.
Preparing the Dough
First, whisk together your flour, yeast, salt, and sugar in a large bowl. Make a well in the center and pour in the warm water and olive oil. Now comes the fun part - dig in with your hands! Mix until a shaggy dough forms, then turn it out onto a lightly floured surface.
Knead for about 5 minutes until the dough becomes smooth and elastic. You'll know it's ready when it springs back slightly when poked. If it feels too sticky, add a sprinkle more flour - but go easy! Too much flour makes tough breadsticks. Place the dough in a greased bowl, cover with a damp towel, and let it rise in a warm spot for 1 hour. It should double in size - this patience pays off in fluffy texture!

Shaping and Baking Homemade Cheesy Breadsticks
Punch down the risen dough and roll it into a rectangle about ½ inch thick. Use a pizza cutter to slice it into 12 even strips - don't worry about perfection, rustic looks charming! Carefully transfer them to a parchment-lined baking sheet, leaving a little space between each.
Brush each strip generously with melted butter (this is where the magic happens!) and sprinkle with garlic powder if using. Now the good part - pile on that mozzarella and parmesan! I like to press the cheese lightly into the dough so it doesn't slide off during baking.
Bake at 375°F for 12-15 minutes until the cheese is bubbly and golden brown. Watch closely near the end - that perfect moment between melted and burnt is just seconds apart! Let them cool for 2 minutes (if you can resist) before serving. The cheese pull is everything!
Tips for Perfect Homemade Cheesy Breadsticks
After making countless batches (and eating even more!), I've learned a few tricks to take your breadsticks from good to "can I have the recipe?" amazing:
- Freshly shred your cheese - pre-shredded bags contain anti-caking agents that prevent that perfect melt. A block of mozzarella makes all the difference!
- Test your yeast first - mix it with the warm water and sugar before adding other ingredients. If it doesn't foam after 5 minutes, your yeast is dead and you'll need new.
- Don't skip the butter brush - that golden layer under the cheese prevents sogginess and adds incredible flavor. I sometimes mix melted butter with minced garlic for extra punch.
- Watch the bake time closely - oven temperatures vary. Pull them out when the cheese bubbles but before the edges darken too much.
- Let them rest briefly - as hard as it is, waiting 2 minutes lets the cheese set so it doesn't slide right off when you pick them up!
Variations of Homemade Cheesy Breadsticks
Once you've mastered the basic recipe, the fun really begins! Here are my favorite ways to mix things up:
- Spicy Kick: Add red pepper flakes or diced jalapeños under the cheese. My husband loves when I drizzle hot honey over the finished breadsticks!
- Herb Garden: Mix fresh chopped basil or rosemary right into the dough. I sometimes sprinkle Everything Bagel seasoning on top for extra crunch.
- Gluten-Free: Swap the all-purpose flour for your favorite 1:1 gluten-free blend. The texture changes slightly, but the cheesy goodness stays perfect.
- Meat Lover's: Before baking, scatter crispy bacon bits or pepperoni slices over the cheese. My kids call these "pizza sticks" and beg for them weekly!
The best part? You can make half a batch plain and half with toppings to please everyone. Get creative - that's how kitchen magic happens!
Serving Suggestions for Homemade Cheesy Breadsticks
These breadsticks are stars on their own, but oh boy, do they shine even brighter with the right partners! My absolute favorite is dunking them in warm marinara sauce - that classic combo never fails. For game nights, I set out bowls of ranch, garlic butter, or even spicy buffalo dip. They're also perfect alongside a big Italian wedding soup or crisp Caesar salad. Honestly? They disappear so fast, you might not need sides at all!
Storing and Reheating Homemade Cheesy Breadsticks
If by some miracle you have leftovers (rare in my house!), here's how to keep them tasting fresh. Store cooled breadsticks in an airtight container in the fridge for up to 3 days. For longer storage, freeze them on a baking sheet first, then transfer to freezer bags - they'll keep for a month. To reheat, pop them in a 350°F oven for 5-8 minutes until the cheese gets melty again. The microwave works in a pinch, but the oven brings back that perfect crispiness. Pro tip: sprinkle a little fresh cheese before reheating for that just-baked look!
Nutritional Information for Homemade Cheesy Breadsticks
Just so you know what you're enjoying (because let's be real - you won't stop at one!), here's the nutritional breakdown per breadstick. These are estimates since ingredients can vary:
- 150 calories - totally worth it for that cheesy goodness
- 8g fat (4g saturated) - hello, buttery deliciousness!
- 15g carbs - perfect balance with all that protein
- 6g protein - cheese power!
- 200mg sodium - easy to reduce if you use low-salt cheese
Remember, these numbers might change slightly based on your exact ingredients. But honestly? When that cheese pulls, nobody's counting!

FAQs About Homemade Cheesy Breadsticks
Q1. Can I use pre-shredded cheese for these breadsticks?
While you can use pre-shredded cheese in a pinch, I always recommend shredding your own mozzarella. The pre-packaged kind has anti-caking agents that make it melt less smoothly. Freshly shredded cheese gives you that Instagram-worthy cheese pull we all love!
Q2. How do I know when the dough has risen enough?
The dough should double in size, which usually takes about an hour in a warm spot. Do the "poke test" - if an indentation stays when you gently press a finger in, it's ready. If it springs back immediately, give it more time. Cold kitchens might need up to 90 minutes.
Q3. My breadsticks turned out dense - what went wrong?
This usually happens if the yeast was old or the water was too hot (over 110°F will kill yeast). Also, don't add too much flour when kneading - the dough should be slightly tacky but not sticky. And never skip the full rising time!
Q4. Can I make the dough ahead and bake later?
Absolutely! After the first rise, punch it down, wrap tightly in plastic, and refrigerate for up to 24 hours. Let it sit at room temp for 30 minutes before shaping. This actually develops more flavor - my little secret for extra-tasty breadsticks!
Q5. What's the best way to reheat leftover breadsticks?
The oven is your friend here! 350°F for 5-8 minutes brings back the crispiness. The microwave makes them rubbery (though still tasty in a desperate snack emergency). A quick tip: sprinkle a little fresh cheese before reheating for that just-baked look.
Final Thoughts
There you have it - my foolproof recipe for the most irresistible Homemade Cheesy Breadsticks! I can't wait for you to experience that first golden, stretchy bite. Don't be surprised when these become your new obsession - they certainly are mine. Tag me on social media when you make them... I love seeing your cheesy creations!
Print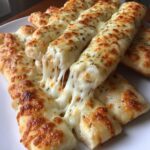
Irresistible Homemade Cheesy Breadsticks in 12 Simple Steps
- Total Time: 1 hour 25 minutes
- Yield: 12 breadsticks 1x
- Diet: Vegetarian
Description
Homemade Cheesy Breadsticks are a delicious and easy-to-make snack. They are perfect for parties, movie nights, or as a side dish.
Ingredients
- 1 ½ cups all-purpose flour
- 1 teaspoon active dry yeast
- ¾ teaspoon salt
- 1 teaspoon sugar
- 1 tablespoon olive oil
- ½ cup warm water
- 1 tablespoon garlic powder (optional)
- 2 cups shredded mozzarella cheese
- ½ cup grated parmesan cheese
- 2 tablespoons butter, melted
- 1 teaspoon dried oregano or Italian seasoning (optional)
Instructions
- Mix flour, yeast, salt, and sugar in a bowl.
- Add olive oil and warm water, then knead into a dough.
- Let the dough rise for 1 hour.
- Roll out the dough and cut into breadstick shapes.
- Brush with melted butter and sprinkle with garlic powder.
- Top with mozzarella and parmesan cheese.
- Bake at 375°F for 12-15 minutes until golden.
- Serve warm.
Notes
- Mozzarella cheese melts perfectly for cheesy goodness.
- Parmesan cheese adds a sharp, tangy flavor.
- Olive oil helps achieve a golden, crispy crust.
- Prep Time: 1 hour 10 minutes
- Cook Time: 15 minutes
- Category: Appetizer
- Method: Baking
- Cuisine: Italian
Nutrition
- Serving Size: 1 breadstick
- Calories: 150
- Sugar: 1g
- Sodium: 200mg
- Fat: 8g
- Saturated Fat: 4g
- Unsaturated Fat: 3g
- Trans Fat: 0g
- Carbohydrates: 15g
- Fiber: 1g
- Protein: 6g
- Cholesterol: 20mg
Leave a Reply