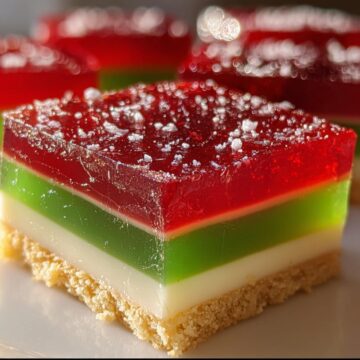
Oh, you're in for a treat! Green & Red Christmas Jelly has been my go-to festive dessert ever since my aunt brought it to our family gathering years ago. The moment I saw those cheerful layers of biscuit, creamy filling, and vibrant jelly, I knew I had to learn how to make it myself. It's such a nostalgic Australian holiday staple-simple, but it always steals the show.

This dessert is perfect for Christmas because it's light, refreshing, and looks absolutely stunning on the dessert table. Plus, it's no-bake, which is a lifesaver when the oven is already working overtime. Whether you're feeding a crowd or just want a little festive sweetness, this jelly is the answer!
Why You'll Love Green & Red Christmas Jelly
Honestly, what's not to love? This dessert is like Christmas in a slice-bright, cheerful, and impossible to resist. Here's why it's a must-make:
- It's a showstopper. Those layers of red and green jelly against the creamy middle and biscuit base? Pure holiday magic. Your guests will ooh and aah before they even take a bite.
- No oven required. When your kitchen's already packed with roasting pans and cookie sheets, a no-bake dessert is a lifesaver. Just a little mixing, pouring, and chilling-easy as pie (but way less work).
- Crowd-pleaser alert. Kids adore the jelly, adults love the creamy layer, and everyone goes wild for that buttery biscuit base. It's the rare dessert that ticks all the boxes.
- Make-ahead friendly. Prep it the day before, and you've got one less thing to stress about on Christmas Day. Just slice and serve when the time comes.
- Light but indulgent. After a heavy holiday meal, this hits the spot-sweet, refreshing, and with just the right amount of richness.
Trust me, once you make it, it'll become your holiday tradition too. I've lost count of how many times someone's asked me for the recipe mid-bite!
Ingredients You'll Need for Green & Red Christmas Jelly
Okay, let's gather everything you'll need! Don't worry-most of these are pantry staples or easy finds at the grocery store. I've grouped them by layer so you can tackle this dessert step by step without any confusion. Here's the breakdown:
Biscuit Base Ingredients
This buttery base is the perfect foundation-crunchy, sweet, and just sturdy enough to hold all those gorgeous layers. You'll need:
- 250g Arnott's Marie or Nice biscuits, crushed - These are my go-to because they're light and slightly sweet, but any plain sweet biscuit works. Graham crackers? Sure! Digestives? Absolutely. Just crush them fine-I use a rolling pin or blitz them in a food processor.
- 125g unsalted butter, melted - Salted butter works in a pinch, but unsalted lets the biscuit flavor shine. Melt it gently-no need to brown it!
Creamy Middle Layer Ingredients
This layer is the *chef's kiss*-silky, tangy, and just sweet enough. Here's what goes in:
- 395g sweetened condensed milk - That's one standard can. Don't skimp-this is what gives the layer its dreamy texture.
- 1 cup boiling water - Just off the kettle for dissolving the gelatine.
- ½ cup lemon juice - Freshly squeezed is best, but bottled works if you're in a rush. The tang balances the sweetness.
- 3 teaspoon gelatine - This sets the layer beautifully. If you're using sheets, check the packet for equivalent measurements.
- ¼ cup cold water - To bloom the gelatine before adding the hot water.
Jelly Layers Ingredients
The festive stars of the show! Go bold with these:
- 85g red jelly crystals (raspberry or strawberry flavor) - Raspberry is classic, but any red flavor works. Think cherries, cranberries-whatever says "Christmas" to you!
- 85g green jelly crystals (lime flavor) - Lime is traditional, but apple or kiwi could be fun twists.
- 2 cups boiling water (1 cup per jelly packet) - For dissolving the crystals.
- 2 cups cold water (1 cup per jelly packet) - To cool the jelly before layering.
That's it! Simple, right? Now, let's get layering.
Step-by-Step Instructions for Green & Red Christmas Jelly
Alright, let's dive in! Don't let the layers intimidate you-this dessert is all about patience, not skill. Just take it step by step, and you'll have a showstopper in no time.
Preparing the Biscuit Base
- Crush those biscuits. Dump your Marie or Nice biscuits into a zip-top bag and go at them with a rolling pin until they're fine crumbs. Or, if you're lazy like me sometimes, pulse them in a food processor. No big chunks-you want a texture like damp sand.
- Mix with melted butter. Pour the crumbs into a bowl, add the melted butter, and stir until every last bit is coated. It should clump together when you squeeze it-if it's too dry, add a tiny bit more butter.
- Press and chill. Scrape the mixture into your 20cm square tin (no need to grease it-the butter does that for you!). Press it down firmly with the back of a spoon or your fingers. Pop it in the fridge for at least 20 minutes to set. This is your foundation-make it solid!
Making the Creamy Layer
- Bloom the gelatine. Sprinkle the gelatine over the ¼ cup cold water in a small bowl and let it sit for 5 minutes. It'll look wrinkly and weird-that's perfect!
- Dissolve it. Pour the boiling water over the gelatine and whisk until it's completely dissolved. No lumps allowed! If you're nervous, microwave the mixture for 10 seconds to help it along.
- Mix the creamy magic. In a separate bowl, whisk together the condensed milk and lemon juice. Slowly pour in the gelatine mixture while whisking. It'll thicken slightly-this is normal! Pour it over your chilled biscuit base and smooth the top.
- Chill it hard. Refrigerate for at least 2 hours, or until the creamy layer is completely set. Test by gently poking the center-no wobble means it's ready for the jelly.
Adding the Jelly Layers
- Prep the red jelly first. Dissolve the red jelly crystals in 1 cup boiling water, stirring until clear. Add 1 cup cold water and let it cool to room temp (about 20 minutes). If you pour it hot, it'll melt the creamy layer-patience is key!
- First jelly layer. Gently pour the cooled red jelly over the creamy layer. Tilt the tin slightly to spread it evenly. Chill for 1 hour, or until set (no liquid jiggle when nudged).
- Repeat with green. Do the same with the green jelly-dissolve, cool, pour, and chill. Don't rush it! Each layer needs its own time to shine.
- Slice and serve. Once fully set (I usually leave it overnight), run a sharp knife around the edges and cut into squares. Wipe the knife between cuts for clean edges. Ta-da-Christmas on a plate!
See? Not hard-just a little waiting. But oh, the payoff is worth it!
Variations for Green & Red Christmas Jelly
Want to mix it up? This dessert is like a blank canvas-have fun with it! Here are some of my favorite twists:
- Jelly flavor shuffle: Swap red raspberry for cherry or cranberry, and lime for apple or kiwi. Or go wild with blue and white for a winter wonderland vibe!
- Fruity layers: Toss some fresh berries or diced mango between the creamy and jelly layers for little bursts of texture. Just pat them dry first so they don't bleed.
- Boozy kick: Replace ¼ cup of the jelly's cold water with vodka or fruity liqueur for an adults-only version (just warn your guests!).
- Coconut cream twist: Use coconut-flavored condensed milk and add shredded coconut to the biscuit base for a tropical Christmas feel.
The best part? No matter how you tweak it, it'll still look and taste like holiday cheer!
Serving and Storage Tips for Green & Red Christmas Jelly
Okay, let's talk about the grand finale-serving this beauty! Here's how to make sure it's as stunning on the plate as it was in your imagination:
- Slice it clean: Run a sharp knife under hot water, wipe it dry, and cut straight down-no sawing! Wipe the blade between cuts for those Instagram-worthy edges.
- Keep it cool: Serve this straight from the fridge. The jelly holds its shape better when chilled, and that creamy layer stays dreamy.
- Fridge life: It'll keep happily for 3-4 days covered in the fridge. Just press cling film directly onto the jelly surface to prevent weeping.
- Freezer? Nah. Jelly doesn't freeze well-it gets weepy when thawed. But trust me, leftovers are rare with this crowd-pleaser!
Pro tip: Pop slices onto a festive platter with some fresh mint or berries for that extra holiday "wow."
Helpful Notes for Perfect Green & Red Christmas Jelly
A few little tricks I've picked up over the years to make sure your jelly turns out flawless:
- Patience is key. Rushing the layers is the #1 mistake! If the creamy layer isn't fully set before adding jelly, you'll get a murky mess. No shortcuts here-give each layer its full chilling time.
- Cool jelly before pouring. Hot jelly melts the creamy layer. Let it sit until it's barely warm to the touch (about 20 minutes) before gently pouring.
- Gelatine pro tip: If your creamy layer isn't setting, you might've under-measured the gelatine. Next time, add an extra ½ teaspoon for insurance.
- Lighter option: Swap the condensed milk for light coconut milk + ¼ cup honey for a dairy-free version. Texture changes slightly, but still delicious!
Don't stress-even if layers aren't perfect, it'll still taste like Christmas magic!
Frequently Asked Questions About Green & Red Christmas Jelly
Over the years, I've gotten the same few questions about this dessert-so here's everything you might be wondering, answered in one spot!
- Can I use other biscuits for the base?
Absolutely! Arnott's Marie or Nice are classics, but graham crackers, digestives, or even gingersnaps work beautifully. Just aim for a plain sweet biscuit that crushes well. - How long does it keep in the fridge?
About 3-4 days, covered. The jelly might start to "weep" a little after day two, but it'll still taste amazing. Press cling film right onto the surface to help prevent it. - Can I make just one color of jelly?
Of course! Skip the green and double the red for a monochrome look, or vice versa. You'll just need to adjust the water amounts accordingly.
Still got questions? Drop them in the comments-I'm happy to help troubleshoot!
Final Thoughts on Green & Red Christmas Jelly
There you have it-my all-time favorite festive dessert! Green & Red Christmas Jelly is the perfect mix of nostalgia, simplicity, and pure holiday joy. It's the kind of treat that makes everyone smile, and honestly, that's what Christmas cooking is all about. Give it a go this year-I promise, it'll earn a permanent spot on your holiday table!
Green & Red Christmas Jelly
Equipment
- 20 cm square cake tin
- Mixing bowl
Ingredients
Biscuit Base
- 250 g Arnott's Marie or Nice biscuits, crushed
- 125 g unsalted butter, melted
Creamy Middle Layer
- 395 g sweetened condensed milk
- 1 cup boiling water
- 0.5 cup lemon juice
- 3 teaspoon gelatine
- 0.25 cup cold water
Jelly Layers
- 85 g red jelly crystals (raspberry or strawberry flavour)
- 85 g green jelly crystals (lime flavour)
- 2 cups boiling water 1 cup per jelly packet
- 2 cups cold water 1 cup per jelly packet
Instructions
- Mix crushed biscuits with melted butter and press into the base of a 20 cm square cake tin. Chill.
- Dissolve gelatine in boiling water, then add condensed milk, lemon juice, and cold water. Pour over the biscuit base and chill until set.
- Prepare red and green jelly separately by dissolving each packet in 1 cup boiling water, then adding 1 cup cold water. Allow to cool slightly.
- Pour red jelly over the creamy layer and chill until set. Repeat with green jelly.
- Cut into squares to serve.


Leave a Reply