Oh, apple slab pie-where do I even begin? This recipe holds a special place in my heart because it's the dessert my grandma always made for big family gatherings. No slicing tiny wedges and hoping there's enough to go around-just one giant, glorious slab of flaky crust and spiced apples that everyone can dig into. I remember sneaking into the kitchen as a kid, stealing bits of crust while she wasn't looking (she always knew, by the way).

Now, I make this for every potluck, holiday, or just because I need a little comfort food. It's easier than making a round pie, feeds a crowd, and honestly? The smell alone is worth it-cinnamon, buttery crust, and sweet apples filling your kitchen. Trust me, once you try this apple slab pie, you'll never go back to fussing with a regular pie dish again.
Why You'll Love This Apple Slab Pie
Okay, let's talk about why this apple slab pie is about to become your new go-to dessert. First off, it's basically pie magic-but easier. Here's why you're going to adore it:
- Feeds a crowd without the stress: No more awkwardly slicing tiny pie wedges hoping everyone gets a bite. This slab pie is like the superhero of desserts-big, generous, and perfect for parties, potlucks, or just treating yourself (no judgment here).
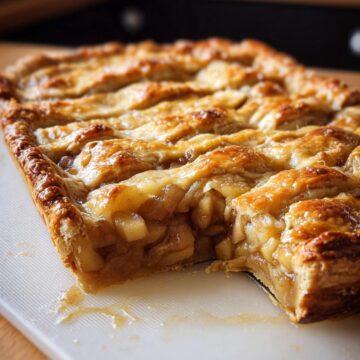
- That crust, though: Flaky, buttery, and just sturdy enough to hold all those juicy apples without falling apart. It's the kind of crust that makes people ask, "Wait, you made this from scratch??" (Yes, and you can too!)
- Spiced apple heaven: Cinnamon, nutmeg, and a hint of allspice turn those apples into something downright addictive. The filling is sweet but not cloying, with just enough tang from a squeeze of lemon to keep it balanced.
- Less fuss, more fun: Rolling out one big rectangle instead of fussing with a round pie crust? Genius. It's forgiving, fast, and way less intimidating for beginner bakers.
Perfect for Sharing
Seriously, this is the dessert you bring when you want to be the hero of the party. It slices into neat squares (or messy, hungry-person rectangles-your call), and there's always enough to go around. Plus, it travels like a dream-just slide the whole baking sheet into the car, and you're good to go.
Irresistible Flavor Combination
The filling is everything you love about classic apple pie, but better. The spices warm everything up without overpowering the fruit, and the cornstarch keeps it juicy but not soggy. Pro tip: Use a mix of sweet and tart apples (like Honeycrisp and Granny Smith) for the best flavor. Oh, and that golden, slightly crisp top crust? *Chef's kiss.*
Ingredients You'll Need for Apple Slab Pie
Okay, let's get into the nitty-gritty of what you'll need to make this beauty. Don't worry-it's all super straightforward, and I'll walk you through every step. Here's the breakdown:
For the Crust
- 3 ¾ cups (470 grams) all-purpose flour: This is the base of your crust, and it's going to give you that perfect flakiness.
- 1 ½ tablespoons sugar: Just a touch to sweeten the crust slightly.
- 1 ½ teaspoons table salt: Balances the flavors and enhances the butter.
- 3 sticks (12 oz or 340 grams) unsalted butter: Cubed and kept very cold. This is the secret to a flaky crust-cold butter creates those lovely layers.
- ¾ cup very cold water: Keeps the dough from getting too warm while you're working with it.
Pro tip: If your kitchen is warm, pop the dough in the fridge for a few minutes if it starts getting sticky. Cold is your friend here!
For the Apple Filling
-
- 3 ½ to 4 pounds apples: Peeled, cored, and chopped into ½-inch chunks (about 10 cups). I like a mix of sweet and tart apples-Honeycrisp and Granny Smith are my go-tos.
Step-by-Step Instructions for Apple Slab Pie
Alright, let's dive into making this gorgeous apple slab pie. I promise, it's easier than it looks-just follow these steps, and you'll have a showstopper dessert in no time.
Preparing the Dough
-
-
- Preheat your oven to 375°F (190°C). Trust me, you don't want to realize halfway through that your oven's cold!
- Mix the dry ingredients: In a large bowl, whisk together the flour, sugar, and salt. Easy peasy.
- Cut in the butter: Add those cold butter cubes and use a pastry cutter or your fingers to work it into the flour until it looks like coarse crumbs with some pea-sized bits of butter still visible. Those butter bits? That's where the flakiness comes from-don't overmix!
- Add the water: Drizzle in the cold water a little at a time, mixing just until the dough starts to come together. It might look a bit shaggy, but that's fine. If it's too dry, add a tablespoon more water.
- Chill out: Divide the dough in half, shape each into a flat disc, wrap in plastic, and refrigerate for at least 30 minutes. This lets the gluten relax and keeps the butter cold-key for a tender crust.
-
Assembling the Filling
-
-
- Prep the apples: While the dough chills, toss your chopped apples with the lemon juice in a big bowl. This keeps them from browning and adds a nice tang.
- Spice it up: Add the sugar, cornstarch, cinnamon, nutmeg, allspice, and salt. Mix well-you want every apple chunk to get coated evenly. The cornstarch will thicken those lovely juices as it bakes.
- Roll the bottom crust: Take one dough disc from the fridge and roll it out on a floured surface into a rectangle big enough to fit your baking sheet (about 10x15 inches). Don't stress about perfection-rustic is charming! Transfer it carefully to the sheet.
- Add the filling: Dump all that spiced apple goodness onto the crust, spreading it evenly. Leave about an inch of dough around the edges for sealing.
-
Baking to Perfection
-
-
- Top it off: Roll out the second dough disc just like the first. Lay it over the apples, then crimp the edges together with a fork or your fingers to seal. Cut a few slits in the top so steam can escape-get creative with the pattern if you want!
- Glaze and bake: Brush the top with heavy cream or egg wash for that gorgeous golden shine. Pop it in the oven and bake for about 45 minutes, until the crust is deep golden brown and you see bubbling juices peeking through the slits.
- Cool it down: Let the pie cool on the baking sheet for at least 30 minutes before slicing. I know, the wait is torture, but this keeps the filling from oozing everywhere. Serve warm with ice cream-you've earned it!
-
See? Not so scary! Just take it step by step, and soon your kitchen will smell like a cozy autumn dream.
Apple Slab Pie Variations
Okay, let's get creative! While I adore the classic version, sometimes it's fun to mix things up. Here are a few twists that'll make your apple slab pie even more irresistible (if that's even possible).
Caramel Apple Slab Pie
Oh boy, this one's dangerous. After you spread the apples but before adding the top crust, drizzle about ½ cup of good-quality caramel sauce over them. The caramel bubbles up and melds with the spiced apples-it's like autumn in every bite. Just watch your fingers when slicing; that caramel stays molten for a while!
Spiced Pear Alternative
Not an apple fan? No problem! Swap in firm pears (Bosc or Anjou work great) and replace the cinnamon with ½ teaspoon cardamom for a floral, slightly exotic twist. The pears get all jammy and sweet-perfect for when you want something a little different.
Other quick ideas: Toss in a handful of dried cranberries with the apples for tart pops of flavor, or sprinkle coarse sugar on the crust before baking for extra crunch. The beauty of slab pie? It's basically a blank canvas for your dessert dreams.
Serving and Storage Tips for Apple Slab Pie
Alright, let's talk about the best part-eating this glorious pie-and how to keep it tasting amazing even days later. Because let's be real, you might not finish it all in one sitting (though I wouldn't blame you if you tried).
Serving Suggestions
First things first: serve this pie warm. Not scalding-hot-straight-from-the-oven warm, but give it that 30-minute cool-down so the filling sets. Then, grab a big scoop of vanilla ice cream-the kind that melts into all the nooks and crannies-and plop it right on top. The contrast of cold ice cream and spiced apples? Absolute magic. If you're feeling fancy, drizzle with extra caramel or a dusting of cinnamon. No ice cream? Whipped cream works too, or even a dollop of Greek yogurt for a tangy twist.
And when it comes to slicing, go big or go home. A pizza cutter makes easy work of those perfect squares, but let's be honest-rustic, uneven slices taste just as good. Serve it right on the baking sheet for that casual, "I'm a pie genius" vibe.
Storing Leftovers
Got leftovers? (Lucky you.) Here's how to keep them fresh:
-
-
- Room temp: If you'll finish it within a day, just cover the pie loosely with foil and leave it on the counter. The crust stays crisp, and the flavors actually deepen a bit.
- Fridge: For longer storage, wrap tightly or transfer slices to an airtight container. It'll keep for up to 4 days. The crust might soften a tad, but a quick 10-minute reheat in a 350°F oven brings back the crunch.
- Freezer: Yes, you can freeze this! Slice it first, wrap pieces individually in foil, and stash them for up to 3 months. Thaw overnight in the fridge, then reheat as above. Perfect for emergency dessert cravings.
-
Pro tip: If reheating, pop a sheet of parchment under the slices to catch any bubbly filling-no one likes a sticky baking sheet!
Helpful Notes for the Best Apple Slab Pie
Alright, let's talk pie wisdom-those little tricks that take your apple slab pie from good to "where has this been all my life?" level. Here's what I've learned after making this more times than I can count:
-
-
- Avoid the dreaded soggy bottom: If your crust tends to get soft, try preheating your baking sheet in the oven before placing the dough on it. That extra heat helps crisp things up from the start. Also, don't skimp on the cornstarch-it's your best friend for thickening those apple juices.
- Butter temperature is everything: If your dough feels sticky or warm while rolling, stop and chill it for 10 minutes. Cold butter = flaky layers. Warm butter = sad, dense crust. Trust me on this.
- Apple choices matter: Firm, tart apples like Granny Smith hold their shape better, while sweeter ones like Fuji break down more. I like a mix for texture and flavor balance. And don't slice them too thin-you want hearty chunks, not apple mush.
- Gluten-free or dairy-free? Swap the flour for a 1:1 gluten-free blend, and use vegan butter (keep it cold!). The texture will be slightly different, but still delicious.
-
One last thing: Don't panic if your edges aren't perfectly even or if some filling bubbles out. That's called "character," and it tastes just as good. Happy baking!
Frequently Asked Questions About Apple Slab Pie
I get it-even the simplest recipes can leave you with questions. Here are answers to the ones I hear most often (and trust me, I've asked them myself!).
-
-
- Can I use store-bought crust?
Absolutely! Two boxes of refrigerated pie dough (the kind you unroll) will work in a pinch. Just press the seams together gently and proceed with the recipe. Homemade is dreamier, but we've all got those days. - How do I prevent a soggy bottom?
Three words: cornstarch, cornstarch, cornstarch. Also, make sure your oven's fully preheated, and don't skip chilling the dough. If you're really paranoid, sprinkle a thin layer of breadcrumbs or crushed graham crackers on the bottom crust before adding apples-they'll soak up extra juice. - Can I make this ahead?
You bet! Assemble the pie up to a day ahead, cover tightly, and refrigerate. Add 5-10 minutes to baking time since it'll be cold. Or freeze unbaked for up to 3 months-bake straight from frozen, adding 15-20 minutes. - My filling is too runny-what went wrong?
Probably needed more cornstarch or longer cooling time. Next time, let the apple mixture sit for 10 minutes after mixing-if it pools liquid, add another tablespoon of cornstarch. And always cool completely before slicing!
- Can I use store-bought crust?
-
Still stumped? Shoot me a comment-I've made every mistake so you don't have to!
Final Thoughts on Apple Slab Pie
There you have it-my not-so-secret love letter to apple slab pie. This recipe is the kind of dessert that turns ordinary days into something special and makes gatherings feel like celebrations. Whether you're baking it for a crowd, meal-prepping cozy desserts for the week, or just treating yourself (because you deserve it), this pie never disappoints.
Don't let the from-scratch crust intimidate you-those imperfect edges and buttery layers are part of the charm. And when you pull that golden, bubbling beauty out of the oven, trust me, you'll feel like a baking rockstar.
So grab those apples, roll up your sleeves, and let's make some memories. I promise, once you've tasted that first warm slice with a melting scoop of vanilla ice cream, you'll understand why this pie has been my go-to for years. Now go bake, enjoy, and don't forget to save me a corner piece-extra crispy, please!
Apple Slab Pie
Equipment
- Rolling pin
- Baking sheet
Ingredients
For the crust
- 3 ¾ cups all-purpose flour 470 grams
- 1 ½ tablespoon sugar
- 1 ½ teaspoon table salt
- 3 sticks unsalted butter 12 oz or 340 grams, cubed and kept very cold
- ¾ cup very cold water
For the apple filling
- 3 ½ to 4 pounds apples peeled, cored and chopped into approximately ½-inch chunks (about 10 cups)
- squeeze of lemon juice
- ⅔ to ¾ cup sugar depending on how sweet you like your pie and how sweet your apples are
- 3 tablespoon cornstarch
- 1 rounded tsp ground cinnamon
- ¼ teaspoon ground nutmeg
- ¼ teaspoon ground allspice
- ⅛ teaspoon table salt
To finish
- 2 tablespoon heavy cream or 1 egg beaten with 1 tablespoon water
Instructions
- Preheat the oven to 375°F (190°C).
- In a large bowl, mix flour, sugar, and salt. Add the cold butter and mix until the dough resembles coarse crumbs.
- Gradually add the cold water and mix until the dough comes together. Divide the dough in half, shape into discs, and refrigerate for at least 30 minutes.
- Roll out one disc of dough to fit a baking sheet. Place it on the sheet.
- In another bowl, combine the chopped apples, lemon juice, sugar, cornstarch, cinnamon, nutmeg, allspice, and salt. Spread the apple mixture over the dough.
- Roll out the second disc of dough and place it over the apples. Seal the edges and cut slits in the top.
- Brush the top with heavy cream or egg wash.
- Bake for 45 minutes or until the crust is golden brown and the filling is bubbly.
- Let the pie cool before slicing and serving.


Leave a Reply