There's something magical about the smell of Apple Pie wafting through the house, isn't there? For me, it's tied to so many memories-Thanksgiving dinners, lazy Sunday afternoons, and even those "just because" moments when you need a little comfort. My grandma used to make the most incredible apple pie, and while I'll never claim to be as good as her, I've spent years perfecting my own version. It's got that flaky, buttery crust and a spiced apple filling that's just sweet enough without being overwhelming. Trust me, once you try this recipe, you'll want to make it again and again.

This Apple Pie is the kind of dessert that feels like a hug in edible form. It's perfect for fall, sure, but honestly, I'll make it any time of year when I'm craving something cozy. Whether you're serving it at a holiday gathering or just treating yourself, it's guaranteed to bring smiles all around. Plus, it's easier than you might think-no fancy skills required. So, grab your rolling pin, let's get baking, and fill your kitchen with that irresistible apple pie aroma!
Why You'll Love This Apple Pie
Okay, let me gush for a second-this Apple Pie is seriously the best. Here's why:
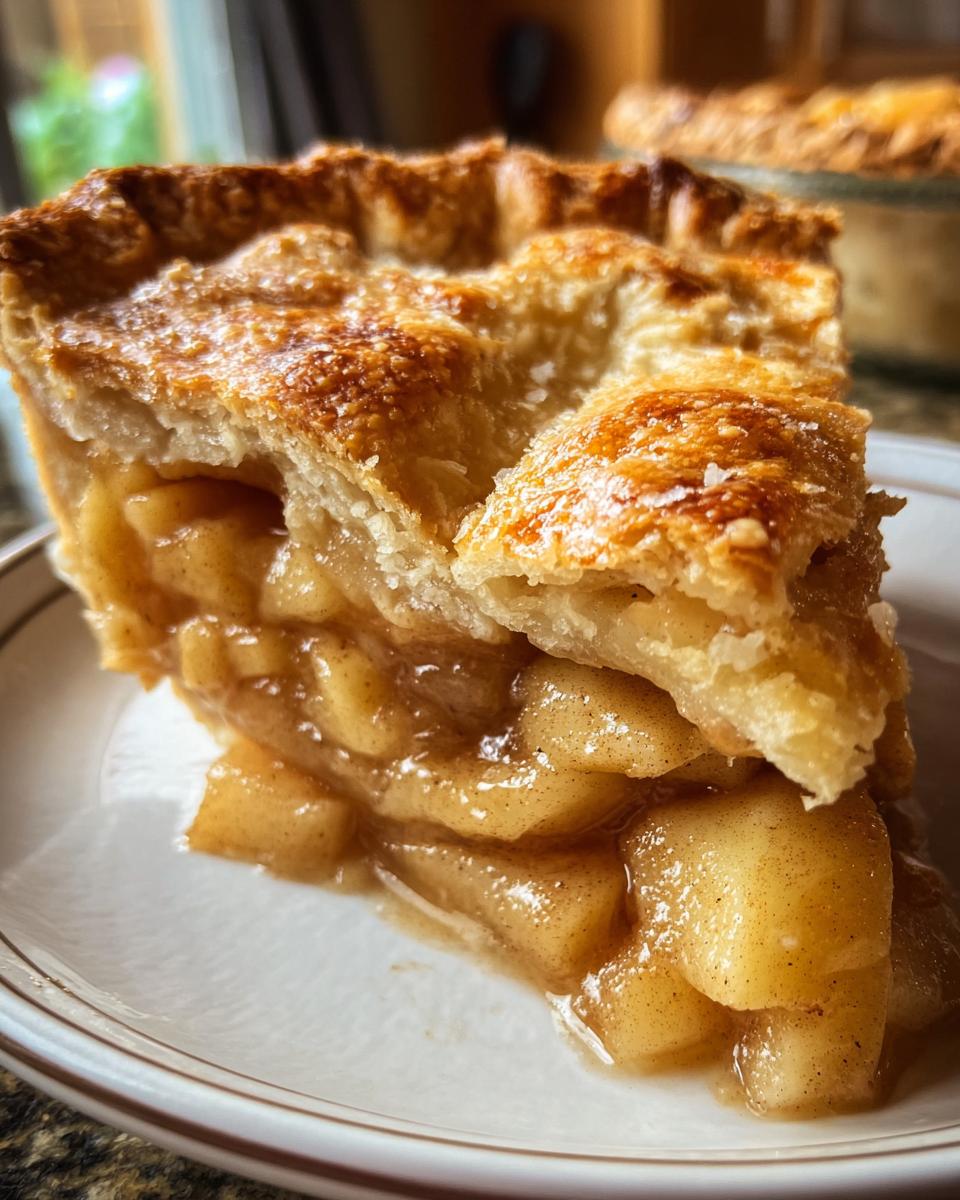
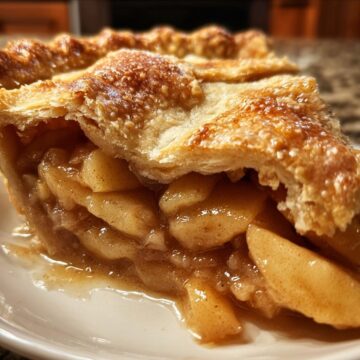
- That crust. Flaky, buttery, and just sturdy enough to hold all those juicy apples without getting soggy. It's everything a pie crust should be.
- The filling. Sweet, spiced, and perfectly balanced-not too mushy, not too firm. The apples keep just enough bite while still melting in your mouth.
- It's surprisingly simple. No fancy techniques here! If you can stir apples in a pan and roll out dough (or even use store-bought), you've got this.
- Crowd-pleaser alert. Serve it warm with ice cream, and watch how fast it disappears. I've yet to meet someone who doesn't swoon over a slice.
- Leftovers? Ha! But if by some miracle there are any, they reheat beautifully. Breakfast pie, anyone?
Honestly, once you taste this, you'll understand why I'm obsessed. It's cozy, classic, and just downright delicious.
Ingredients You'll Need
Okay, let's gather everything for this dreamy Apple Pie! Don't worry-most of these are pantry staples, and the apples do all the heavy lifting. Here's what you'll need:
- For the Filling:
- 2 tablespoons unsalted butter (trust me, it adds that rich depth)
- 2.5 pounds apples (about 5 large Honeycrisps-peeled, cored, and cut into wedges. Granny Smiths work too if you like a little tartness!)
- ¼ teaspoon ground allspice (it's the secret warmth booster)
- ½ teaspoon ground cinnamon (because apple pie without cinnamon is just sad)
- ¼ teaspoon kosher salt (balances the sweetness)
- ¾ cup sugar, plus 1 tablespoon (for that caramel-like magic)
- 2 tablespoons all-purpose flour (helps thicken things up)
- 2 tablespoons cornstarch (double thickener = no soupy filling)
- 1 tablespoon apple cider vinegar (just a splash for brightness)
- For the Crust:
- 1 recipe double pie dough (homemade or store-bought-no judgment here!)
- 1 egg, lightly beaten (for that golden, shiny crust)
See? Nothing crazy! Just good, honest ingredients that turn into something extraordinary. Now, let's get those apples peeled and cored-it's the most tedious part, but so worth it.
Step-by-Step Apple Pie Instructions
Alright, let's dive into making this Apple Pie! I promise it's easier than it looks-just take it one step at a time, and you'll have a golden, bubbling masterpiece before you know it.
Preparing the Apple Filling
- Preheat your oven to 375°F (190°C). Trust me, you don't want to realize halfway through that the oven's cold. Been there!
- Melt the butter in a large skillet over medium heat. Toss in the apples, allspice, cinnamon, salt, sugar, flour, cornstarch, and apple cider vinegar. Stir it all together-get those apples nice and coated. The smell at this stage? Heavenly.
- Cook the mixture, stirring occasionally, for about 10 minutes. You'll know it's ready when the apples soften slightly (they shouldn't be mushy!) and the liquid thickens into a glossy, syrupy consistency. Take it off the heat and let it cool just a bit-hot filling + cold dough = sad, soggy crust.
Assembling and Baking the Apple Pie
- Roll out one half of your pie dough on a lightly floured surface until it's about 12 inches wide. Gently fit it into a 9-inch pie dish, letting the edges hang over. No need to be perfect here-rustic is charming!
- Pour the apple filling into the crust, spreading it evenly. Now, roll out the second half of the dough and drape it over the top. Trim any wild edges, then crimp them together with your fingers or a fork. Don't forget to cut a few slits in the top crust-this lets steam escape so your pie doesn't explode (yes, that's as dramatic as it sounds).
- Brush the top crust with the beaten egg. This gives it that gorgeous golden shine. Bonus: sprinkle a little extra sugar on top if you're feeling fancy.
- Bake for 45-50 minutes, or until the crust is deep golden brown and the filling is bubbling through the vents. Pro tip: Slide a baking sheet under the pie halfway through-just in case of any juicy spills!
Once it's out, resist the urge to slice right in. Let it cool on a wire rack for at least an hour. I know, it's torture, but this lets the filling set so you don't end up with apple soup. Worth the wait, I swear!
Apple Pie Variations
Okay, so you've mastered the classic Apple Pie-now it's time to get creative! One of the best things about this recipe is how easy it is to tweak and make it your own. Here are a few fun twists I love:
- Add some crunch. Toss a handful of chopped pecans or walnuts into the filling. They add a nice texture and nutty flavor that pairs perfectly with the apples.
- Go caramel crazy. Drizzle caramel sauce over the filling before adding the top crust. Or, for the ultimate indulgence, serve each slice with a drizzle of warm caramel on top.
- Spice it up. Swap out the allspice for a pinch of nutmeg or cardamom if you're feeling adventurous. It gives the pie a whole new vibe.
- Cheese, please. Serve your pie with a slice of sharp cheddar on the side-trust me, it's a classic combo that works surprisingly well.
- Mini pies. Use the same filling and crust to make individual hand pies or tarts. Perfect for portion control (or not!).
Really, the possibilities are endless. Whether you stick to the classic or try something new, this Apple Pie is your canvas. Have fun with it!
Serving and Storage Tips for Apple Pie
Alright, your Apple Pie is baked to golden perfection-now what? Let's talk about the best ways to serve and store it so it stays just as delicious as the moment it came out of the oven.
Serving Suggestions:
- Warm and cozy. Serve your pie slightly warm-it's the ultimate comfort food. A quick 10 seconds in the microwave does the trick if it's cooled down.
- Ice cream is non-negotiable. A scoop of vanilla ice cream on the side is classic for a reason. The warm pie + cold ice cream combo is pure bliss.
- Whipped cream lovers, unite. If you're not into ice cream, a dollop of fresh whipped cream is just as heavenly. Bonus points if you add a little cinnamon to it.
- Breakfast pie? Yes, please. Let's be honest, leftover pie makes the best breakfast. Pair it with a cup of coffee, and your morning is instantly better.
Storage Tips:
- Room temperature. If you plan to eat your pie within 1-2 days, you can leave it covered with foil or plastic wrap on the counter. Just keep it away from direct sunlight or heat.
- Fridge it. For longer storage, pop it in the fridge. It'll stay fresh for up to 4 days. Cover it tightly to keep it from drying out.
- Freezing for later. Yes, you can freeze Apple Pie! Wrap it tightly in plastic wrap and then foil, and it'll keep for up to 3 months. To reheat, bake it at 350°F (175°C) for about 30 minutes, or until warmed through.
- Slice and save. If you're freezing individual slices, wrap each one separately. That way, you can grab a slice whenever the craving hits.
Whether you're serving it fresh out of the oven or enjoying leftovers days later, this Apple Pie is always a winner. Just don't forget the ice cream-it's practically a rule!
Helpful Notes for the Best Apple Pie
Alright, let's talk pro tips-those little things that take your Apple Pie from good to "oh my goodness, how did you make this?!" Here's what I've learned after many (many) pies:
- Apple varieties matter. I love Honeycrisps for their sweetness and firm texture, but Granny Smiths add a nice tartness. Mix them if you want the best of both worlds!
- Don't skip the vinegar. That splash of apple cider vinegar might seem odd, but it brightens the filling and keeps it from being overly sweet.
- Thickener backup. If your filling looks too juicy after baking, let the pie cool completely-it'll firm up. Still runny? A little extra cornstarch next time will fix it.
- Go easy on the sugar. Taste your apples first! If they're super sweet, you can reduce the sugar by a tablespoon or two.
- Crust shield hack. If the edges brown too fast, tent them with foil. No fancy pie shield? Aluminum foil and some creativity work just fine.
- Dairy-free? Swap the butter in the filling for coconut oil, and use a vegan pie crust. Still delicious!
- Gluten-free? A 1:1 gluten-free flour blend works great for thickening the filling, and there are plenty of GF crust options out there.
Remember, pie-making is part art, part science-but mostly love. Don't stress if it's not perfect. Lopsided crusts and messy crimps just mean it's homemade!
Frequently Asked Questions About Apple Pie
Got questions about making the perfect Apple Pie? Don't worry-I've got you covered. Here are some of the most common things people ask (and my best answers!):
- What's the best type of apple for Apple Pie?
Honeycrisps are my go-to because they're sweet and hold their shape well. Granny Smiths are great if you like a tart pie, or you can mix the two for the best of both worlds! - Can I use store-bought pie crust?
Absolutely! I've done it plenty of times, and it works just fine. No shame in saving a little time-just make sure it's a good-quality one. - Why is my filling too runny?
It's usually because the pie needs more time to cool. Let it sit for at least an hour-the filling will thicken as it sets. If it's still too liquidy, try adding a bit more cornstarch next time. - Can I make this pie ahead of time?
Yes! You can assemble it a day ahead and bake it when you're ready. Or, bake it fully, let it cool, and store it at room temperature for up to 2 days. Just reheat it slightly before serving. - Can I freeze Apple Pie?
Definitely! Wrap it tightly in plastic wrap and foil, and it'll keep for up to 3 months. To reheat, bake it at 350°F (175°C) for about 30 minutes, or until warmed through.
Still have questions? Drop them in the comments-I'm here to help! Pie-making should be fun, not stressful, so let's figure it out together.
Final Thoughts on This Apple Pie
At the end of the day, this Apple Pie is everything a classic dessert should be-warm, comforting, and packed with flavor. It's the kind of recipe that feels like home, whether you're baking it for a special occasion or just because. The flaky crust and spiced apple filling come together so perfectly, you'd think it took way more effort than it actually does. Honestly, once you try it, you'll understand why it's my go-to. So go ahead, slice yourself a piece, maybe add that scoop of ice cream, and enjoy every bite. Happy baking!
Apple Pie
Ingredients
For the Filling
- 2 tablespoons unsalted butter
- 2.5 pounds apples peeled, cored, and cut into wedges (about 5 large Honeycrisps)
- 0.25 teaspoon ground allspice
- 0.5 teaspoon ground cinnamon
- 0.25 teaspoon kosher salt
- 0.75 cup sugar plus 1 tablespoon
- 2 tablespoons all-purpose flour
- 2 teaspoons cornstarch
- 1 tablespoon apple cider vinegar
For the Crust
- 1 recipe double pie dough or pre-made crust
- 1 egg lightly beaten
Instructions
- Preheat your oven to 375°F (190°C).
- In a large skillet, melt the butter over medium heat. Add the apples, allspice, cinnamon, salt, sugar, flour, cornstarch, and apple cider vinegar. Stir to combine.
- Cook the apple mixture, stirring occasionally, until the apples soften and the liquid thickens, about 10 minutes. Remove from heat and let cool slightly.
- Roll out one half of the pie dough and fit it into a 9-inch pie dish. Pour the apple filling into the crust.
- Roll out the second half of the pie dough and place it over the filling. Trim and crimp the edges to seal. Cut a few slits in the top crust to vent.
- Brush the top crust with the beaten egg. Bake for 45-50 minutes, or until the crust is golden brown and the filling is bubbling.
- Let the pie cool on a wire rack for at least 1 hour before serving.


Leave a Reply