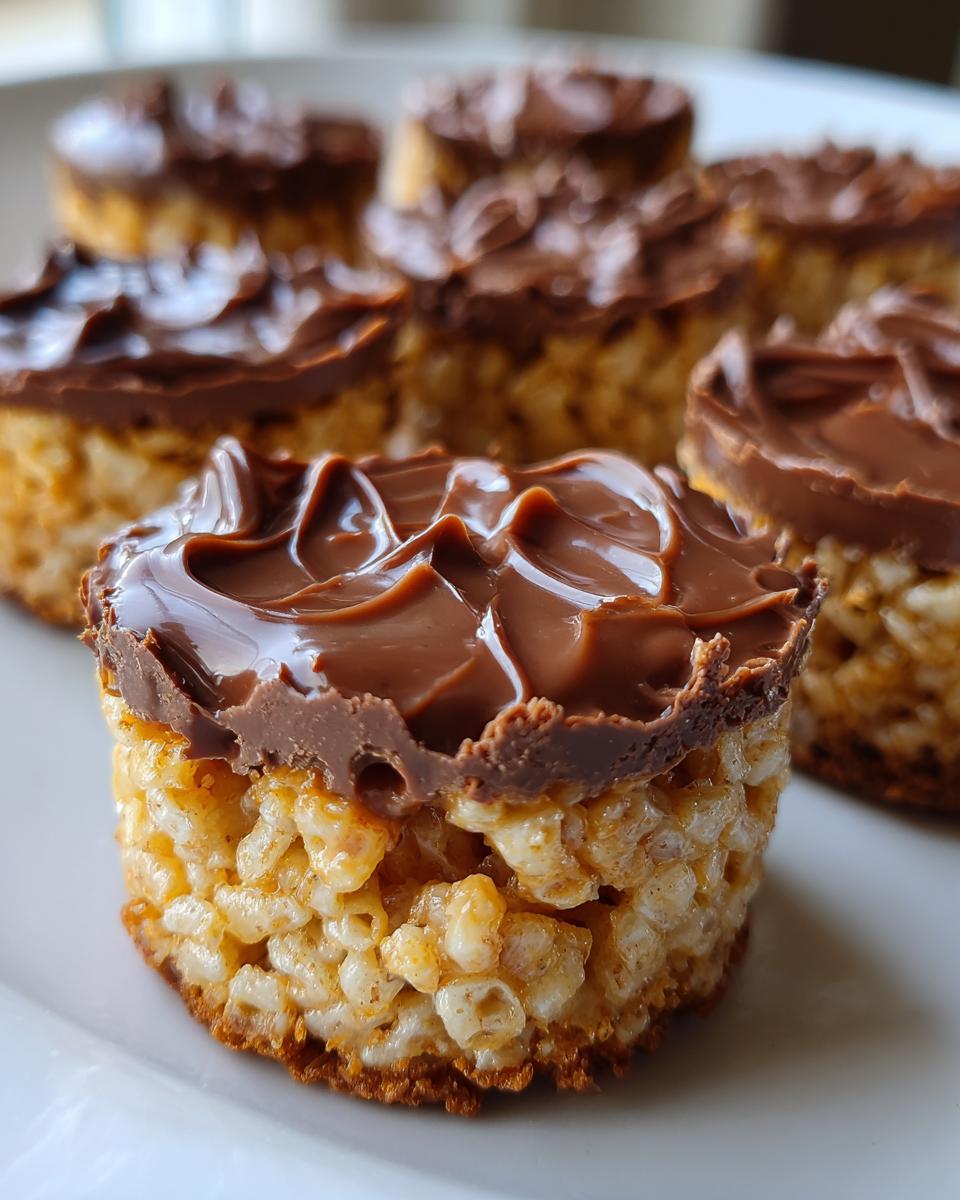
Oh my gosh, you HAVE to try these Chocolate Peanut Butter Rice Krispie Cups! They're my go-to when I need something fast, delicious, and completely no-fuss-no oven required! Picture this: crispy cereal swimming in sticky peanut butter marshmallow goodness, topped with a layer of melty chocolate. It's basically childhood nostalgia in perfect little bite-sized cups.

I make these at least twice a month because they disappear FAST-my kids beg for them, and honestly? So do my book club friends. The best part? You probably have all the ingredients sitting in your pantry right now. Just grab that jar of peanut butter, dig out the Rice Krispies from the back of the shelf, and let's make some magic happen. These little cups are seriously life-changing-dangerously easy to make and impossible to resist!
Why You'll Love These Chocolate Peanut Butter Rice Krispie Cups
Trust me, these little cups are about to become your new obsession. Here's why:
- Speed demon: 20 minutes active time - you'll be eating them before your oven could even preheat!
- No-bake bliss: Perfect for summer when turning on the oven feels like a crime
- Kid magic: My 5-year-old can practically make these herself (and yours will love helping too)
- Customizable: Swap in different nut butters, cereals, or chocolates to make them your own
- Nostalgia bomb: All the Rice Krispie treat joy with bonus peanut butter chocolate goodness
Seriously, what's not to love? They're the ultimate crowd-pleaser!
Ingredients for Chocolate Peanut Butter Rice Krispie Cups
Okay, let's raid the pantry! Here's everything you'll need to make these irresistible cups. I'm super picky about a couple ingredients-trust me, these little details make all the difference in getting that perfect texture.
- 3 cups Rice Krispies cereal: That classic snap-crackle-pop is non-negotiable! Measure them lightly-no packing down.
- 1 cup creamy peanut butter: Skip the natural kind here-we need that smooth, sticky texture from regular PB. My go-to is Jif or Skippy.
- ½ cup unsalted butter: Always unsalted so we control the saltiness. Cut it into chunks-it'll melt faster.
- 1 cup mini marshmallows: These melt quicker than big ones. Pro tip: toss them in flour if they're sticking together!
- 1 cup chocolate chips: Semi-sweet is perfect, but milk chocolate makes kids extra happy. Heck, use both if you're feeling wild!
- ½ teaspoon vanilla extract (optional): Just a splash adds warmth-like a cozy blanket for your taste buds.
- Pinch of sea salt (optional): Flaky salt cuts the sweetness beautifully. I always add it!
Quick prep notes: You'll want to line your muffin tin with paper liners or give it a light spritz of cooking spray. And clear some fridge space-these babies need to chill before devouring!
Equipment You'll Need
No fancy gadgets required here-just grab these basics from your kitchen drawers. I swear, half the charm of this recipe is how simple the tools are!
- Medium saucepan: Anything that won't scorch your peanut butter mixture. Non-stick makes cleanup a breeze.
- 12-cup muffin tin: Standard size works perfectly. Mini muffin tins make adorable bite-sized treats too!
- Silicone spatula: That peanut butter mixture sticks to everything-trust me, silicone is your friend here.
- Measuring cups: No eyeballing the peanut butter-we want perfect ratios for that addictive texture.
- Small microwave-safe bowl: For melting chocolate in quick bursts (or use a double boiler if you're fancy).
Bonus items that aren't essential but I always grab: parchment liners (no sticking drama), a butter knife for smoothing the chocolate, and-most importantly-a hungry taste-tester standing by!
How to Make Chocolate Peanut Butter Rice Krispie Cups
Alright, let's get our hands sticky! I've made these cups more times than I can count, and I've learned a few tricks to make sure they turn out perfect every single time. Follow these steps, and you'll have irresistible treats ready before you know it!

- Melt the good stuff: In your saucepan over LOW heat (seriously, keep it low-we're not trying to burn anything here), melt the peanut butter and butter together. Stir constantly with your spatula until it's smooth and combined. This takes about 2-3 minutes-you'll know it's ready when it looks like a velvety peanut butter river.
- Marshmallow magic: Dump in those mini marshmallows and keep stirring until they're completely melted and the mixture is gooey perfection. If you're adding vanilla and salt, now's the time! Just a quick stir to incorporate.
- Cereal crunch time: Take the pan off the heat and immediately add the Rice Krispies. Fold them in gently but thoroughly-you want every single piece coated in that peanut butter bliss. Pro tip: Don't overmix or your cereal will lose its satisfying crunch!
- Cup creation: Scoop the mixture into your prepared muffin tin, pressing down firmly with lightly greased fingers or the back of a spoon. Really pack it in there-these babies need to hold their shape when you bite into them!
- Chocolate finale: Melt your chocolate chips (30 second bursts in the microwave, stirring between each, works great). Spoon about 1 tablespoon over each cup, then tilt the tin to spread it evenly. A quick tap on the counter helps settle everything nicely.
- The hardest part-waiting: Pop them in the fridge for at least 30 minutes to set. I know, I know-the temptation to sneak one early is REAL. But trust me, that chill time makes all the difference for that perfect snap when you bite in!
Tips for Perfect Chocolate Coating
Okay, let's talk chocolate-because a cracked or blotchy top is just sad. Here's how I get that smooth, glossy finish every time:
First, melt your chocolate SLOWLY. I'm talking low power in the microwave (50% power is ideal) with frequent stirring. Burnt chocolate is bitter and gross, and we're not about that life. If it starts looking thick, add a tiny bit of coconut oil or shortening to keep it pourable.
When spreading, work quickly but gently. The residual heat from your peanut butter base will help the chocolate melt slightly as you spread it-this is good! It creates that seamless bond between layers. Use the back of a spoon or a small offset spatula to smooth it right to the edges.
Here's my secret weapon: After spreading, give the whole tin one firm tap on the counter. This settles the chocolate, removes air bubbles, and gives you that professional-looking smooth finish. And if any chocolate gets on the liners? No stress-just wipe the edges with a clean finger for picture-perfect cups!
Variations for Chocolate Peanut Butter Rice Krispie Cups
Oh, the possibilities! Once you've mastered the basic recipe (and trust me, you will), it's time to play around. Here are my favorite ways to mix things up-some tried-and-true combos that'll make you feel like a dessert wizard!
- Nut butter swap: Almond butter brings this elegant sophistication (okay, as sophisticated as Rice Krispie treats can get). Cashew butter? Creamy heaven. Just keep it to the smooth varieties-chunky textures don't coat the cereal as nicely.
- Crunch attack: Stir in ¼ cup crushed pretzels or potato chips with the cereal-that salty-sweet contrast is dangerously good. My kids go nuts when I add crushed peanuts right into the mix before pressing into cups.
- Double chocolate madness: Replace ¼ cup of the cereal with cocoa rice cereal for a chocolate-on-chocolate experience. Or-get this-mix mini chocolate chips right into the peanut butter base before adding cereal. Pure magic.
- Drizzle drama: After the chocolate top sets, melt some white chocolate and zigzag it over the cups with a fork. Looks fancy, takes 2 minutes, and makes everyone think you slaved over them!
Last week I got wild and added a spoonful of Nutella to the melted peanut butter-no regrets. The beauty of these cups? You can tweak them endlessly based on what's in your pantry or your current craving. Go ahead-make them your own!
Storage Instructions
Here's the thing about these Chocolate Peanut Butter Rice Krispie Cups-they rarely last long enough to need storing! But just in case you have superhuman willpower (or made a double batch like I always do), here's how to keep them fresh and delicious.
Airtight is everything: Pop them in a container with a tight-fitting lid-I'm partial to glass ones because they don't absorb smells. Layer them with parchment paper between if you're stacking. They'll stay perfect at room temperature for 2-3 days, though ours never make it past day two!
Now, about refrigeration-it's not necessary, but I actually prefer storing them in the fridge. That chocolate top stays extra crisp, and the peanut butter layer gets this amazing fudge-like texture. Just be sure to let them sit at room temp for 5 minutes before eating-cold peanut butter needs a minute to wake up its flavors.
Freezing? Absolutely! These little cups freeze like champs for up to 2 months. Wrap each one individually in plastic wrap, then toss them all in a freezer bag. Thaw at room temperature for about 30 minutes when the craving hits. Pro tip: Freeze them before adding the chocolate topping if you want to switch up flavors later!
One warning though: If your kitchen runs warm (or it's summer), skip the counter and go straight to the fridge. That chocolate coating can get melty and messy faster than you'd think. Learned that lesson the hard way during last year's heatwave-sticky fingers for days!
Nutritional Information
Now, I'm no nutritionist, but I know we all like to have a rough idea of what's going into our favorite treats! These Chocolate Peanut Butter Rice Krispie Cups are definitely an indulgence-let's call them "happy little energy bombs." The peanut butter gives you protein, the cereal adds some whole grains, and the chocolate... well, the chocolate gives you joy. That counts as a food group, right?
Important note: These numbers are just estimates-your actual nutrition will vary based on specific ingredients and how generously you scoop (no judgment here!). I calculate based on making 12 standard-size cups, but we all know some of us make them "extra generous" (ahem).
- Peanut butter and butter bring healthy fats to keep you satisfied
- Rice Krispies add that satisfying crunch with minimal ingredients
- Dark chocolate lovers can feel good about those antioxidants
- Using natural peanut butter? Your sugar content will be lower
- Added sea salt boosts those electrolytes (see? practically health food!)
My philosophy? Life's too short to stress over dessert nutrition. Enjoy these in moderation-or don't. I won't tell if you sneak two... or three. After all, balance is key, and sometimes that means balancing a cup in each hand!
Frequently Asked Questions
I get asked about these Chocolate Peanut Butter Rice Krispie Cups ALL the time-here are the answers to everything you might be wondering before diving in!
Can I use crunchy peanut butter instead of creamy?
Technically yes, but I don't recommend it for this recipe. Those little peanut bits make it harder to press the mixture smoothly into the cups, and you lose that perfect velvety texture. If you're dying for crunch, better to stir in chopped peanuts separately!
How do I prevent sticking to the muffin liners?
Two words: parchment liners. Those wax-coated ones from the grocery store? They stick like crazy. Either use parchment cupcake liners or give regular liners a quick spritz with cooking spray. Problem solved!
Can I freeze these for later?
Absolutely! They freeze like a dream for up to 2 months. Just wrap each cup individually in plastic wrap before freezing-this prevents freezer burn and lets you grab just one (or five) whenever cravings strike.
Why did my chocolate topping crack?
Most likely chilled them too quickly! After spreading the chocolate, let them sit at room temp for 5 minutes before refrigerating. The gradual temperature change prevents that annoying cracking. Also-make sure your chocolate isn't too thick when spreading!
Can I make these vegan/dairy-free?
You bet! Swap the butter for coconut oil and use dairy-free chocolate chips. Just be sure your marshmallows are vegan too (most regular ones contain gelatin). The texture comes out nearly identical-I've fooled many non-vegans with this version!
Final Thoughts
Alright, my fellow dessert lovers-it's time to grab that peanut butter jar and get mixing! These Chocolate Peanut Butter Rice Krispie Cups are truly my favorite quick fix when I need something guaranteed to make people happy. Whether it's last-minute guests, school bake sales, or just a Tuesday afternoon pick-me-up, they never disappoint.
I'd love to hear how yours turn out-did you stick with the classic combo or go wild with one of the variations? Maybe you've invented an amazing twist I haven't tried yet! Drop me a note in the comments or tag me on social media when you make them. There's nothing I love more than seeing your kitchen creations!
One last tip from me to you: Always make a double batch. Trust me on this. The first batch mysteriously disappears before you can even take photos (ask me how I know). Now go forth and spread the peanut butter-chocolate-Rice Krispie joy-your future self will thank you when that midnight snack craving hits!
Print
Decadent Chocolate Peanut Butter Rice Krispie Cups in 20 Minutes
- Total Time: 50 minutes
- Yield: 12 cups 1x
- Diet: Vegetarian
Description
Easy no-bake chocolate peanut butter rice krispie cups with a crunchy texture and rich flavor.
Ingredients
- 3 cups Rice Krispies cereal
- 1 cup creamy peanut butter
- ½ cup unsalted butter
- 1 cup mini marshmallows
- 1 cup chocolate chips
- ½ tsp vanilla extract (optional)
- Pinch of sea salt (optional)
Instructions
- Melt peanut butter and butter in a saucepan over low heat.
- Stir in mini marshmallows until fully melted.
- Remove from heat and mix in vanilla extract and sea salt.
- Fold in Rice Krispies until evenly coated.
- Press mixture into lined muffin tins.
- Melt chocolate chips and spread over each cup.
- Chill for 30 minutes before serving.
Notes
- Store in an airtight container for up to 3 days.
- Use dark chocolate for a richer taste.
- Add crushed peanuts for extra crunch.
- Prep Time: 10 minutes
- Cook Time: 10 minutes
- Category: Dessert
- Method: No-Bake
- Cuisine: American
Nutrition
- Serving Size: 1 cup
- Calories: 220
- Sugar: 12g
- Sodium: 85mg
- Fat: 14g
- Saturated Fat: 6g
- Unsaturated Fat: 5g
- Trans Fat: 0g
- Carbohydrates: 20g
- Fiber: 2g
- Protein: 5g
- Cholesterol: 15mg


Leave a Reply