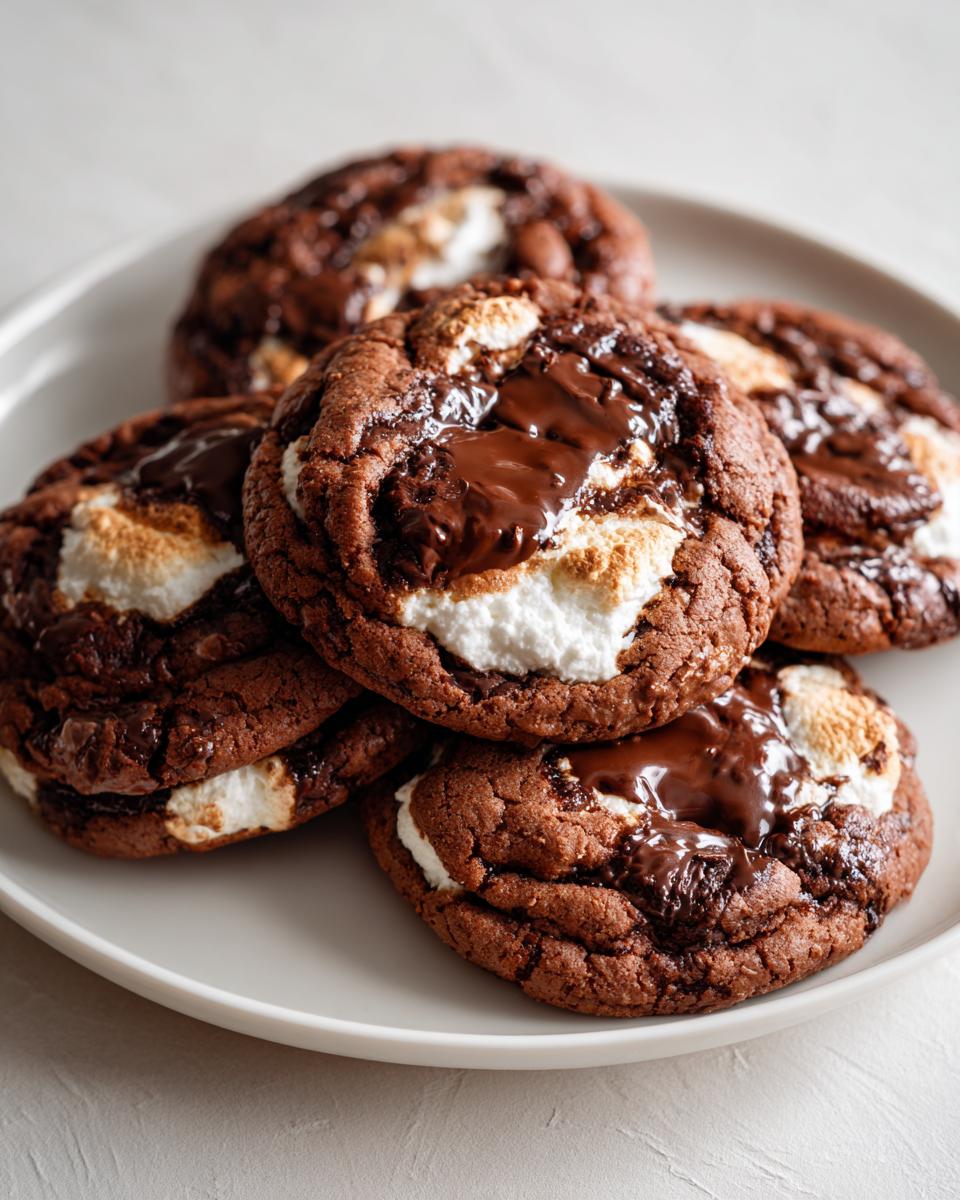
Oh my goodness, have you ever bitten into a cookie and gotten that perfect surprise of warm, gooey marshmallow mixed with rich chocolate? That's exactly what these Chocolate Marshmallow Swirl Cookies bring to the table-literally! The contrast of deep cocoa flavor and sweet, melty marshmallow pockets is pure magic. I've been baking these for years, and they never fail to disappear within minutes at any gathering.

I first fell in love with this combo as a kid when my mom would make s'mores over the campfire. I wanted that same cozy, nostalgic taste in cookie form, so I tweaked a classic chocolate cookie recipe until I nailed it. The marshmallow swirl isn't just for looks-it creates little pockets of sweetness that balance the dark cocoa perfectly. Trust me, once you try these, you'll be making them on repeat!
Why You'll Love These Chocolate Marshmallow Swirl Cookies
These cookies are pure happiness in every bite, and here's why:
- Easy-peasy to make: No fancy techniques-just mix, drop, and bake. Even beginner bakers nail these on the first try.
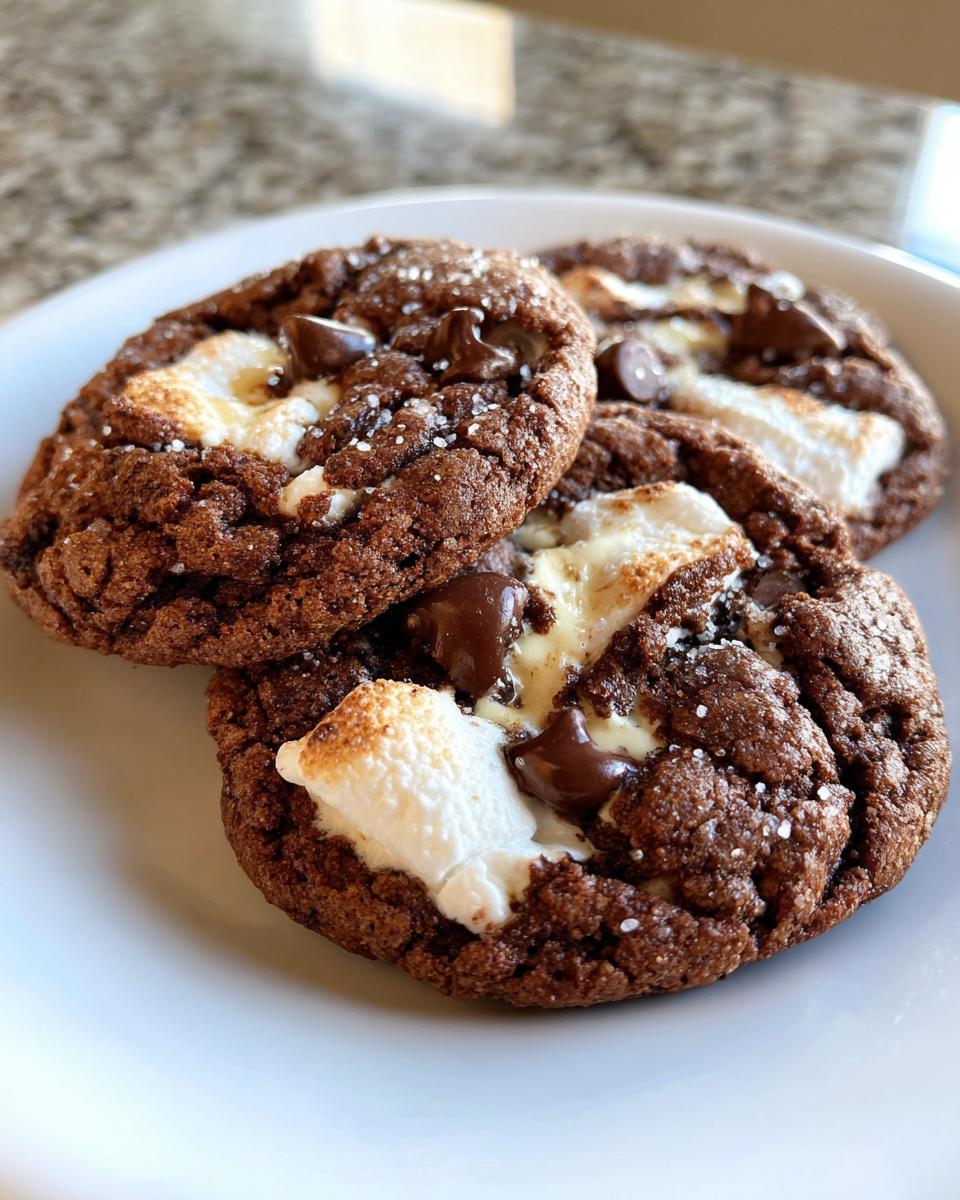
- That dreamy texture: Crispy edges with a soft, chewy center and melty marshmallow surprises in every bite.
- Crowd-pleaser magic: Kids adore the marshmallow swirls, while adults go wild for the rich cocoa depth. Bake them for parties and watch them vanish!
- Nostalgia overload: Tastes like childhood s'mores and chocolate chip cookies had the best possible baby.
Seriously, one batch and these'll become your new go-to cookie. They're that good.
Ingredients for Chocolate Marshmallow Swirl Cookies
Gathering the right ingredients is half the battle with these cookies-but don't worry, everything's easy to find. Here's what you'll need (and yes, I've learned the hard way that measuring matters with baking!):
-
- 1 ¾ cups (220 g) all-purpose flour - Spoon and level it, don't scoop!
- ½ cup (40 g) unsweetened cocoa powder - The darker the better for that rich chocolate punch
- 1 teaspoon baking soda - Check the date-old soda means flat cookies
- ¼ teaspoon salt - Just a pinch to balance the sweetness
- ½ cup (115 g) unsalted butter, softened - Leave it out for 30 minutes first-press should leave a slight dent
- ¾ cup (150 g) granulated sugar - For that classic cookie crispness
- ½ cup (100 g) packed light brown sugar - Pack it tight in the measuring cup!
- 1 large egg - Room temp blends smoother (quick tip: soak in warm water 5 minutes if you forgot to take it out)
- 1 teaspoon vanilla extract - The good stuff, not imitation
- ½ cup (90 g) semi-sweet chocolate chips - Or chop up a bar for rustic chunks
- 1 cup (50 g) mini marshmallows - The star of the show!
Optional but amazing:
- ⅓ cup (60 g) marshmallow fluff - For swirling extra gooey pockets
Ingredient Notes & Substitutions
Baking is science, but I've found some wiggle room over the years:
- Cocoa powder: Splurge on Dutch-process if you can-it's less bitter and gives that deep chocolate color I love. Natural cocoa works in a pinch though.
- No mini marshmallows? Tear regular ones into small pieces (scissors work great), but dust them with a bit of flour first so they don't disappear into the dough.
- Vegan swaps: Use plant butter and flax egg (1 tablespoon ground flax + 3 tablespoon water, sit 5 min). For marshmallows, Dandies brand melts beautifully.
- Gluten-free? A 1:1 GF flour blend works, but add ½ teaspoon xanthan gum if your mix doesn't have it.
One rule I never break though-real butter and good vanilla make all the difference. Your taste buds will thank you!
Equipment You'll Need
Okay, let's talk tools! The beauty of these cookies is you don't need fancy gadgets-just the basics most bakers already have. (But if you're new to baking, no worries, this list covers everything!) Here's what I grab before starting:
- 2 mixing bowls - One for dry ingredients, one for wet. I like my trusty stainless steel ones-they don't hold onto smells like plastic can.
- Hand mixer or stand mixer - A wooden spoon works too, but your arm will thank you for the electric help when creaming that butter and sugar!
- Whisk - For blending dry ingredients evenly-those cocoa lumps are sneaky!
- Rubber spatula - My MVP for scraping every last bit of dough (and let's be honest, licking the bowl later).
- Baking sheet - Standard half-sheet pan works great. If yours tends to warp, grab a heavier one-it prevents uneven baking.
- Parchment paper or silicone mat - Lifesavers for easy cleanup and no stuck cookies. (Grandma used to grease pans with butter and flour-bless her heart, but we've evolved!)
- Cookie scoop or tablespoons - For evenly sized cookies. I use a #40 scoop (about 1.5 tbsp) for that perfect two-bite size.
- Wire rack - Lets cookies cool evenly so bottoms don't get soggy. In a pinch? A clean oven rack works too!
Bonus items if you want to get fancy:
- Offset spatula - Makes swirling that marshmallow fluff look pro-level.
- Kitchen scale - Because eyeballing flour leads to hockey pucks (ask me how I know).
- Cookie spatula - Thin metal ones slide under delicate cookies without breaking them.
See? Nothing crazy-just the usual suspects. Now let's get baking!
How to Make Chocolate Marshmallow Swirl Cookies
Alright, let's dive into the fun part-making these dreamy cookies! I've made this recipe so many times I could probably do it in my sleep, but I'll walk you through each step so yours turn out just as perfect as mine always do. (Okay fine, there was that one batch where I forgot the baking soda-we don't talk about those hockey pucks.) Here's how it's done:
- Preheat your oven to 350°F (175°C). Line your baking sheet with parchment paper-trust me, this saves so much cleanup drama later. (If you're using multiple sheets, keep them ready-these bake fast!)
- Whisk together the dry stuff: In a medium bowl, combine the flour, cocoa powder, baking soda, and salt. Give it a good whisk-you want to banish any cocoa lumps hiding in there like shy chocolate ghosts.
- Cream the butter and sugars in a large bowl until light and fluffy (about 2-3 minutes). This is where the magic starts! The mixture should look pale and kinda like wet sand. Pro tip: Scrape down the sides halfway through-those butter clumps are sneaky.
- Add the egg and vanilla, mixing until just combined. Don't overdo it here-we're going for silky, not scrambled!
- Gradually add the dry ingredients to the wet mixture, mixing on low until barely combined. Some flour streaks are okay-we'll finish mixing when we add the goodies.
- Fold in the chocolate chips and mini marshmallows gently with a spatula. Marshmallows are delicate-treat them like you're folding in whipped cream, not kneading bread!
- Scoop dough onto baking sheet (about 1.5 tablespoon per cookie), spacing them 2 inches apart-these babies spread! Optional marshmallow fluff swirl: Dollop a tiny bit of fluff on each cookie, then use a toothpick to swirl it in pretty patterns. (Or just go wild-abstract art tastes the same!)
- Bake for 10-12 minutes until edges look set but centers are still soft. They'll firm up as they cool-resist the urge to overbake! Marshmallows might peek out looking golden-that's the s'moresy goodness we want.
- Let cool on the baking sheet for 5 minutes before transferring to a wire rack. This prevents cookie breakage-those melty marshmallow spots are fragile when hot!
Pro Tips for Perfect Cookies
After burning (literally) through many test batches, here are my hard-earned secrets:
- Avoid overmixing! Once you add flour, mix just until combined-overworked dough = tough cookies.
- Chill dough if it's sticky. 30 minutes in the fridge firms it up for easier scooping (and prevents overspreading).
- Space cookies properly. These spread more than you'd think-crowding leads to cookie merges (delicious but messy).
- Underbake slightly. They'll keep cooking on the hot pan-perfect for that fudgy center.
- Freeze extras! Roll dough into balls, freeze on a tray, then bag them up. Bake straight from frozen (add 1-2 minutes). Midnight cookie emergencies? Solved.
Now step back and admire those beautiful cracked tops with melty marshmallow swirls peeking through... then try not to eat them all before they cool!
Variations & Serving Ideas
These cookies are amazing as-is, but here's how I like to mix them up:
- Crunchy twist: Fold in ½ cup chopped walnuts or pecans-that nutty crunch plays so well with the gooey marshmallow.
- Dark chocolate lovers: Swap semi-sweet chips for chopped 70% dark chocolate-extra rich!
- Serve warm with a cold glass of milk (duh) or crumbled over vanilla ice cream for next-level sundaes.
Honestly? They're perfect straight from the cookie jar too-no embellishments needed!
Storage & Reheating
Okay, let's be real-these cookies rarely last long enough to need storing in my house! But when they do (miraculously), here's how I keep them tasting fresh:
- Room temp: Store in an airtight container with a slice of bread-the bread absorbs excess moisture so cookies stay chewy for up to 3 days. (The marshmallows might lose some goo-factor after day 2 though.)
- Freezing baked cookies: Layer them between parchment paper in a freezer bag-they'll keep for a month! Thaw at room temp or zap frozen for 15 seconds if you can't wait.
- Freezing dough: My favorite trick! Roll dough into balls, freeze on a tray, then transfer to a bag. Bake straight from frozen-just add 1-2 extra minutes. Fresh cookies anytime!
Reviving stale cookies: Had a few linger past their prime? Place one on a microwave-safe plate with a damp paper towel, nuke for exactly 8 seconds, and boom-warm, soft cookie magic again!
Nutritional Information
Okay, full transparency time-these are cookies, not health food! But since I know some folks like to track (or just want to balance that next workout with their treat), here's the general nutritional breakdown per cookie. Keep in mind these numbers can vary based on your exact ingredients-especially since marshmallow sizes aren't always consistent!
- Calories: About 150 per cookie (but who stops at one? Be honest!)
- Sugar: 12g - Mostly from the marshmallows and brown sugar (worth every gram!)
- Fat: 6g - Thank that glorious butter and chocolate chips
- Carbs: 22g - Perfect fuel for your next cookie-baking marathon
- Protein: 2g - Surprising little boost from the egg and flour
Important note: These are estimates based on standard brand ingredients. Your numbers might dance around a bit depending on whether you used that extra marshmallow fluff swirl (no judgment here) or swapped in dark chocolate like I sometimes do. The takeaway? Enjoy every gooey bite-life's too short to stress over cookie math!
FAQs About Chocolate Marshmallow Swirl Cookies
Over the years, I've gotten so many questions about these cookies-mostly from friends begging for the recipe after tasting them! Here are answers to the most common head-scratchers (and yes, I've made all these mistakes so you don't have to):
Q1. Can I freeze the dough?
Absolutely! In fact, I always keep a stash in my freezer for sudden cookie cravings. Scoop the dough into balls first, freeze them on a tray for an hour (so they don't stick together), then toss them in a freezer bag. When the mood strikes, bake frozen-just add 1-2 extra minutes. Fresh cookies in 12 minutes flat? Yes please!
Q2. Why did my marshmallows melt into nothing?
Ah, the great marshmallow disappearance act! This happens if they're too close to the surface or your oven runs hot. My tricks: Use mini marshmallows (they hold shape better), gently press them into the dough balls before baking, and rotate your baking sheet halfway through. If all else fails? That's when I swirl in marshmallow fluff after baking-warm cookies make it melty without vanishing!
Q3. Can I use regular marshmallows instead of minis?
You can, but here's my hack: Snip them into quarters with kitchen shears (dust the sticky bits with a pinch of flour first). Regular marshmallows tend to glob together when melted, while minis give those perfect little pockets. Pro tip? Toast the big marshmallow pieces lightly first-tastes like campfire s'mores in cookie form!
Ultimate Chocolate Marshmallow Swirl Cookies - Irresistibly Gooey!
- Total Time: 27 minutes
- Yield: 18 cookies 1x
- Diet: Vegetarian
Description
Delicious chocolate cookies with a sweet marshmallow swirl, combining rich cocoa flavor with gooey marshmallow pockets.
Ingredients
- 1 ¾ cups (220 g) all-purpose flour
- ½ cup (40 g) unsweetened cocoa powder
- 1 teaspoon baking soda
- ¼ teaspoon salt
- ½ cup (115 g) unsalted butter, softened
- ¾ cup (150 g) granulated sugar
- ½ cup (100 g) packed light brown sugar
- 1 large egg
- 1 teaspoon vanilla extract
- ½ cup (90 g) semi-sweet chocolate chips
- 1 cup (50 g) mini marshmallows
- ⅓ cup (60 g) marshmallow fluff (optional)
Instructions
- Preheat your oven to 350°F (175°C). Line a baking sheet with parchment paper.
- In a bowl, whisk together flour, cocoa powder, baking soda, and salt.
- In another bowl, beat butter, granulated sugar, and brown sugar until creamy.
- Add egg and vanilla extract to the butter mixture, mixing well.
- Gradually add the dry ingredients to the wet mixture, mixing until combined.
- Fold in chocolate chips and mini marshmallows.
- Drop spoonfuls of dough onto the baking sheet. Swirl in marshmallow fluff if using.
- Bake for 10-12 minutes until edges are set.
- Let cool on the baking sheet for 5 minutes before transferring to a wire rack.
Notes
- Store in an airtight container for up to 3 days.
- For extra marshmallow flavor, lightly toast the marshmallows before adding.
- If dough is sticky, refrigerate for 30 minutes before baking.
- Prep Time: 15 minutes
- Cook Time: 12 minutes
- Category: Dessert
- Method: Baking
- Cuisine: American
Nutrition
- Serving Size: 1 cookie
- Calories: 150
- Sugar: 12g
- Sodium: 80mg
- Fat: 6g
- Saturated Fat: 3.5g
- Unsaturated Fat: 2g
- Trans Fat: 0g
- Carbohydrates: 22g
- Fiber: 1g
- Protein: 2g
- Cholesterol: 20mg
Leave a Reply