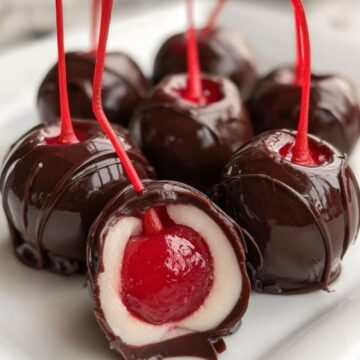
There's something undeniably nostalgic and luxurious about biting into a rich, glossy Chocolate Covered Cherry-the snap of the chocolate shell, the creamy sweet center, and the burst of juicy cherry. These delightful little treats are a timeless holiday classic, perfect for gift-giving, festive platters, or just indulging in a sweet, homemade candy that looks as impressive as it tastes.

I first made chocolate covered cherries with my grandmother during a snowy December weekend, and I'll never forget how fun it was to roll each cherry in its creamy coat and then dip it into melted chocolate. It felt like creating tiny treasures. Since then, it's been a cherished tradition every winter, and each batch tastes like a memory in every bite.
This recipe is beautifully straightforward, requiring no fancy equipment and just a bit of patience while they chill and set. With a smooth almond-flavored filling and crisp chocolate coating, these cherries are irresistible and easy to make in large batches.
Why You'll Love Chocolate Covered Cherries
- Holiday Favorite: Perfect for Christmas trays, Valentine's Day, or wedding favors.
- Beautiful Gift: Wrap in mini candy cups or tins for stunning edible gifts.
- Surprisingly Easy: No candy thermometer or special tools needed.
- Make-Ahead Friendly: Improves with time as the filling softens around the cherry.
- Customizable: Add dark chocolate, white chocolate drizzle, or chopped nuts.
- Kid-Friendly Activity: Fun to make with the whole family.
Ingredients You'll Need
For the Cherry Filling:
- 10 ounces maraschino cherries with stems (about 32-36 cherries)
Drain well and pat dry to prevent soggy centers or chocolate seize. - 2 ¼ cups powdered sugar, sifted
Creates a smooth, pliable fondant-like filling. - 4 tablespoons salted butter, softened
Adds richness and helps bind the filling. - 2 tablespoons light corn syrup
Gives the filling a smooth texture and mild sweetness. - ½ teaspoon pure vanilla extract
For warm, rounded flavor. - ¼ teaspoon almond extract
Enhances the cherry flavor beautifully.
For the Coating:
- 12 ounces chocolate almond bark (broken into chunks)
Melts smoothly and sets quickly for the perfect glossy shell.
Step-by-Step Instructions
- Prep the Cherries
- Drain cherries thoroughly in a colander.
- Place on paper towels and gently pat dry, especially around the stem.
- Allow to sit out for 10-15 minutes to air dry while you prep the filling.
- Make the Cherry Filling
- In a large bowl, combine the sifted powdered sugar, softened butter, corn syrup, vanilla extract, and almond extract.
- Mix with a hand mixer or sturdy spatula until smooth and creamy.
- The texture should resemble a soft dough that holds its shape.
- Coat the Cherries in Filling
- Gently fold the dried cherries into the filling.
- Take one cherry at a time and wrap it in the filling, shaping with your hands into a smooth ball with the cherry completely enclosed.
- Place each cherry ball on a parchment-lined baking sheet.
- Chill
- Refrigerate the coated cherry balls for about 30 minutes to firm up. This makes them easier to dip in chocolate.
- Melt the Chocolate
- In a microwave-safe bowl, add almond bark pieces.
- Heat in 30-second intervals, stirring between each, until smooth and fully melted.
- Avoid overheating to prevent scorching.
- Dip the Cherries
- Using a fork or candy dipping tool, lower each cherry ball into the melted chocolate.
- Gently tap to remove excess chocolate, then place back on the parchment paper.
- Repeat with all cherries.
- Chill Until Set
- Refrigerate dipped cherries for about 1 hour or until the chocolate is firm.
- Optional Decoration
- Once set, you can drizzle with melted white chocolate, add sprinkles, or dust with edible glitter for a festive touch.

Serving and Storage Tips
Serving Suggestions:
- Serve chilled or at room temperature.
- Pair with espresso or dessert wine.
- Add to holiday candy trays alongside fudge, bark, and truffles.
Storage:
- Store in an airtight container in the fridge for up to 2 weeks.
- For best flavor, allow to sit 24-48 hours after making-this allows the filling to soften and meld.
Freezing:
- Freeze in layers with parchment between to prevent sticking.
- Thaw in the fridge overnight before serving.
Helpful Notes
- Drying Is Key: Wet cherries will cause the filling or chocolate to seize. Be sure to pat completely dry.
- Use Gloves: If shaping is too sticky, wear food-safe gloves or chill your hands briefly.
- Flavor Swaps:
- Add 1 teaspoon cherry liqueur to the filling for an adult twist.
- Use dark chocolate almond bark for a bittersweet variation.
- Almond Bark Tip: Unlike regular chocolate, almond bark doesn't need tempering, making it easier for beginners.
Frequently Asked Questions
- Can I use regular chocolate chips instead of almond bark?
Yes, but you'll need to add 1 tablespoon coconut oil or shortening per cup to help the chocolate melt and set smoothly. - How do I prevent the chocolate from cracking?
Make sure the cherry centers aren't too cold before dipping; let them sit a few minutes after chilling. - Can I make these without stems?
Absolutely! Just ensure you fully enclose the cherry in the filling and use a fork for dipping. - Are these like the ones with liquid centers?
These don't start with a liquid center, but after a few days, the filling softens and becomes syrupy. - Can I make this dairy-free?
Use plant-based butter and dairy-free chocolate. Check ingredient labels to ensure they meet your dietary needs.
Final Thoughts
Homemade Chocolate Covered Cherries are one of those special treats that bring a touch of elegance and homemade love to any occasion. Whether you're preparing them for a holiday cookie exchange, gifting them to a neighbor, or just indulging in a little winter magic, this recipe is a tried-and-true favorite.
The flavor gets better with time, so don't be afraid to make them ahead. The process is meditative, the result is gorgeous, and the compliments will roll in. I've made these countless times and they never last long. If you give them a try, tag your creations with #HomemadeCherryMagic-I'd love to see how sweet your version turns out!
Chocolate Covered Cherries
Ingredients
Filling:
- 10 oz maraschino cherries with stems drained and patted dry (about 32-36 cherries)
- 2¼ cups powdered sugar sifted
- 4 tablespoons salted butter softened
- 2 tablespoons light corn syrup
- ½ teaspoon pure vanilla extract
- ¼ teaspoon almond extract
Coating:
- 12 oz chocolate almond bark broken into chunks
Instructions
- Drain and thoroughly dry the cherries using paper towels. Let air dry for 10-15 minutes.
- In a large bowl, mix powdered sugar, butter, corn syrup, vanilla, and almond extract until smooth and creamy.
- Fold cherries into filling. Wrap each cherry completely in the filling, shaping into balls.
- Place on a parchment-lined baking sheet and chill for 30 minutes.
- Melt almond bark in microwave-safe bowl in 30-second intervals, stirring until smooth.
- Dip each cherry ball into melted chocolate. Let excess drip off, then place back on parchment paper.
- Chill dipped cherries for 1 hour until chocolate is set.
- Optional: decorate with melted white chocolate drizzle or festive sprinkles.
Notes
- Dry cherries thoroughly to prevent chocolate seizing.
- Let cherries sit 24-48 hours before serving to allow centers to soften.
- Store in fridge up to 2 weeks; freeze for longer storage.
- For a grown-up twist, add cherry liqueur to the filling.
- Swap almond bark with dark chocolate plus coconut oil if desired.


Leave a Reply